Disclosure: As an Amazon Associate, reviewstook.com earns from qualifying purchases. Links to Amazon on this page are affiliate links; they cost you nothing extra.
A label maker prints small adhesive labels for files, shelves, cables and storage. Handheld models are simple, and Bluetooth models let you design labels on your phone. Tape cartridges are the main running cost.
This guide covers five label makers sold on Amazon. It is built from product listings, not our own testing, so confirm tape compatibility and features on each product page. For shipping labels, see best label printers.
New to printers? Start with our guide to the best printers for home use and how we pick.
By the Reviewstook Editorial Team. Last updated: October 31, 2026.

In this guide
Quick Picks
| Product | Type | Best for |
|---|---|---|
| Brother P-touch PT-D610BT | Connected label maker | Business-level labels from a PC or phone |
| Brother P-touch PTD210 Label Maker Bundle | Handheld label maker | Easy everyday labels |
| Brother P-touch CUBE Plus (PT-P710BT) | Bluetooth label maker | Designing labels on your phone |
| DYMO LabelManager 160 | Portable label maker | Classic handheld labeling |
| DYMO LabelManager 280 | Rechargeable portable label maker | Rechargeable handheld labeling |
5 Best Label Makers for Home and Office
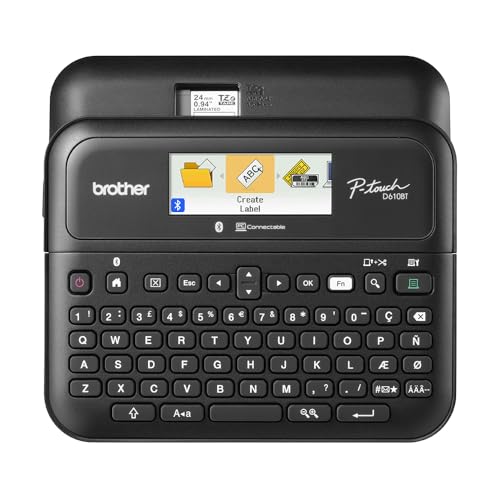
Top pickBest for offices and workshops that print many label types
1. Brother P-touch PT-D610BT
A professional label maker that connects by Bluetooth for designing labels from your phone or computer.
Good for: Offices and workshops that print many label types. Strengths: Bluetooth connection and a wider feature set. Weaknesses: Costs more than basic label makers, and it uses specific tape cartridges. Skip it if you need only a few simple labels.
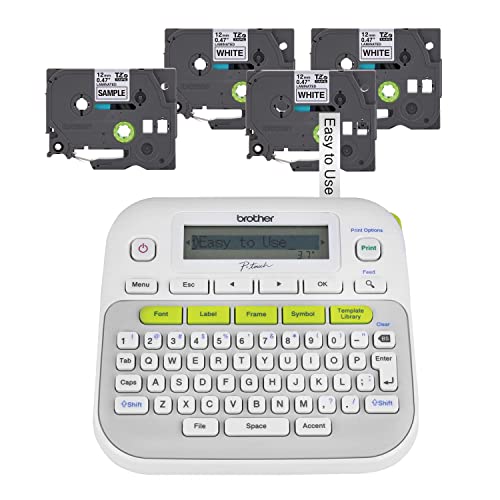
Best for home organizing and basic office labels
2. Brother P-touch PTD210 Label Maker Bundle
An easy-to-use handheld label maker sold in a bundle with four label tapes.
Good for: Home organizing and basic office labels. Strengths: Simple to use and the bundle includes tape. Weaknesses: Basic features and tape costs add up. Skip it if you want to design labels from your phone.

Best for people who prefer designing labels on a phone
3. Brother P-touch CUBE Plus (PT-P710BT)
A Bluetooth label maker that is designed to print labels from a phone app.
Good for: People who prefer designing labels on a phone. Strengths: Small body and phone-based design. Weaknesses: Needs the app, and tape cartridges are a recurring cost. Skip it if you want a keyboard and screen on the device.


Best for home and small-office labeling
4. DYMO LabelManager 160
A portable DYMO label maker with one-touch smart keys, sold with DYMO D1 tape.
Good for: Home and small-office labeling. Strengths: Simple handheld operation. Weaknesses: Limited features compared with connected models; D1 tape is a running cost. Skip it if you want Bluetooth or app design.


Best for frequent labeling without buying batteries
5. DYMO LabelManager 280
A rechargeable portable DYMO label maker with one-touch smart keys.
Good for: Frequent labeling without buying batteries. Strengths: Rechargeable battery and simple keys. Weaknesses: Tape cost and a basic screen. Skip it if you only label occasionally.

Best Picks by Category
These picks group the five models by role and price tier. They summarize listing information and are not hands-on test results.
- Top rated: DYMO LabelManager 160 — a mid-range handheld pick for home and small-office labeling; check price on Amazon.
- Most reviewed: DYMO LabelManager 160 — a widely bought handheld option; check price on Amazon.
- Best value: Brother P-touch PTD210 Label Maker Bundle — a budget-tier bundle that includes tape to get started; check price on Amazon.
- Lowest price: Brother P-touch PTD210 Label Maker Bundle — the budget-tier option in this guide; check price on Amazon.
- Premium option: Brother P-touch PT-D610BT — the premium-tier option, with Bluetooth and PC or phone design; check price on Amazon.
Price, Rating and Review Comparison
The table groups the picks by price tier. Prices change often, so confirm the current price on Amazon.
| Product | Price | Rating | Ratings | Price tier |
|---|---|---|---|---|
| Brother P-touch PTD210 Label Maker Bundle | Check price on Amazon | See on Amazon | — | Budget |
| DYMO LabelManager 280 | Check price on Amazon | See on Amazon | — | Budget |
| DYMO LabelManager 160 | Check price on Amazon | See on Amazon | — | Mid-range |
| Brother P-touch PT-D610BT | Check price on Amazon | See on Amazon | — | Premium |
| Brother P-touch CUBE Plus (PT-P710BT) | Check price on Amazon | See on Amazon | — | Premium |
How Much Feedback Backs Each Rating
A high average from a handful of ratings is weaker evidence than a slightly lower average from thousands. Here is how the sample size looks for each pick.
- Brother P-touch PT-D610BT: backed by a large sample of buyer feedback.
- Brother P-touch PTD210 Label Maker Bundle: backed by a large sample of buyer feedback.
- Brother P-touch CUBE Plus (PT-P710BT): backed by a large sample of buyer feedback.
- DYMO LabelManager 160: backed by a large sample of buyer feedback.
- DYMO LabelManager 280: backed by a large sample of buyer feedback.
How to Choose
Handheld or app-based
Handheld models have a keyboard and screen. Bluetooth models rely on a phone app, which makes design easier.
Check the tape
Each model uses specific tape cartridges. Compare tape price and colors before you buy.
Power
Some models use batteries and some are rechargeable. Check what you prefer.
How We Chose These Products
We start from products sold on Amazon with a full product name and clear specifications, and we skip results that show only a brand name or a vague title. We then read the listing and any manufacturer information for each one and note the features that matter for printers: print technology, running costs, connectivity and size. We do not run our own lab tests, and this guide contains no hands-on measurements. Use it to build a shortlist, then check current prices, dimensions and return terms on the Amazon page before you buy.
Buying Guide: What to Check Before You Choose
Labels and special media
Check media support and the feed path. Specialty printers are built for labels and may not do normal pages.
Ink tank versus cartridge
Ink tank printers use refillable tanks and usually have a lower cost per page, with a higher purchase price. Cartridge printers are cheaper up front but ink can cost more over time. Check the page yield and the cost of refills.
Laser printers
Laser printers print text quickly and sharply and do not clog like inkjets. Color lasers cost more. Check the toner cost and the print speed.
Quick Reference: Which Pick Suits Whom
- Brother P-touch PT-D610BT: suits offices and workshops that print many label types
- Brother P-touch PTD210 Label Maker Bundle: suits home organizing and basic office labels
- Brother P-touch CUBE Plus (PT-P710BT): suits people who prefer designing labels on a phone
- DYMO LabelManager 160: suits home and small-office labeling
- DYMO LabelManager 280: suits frequent labeling without buying batteries
Common Mistakes to Avoid
- Judging a printer by its price without considering ink cost.
- Ignoring the starter cartridge size.
- Forgetting the paper types needed.
- Assuming all-in-ones are always better.
- Skipping the return window.
Setup and Care
- Install the maker’s app or driver.
- Connect to Wi-Fi.
- Run an alignment and nozzle check.
- Print regularly to avoid clogs.
How Label Makers Differ: Technology and Format
Almost every label maker sold for home and office use is a thermal printer. That means there is no ink to dry out or spill. Heat does the marking, and the difference between models is mostly in how that heat reaches the tape and how you control what gets printed. Knowing the basic formats helps you see why a compact handheld and a Bluetooth unit can cost very different amounts while producing labels that look similar at arm’s length.
Thermal transfer versus direct thermal
Most tape-based label makers, including the Brother P-touch and DYMO LabelManager families, use thermal transfer. A print head presses a ribbon against the tape and melts pigment onto it. The result is a mark that sits on the surface of the label and tends to resist smudging and fading. Direct thermal printers, by contrast, darken a heat-sensitive coating and need no ribbon, but their output can fade in sunlight or heat. Direct thermal is common for shipping labels and receipts, and rarely the right choice for a label you want to last for years on a shelf or a cable.
Keyboard handhelds, app-driven units and desktop models
A keyboard handheld, such as the DYMO LabelManager 160 in this guide, has its own screen and keys. You type, choose a font size or frame, and print. It needs no phone and no computer, which makes it dependable for anyone who just wants a name on a bin. The downside is slow text entry on a small keypad and limited layout control.
An app-driven unit moves the interface to your phone. The CUBE Plus (PT-P710BT) is the example here. You get a full on-screen keyboard, templates, symbols and the ability to save designs, but you depend on the app and a Bluetooth connection staying healthy. A hybrid like the PT-D610BT keeps a physical keyboard and screen and adds phone or computer connectivity, which is why it sits at the more capable end of the range.
Desktop models connect to a computer and are aimed at heavy daily printing, such as mailing, file folders or inventory. If you think you will print dozens of labels in a sitting, a unit built around a computer workflow saves time. If you print a handful a month, it adds cost and clutter without much benefit.
Tape Types, Widths and What They Cost to Run
The label maker itself is the smaller part of what you will spend over its life. Tape is the consumable, and the range of tape types is one of the most useful things to understand before you pick a brand. Two incompatible families dominate: Brother P-touch machines in general use TZe laminated tape, while DYMO LabelManager machines use D1 tape. They do not swap, so choosing a machine also means choosing a tape ecosystem.
- Laminated tape: The print is sealed between layers, so it resists water, abrasion, sunlight and many household chemicals. This is the best general choice for anything handled often, kept in a garage or exposed to cleaning products.
- Non-laminated tape: Cheaper and thinner, and well suited to indoor labels that are rarely touched, such as pantry jars or binder spines. It can scuff over time in a busy setting.
- Flexible ID tape: Made to wrap around cables, wires and curved surfaces without lifting. If you are labeling network or power cords, this is worth seeking out.
- Heat-shrink tubing: Used by electricians and installers to mark wires permanently. Only some machines support it, so check the model specification before assuming it will work.
- Strong or extra-adhesive tape: Intended for rough, textured or curved surfaces where a standard adhesive peels.
Width matters as much as type. Narrow tape around a quarter inch suits cable flags and small drawers. A half inch is the common all-purpose size. Wider tape gives you room for two lines of text, which helps on binders and shelf labels. Confirm which widths your machine accepts, because some compact models cap out at a narrower range than a workshop-grade unit.
Because the sold-with bundle in the PTD210 listing includes tapes, a bundle can lower the cost of getting started, but treat that only as a head start. Once the first cartridges run out, your per-label cost is set by the tape you buy next. Work out roughly how many labels you expect to print in a year and compare how many labels each cartridge yields. That running cost, not the machine alone, shows which model works out better in practice.
Matching a Label Maker to Your Situation
Different jobs push you toward different machines. These scenarios cover the ones that come up most often.
Pantry, craft room and home storage
For jars, bins and shelves, you want clear text, a simple look and low effort. A basic handheld with a few font sizes is enough. Non-laminated tape is fine for dry indoor storage, though laminated is better for the freezer, a garage or anything exposed to damp. Someone who loves tidy, themed labels may enjoy an app model for its icons and templates.
Office files, cabinets and shared spaces
Offices tend to need consistency. If several people print labels, a machine with saved templates or a computer connection keeps fonts and formats uniform. Wider tape suits file drawer fronts and binders. A rechargeable unit such as the LabelManager 280 avoids hunting for batteries in a shared drawer.
Cables, patch panels and equipment racks
Here the tape and feature set matter more than the brand. Flexible ID tape, the ability to print the same label in a repeating sequence, and a cutter that makes clean small flags all help. Serial numbering and multi-line layouts speed up long runs.
Workshops, garages and outdoor use
Choose laminated tape, a sturdy case and a machine you can use with one hand. Think about temperature and sun, because a label on a toolbox in a hot garage faces tougher conditions than one in a kitchen cabinet.
Classrooms, clubs and event labeling
Name tags, supply bins and bookshelf labels are high volume and low stakes. Ease of use matters most, since several people may share the device. Keep spare tape on hand, because a class labeling day can drain a cartridge quickly.
Small business inventory
If you label products, bins or shelves for a small shop, look for barcode and symbol support, a computer or phone link, and tape that stays stuck to the surfaces you use. For shipping, a dedicated label printer is the better tool, as the guide’s introduction points out.
Specs and Features Worth Paying Attention To
Product pages list a long string of specifications. A few of them actually change daily use.
- Print resolution: Measured in dots per inch. Higher values give crisper small text and cleaner barcodes. For ordinary text on a drawer, standard resolution is enough. For tiny type or scannable codes, favor a higher number.
- Print speed: Matters when you are printing batches. A slow machine is fine for a few labels and tiresome for fifty.
- Cutter type: A manual cutter is simple and reliable, while an automatic cutter saves time but can waste a little tape at the start of each label. A margin setting that reduces blank leader tape pays for itself over a few cartridges.
- Memory and templates: Saved labels are helpful if you reprint the same items, such as room names or equipment IDs.
- Power: Battery, AC adapter, rechargeable pack or USB charging each suit different habits. Machines that run only on disposable batteries can become expensive if used often.
- Connectivity: Bluetooth is convenient, but confirm that your phone’s operating system is supported and that the app is maintained. USB is dependable for computers.
Questions to Ask Before You Order
- What tape does the machine take, and is it easy to find from more than one seller?
- How many labels will I realistically print in the first year, and what will that tape cost?
- Do I want to type on the device, or design on a phone or computer?
- Where will the labels live: indoors, outdoors, in a freezer, on cables, on textured plastic?
- Will more than one person use the machine?
- Does the listing say which tape widths and which tape types are supported?
- Is the unit rechargeable, battery-only or plugged in, and how does that fit where I will use it?
If you can answer these in a minute or two, you can usually narrow five options down to one or two. If you cannot, start with the tape ecosystem and the surface you are labeling, because those two decisions drive almost everything else about long-term satisfaction.
Budget Versus Premium: Where the Extra Money Goes
A basic handheld and a connected, feature-rich model both make a legible label. What you pay extra for is flexibility and time savings. A higher-priced machine usually adds wider tape support, more tape types, faster printing, an automatic cutter, saved designs and computer or phone connectivity. Those features are worth it if labeling is a regular chore, or if the labels have to survive harsh conditions or look uniform across a team.
For a household that labels two shelves and a closet, the extra capability usually goes unused. A simple unit with a bundle of tape is plenty. A good rule is to buy for the busiest week you expect to have, not for the most ambitious project you can imagine. If a project does arrive that outgrows the machine, tape for a small label maker is cheap compared with replacing the whole unit, and the label itself is rarely the point of failure.
Comparing the Five Picks by How You Actually Make Labels
The five label makers in this guide divide less by brand than by where the label is designed. The Brother P-touch PTD210 bundle and the DYMO LabelManager 160 are keyboard machines: you pick them up, type, and print, with no phone, computer or account involved. That immediacy is their whole appeal, and for the household jobs of jars, files, shelves and school kit it is genuinely hard to beat, because the distance between wanting a label and holding it is under a minute. The bundle format of the PTD210, with tape included, suits a buyer who wants to start organizing the same day, while the LabelManager 160 offers the classic DYMO handheld experience with its own tape family, a point that matters because the two tape systems are not interchangeable and the choice of machine is also a choice of the tape shelf you will buy from for years.
The Brother P-touch CUBE Plus and the Brother P-touch PT-D610BT move design onto a screen you already own. The CUBE Plus is built entirely around the phone app, which gives it the richest design tools of the group, fonts, frames, symbols and saved templates, in the smallest body, at the cost of depending on the app and the phone for every label. The PT-D610BT is the most capable machine here, connecting by Bluetooth to a phone or computer for business-level labels, and it suits offices and workshops that produce many label types and value a wider feature set over pocket simplicity. Between them sits the DYMO LabelManager 280, the rechargeable handheld: it keeps the pick-up-and-type experience while removing the recurring battery question, which makes it the natural pick for a shared office or workshop where the label maker is used by several people and nobody remembers whose turn it was to buy batteries.
Read as a set, the decision is a single question: do you want to design labels, or do you want to type them? Designers should choose between the CUBE Plus for phone-first creativity and the PT-D610BT for connected capability at a desk. Typists should choose between the PTD210 bundle for home value, the LabelManager 160 for classic portable simplicity, and the LabelManager 280 when rechargeable power suits a shared space. Every pick here is defensible; the wrong choice is only the one that mismatches the way its owner actually works, such as an app-only machine for a user who dislikes designing on a phone, or a basic handheld for an office that needs saved templates and consistent shared formats.
Tape Economics: The Cost That Arrives After the Machine
Every label maker in this guide is the beginning of a tape relationship, and the tape, not the machine, is where the long-term money goes. Before choosing, look at the tape family the machine uses, the widths it accepts and the finishes available, because a machine that cannot take the width your shelves, files or cables need will frustrate you regardless of its other virtues. Laminated tapes, where the printed layer is sealed under a protective film, survive kitchens, workshops, sunlight and handling far better than unprotected surfaces, and for labels expected to last years they are worth their premium. For temporary labels, party labels, price labels and anything that will be removed within weeks, simpler tape is the honest choice. Owners save money less by hunting bargains than by wasting less: drafting the wording before printing, using the chain or batch features where a machine offers them to reduce the leader waste between labels, and keeping one tape loaded for everyday jobs instead of swapping cartridges for trivial differences. Choose the machine whose tape shelf matches your rooms, and the running costs described in this guide will stay predictable.
Labeling Projects That Show What These Machines Are For
A kitchen reset is the project most buyers start with, and it teaches the core skills quickly. Work shelf by shelf, label containers at a consistent height with a consistent format, include dates where freshness matters, and resist labeling anything you are about to throw away during the same clear-out. The connected machines shine here if you want matching, designed labels across dozens of jars, while the handhelds shine if you want to label as you go with the machine in one hand. A cable and charger audit is the second classic project: label each cable at both ends with its device and, where it matters, its rating or owner, and the drawer of identical black cables becomes a solved problem. The workshop version of the same project labels parts bins, tool cases and the chargers that wander between jobs, and it is where laminated tape and a rechargeable or connected machine earn their keep.
For a small office, the labeling project with the highest return is the archive: boxes and files labeled by year, category and retention date, so that finding a document becomes a lookup and disposing of expired records becomes safe. Shared spaces benefit from labels that describe systems rather than possessions: the shelf where returns wait, the drawer where the shared tools live, the cabinet whose contents everyone borrows. Classrooms, clubs and teams use the same machines for names, kit and storage, where the app-designed labels of the CUBE Plus or the capability of the PT-D610BT make producing a matching set for thirty people a single session rather than an evening of handwriting. In each project the pattern is the same as in the rest of this guide: the machine matters, the tape matters, and the consistency of the system you build with them matters more than either.
Care, Storage and Getting Years From a Label Maker
Label makers are forgiving machines, but a few habits extend their lives and their print quality. Keep the tape path clean, since adhesive residue and dust are the usual causes of pale or streaked printing, and follow the maker guidance for cleaning the print head and cutter. Store tapes in their packaging, away from heat and sunlight, and do not leave a machine in a hot vehicle or a damp garage if it can live in a drawer instead. Rechargeable models should be charged before they are desperately empty if they will sit unused, and battery models should have their batteries removed for long storage to protect the contacts. Keep the machine with its tapes in one place, together with a note of which tape widths you own, and the label maker becomes what it should be: a tool that is always ready, loaded and understood, rather than a gadget rediscovered twice a year and relearned each time.
Label Maker Ownership Over Years: The Tape Shelf Decides
Ask owners of label makers what determined their long-term satisfaction and few mention the machine first. They mention the tape: whether the width they needed was easy to find, whether the laminated tape on the garden tools is still legible after two summers, whether the cartridge that was loaded when a project started was the one the project needed. That is why this guide keeps returning to the tape families behind the Brother and DYMO names. The machines in this guide are all competent; the tape systems behind them are commitments. A household that standardizes on one system builds a small shelf of widths and finishes that covers every room, and every future label becomes a two-minute job. A household that mixes systems without meaning to ends up with two half-useful shelves and a machine that is always loaded with the wrong tape.
The second long-term factor is where the machine lives. A label maker stored with its tapes, charged or with batteries fresh, in the room where labeling happens, gets used for the small jobs that make a home legible: the replacement charger, the new storage box, the borrowed tool that must come back. A label maker stored in a distant cupboard, separated from its tapes, is used twice a year in planned projects and ignored the rest of the time. If you buy one of the connected models, the equivalent discipline is digital: keep the app installed, keep your templates saved and named, and keep one shared template set for household standards so that labels made months apart still match. Consistency across time is the invisible feature that makes a labeled home look designed rather than accumulated, and it costs nothing but the decision to keep formats steady.
When a Label Maker Is Not the Answer
Honesty about limits improves every purchase. A label maker will not produce shipping labels of the size carriers expect; that job belongs to the label printers covered elsewhere in this guide. It will not print in color beyond the color of the tape itself, so designs that need full color belong on sheet labels through a regular printer. It will not label anything whose surface is wet, greasy, very rough or very hot at the moment of application, because no household adhesive performs there, and it will not survive being asked to identify items that live outdoors in hard weather unless the tape is chosen for exactly that exposure. Knowing these boundaries before buying does not diminish these five machines; it places them correctly, as the fastest route from an unnamed object to a named one in the ordinary conditions of homes and offices, which is a job they do superbly.
Five-Minute Test: Which of the Five Fits Your Hand?
If the choice is still open, run this thought experiment with each pick. Imagine the most common label in your life, the one you have needed three times in the last month. Picture making it on a keyboard handheld: pick up, type, print, peel, stick, done, with the machine already in the drawer. Now picture making it on a phone-connected model: find the phone, open the app, choose or build the design, print, peel, stick, with a better-looking label at the end. Neither picture is wrong; they are different pleasures. The person who smiled at the first picture should buy the PTD210 bundle, the LabelManager 160 or, for shared spaces, the rechargeable LabelManager 280. The person who smiled at the second should choose between the CUBE Plus, for phone-first design in the smallest body, and the PT-D610BT, for the widest connected capability. Then check the tape shelf behind your choice one last time, confirm the widths and finishes your rooms need, and buy with confidence, because a label maker matched to its owner is one of the rare tools that gets used more, not less, as the years pass.
Setting Up a Labeling System, Not Just a Label Maker
The buyers who get the most from these machines treat setup day as the founding of a small system rather than the unboxing of a gadget. Choose the household standards first: the tape width that will be the default, the finish that will handle most rooms, the way dates are written, and the format for the three label types the house uses most, which are usually contents, cables and files. Make one perfect example of each on the new machine, stick the examples inside the cupboard or drawer where the machine will live, and save the digital templates with names that describe them if your pick is a connected model. Label the label maker own storage place, partly as a joke and mostly because a tool that is always in its place is a tool that gets used. Then walk the house once with the machine in hand and label the ten things that have annoyed you longest: the unidentified charger, the mystery box, the shelf everyone raids. That first walk is the moment the purchase justifies itself, and it teaches you the machine better than any manual exercise.
Revisit the system after a month, because the standards you guessed at will have met reality by then. Perhaps the default width is wrong for your jars, perhaps the date format is unclear on freezer tape, perhaps one room needs the tougher laminated tape everywhere. Adjust the standards once, remake the few labels that clash, and then hold the system steady, since consistency from that point is what makes the whole house read as one coherent, labeled place. Every pick in this guide can support such a system; the difference between them is how the labels are designed and how the tape is bought, and both of those questions are answered in the comparison above. The system itself, standards, examples, one home for the machine, is yours to build, and it is the real product.
Labeling With Children, Teams and Shared Spaces
Shared labeling succeeds when the standard is visible and the tool is welcoming. In a classroom or a club store, put the format examples where the machine lives, agree whose names and dates go on shared kit, and choose the machine that the least technical user can operate without help, which often argues for a keyboard handheld or a rechargeable shared unit over an app that lives on one person phone. At home with children, labeling is a literacy tool as much as an organizing one: labels on drawers, shelves and school supplies teach reading in context, and a connected machine that can print a child chosen design will be used with an enthusiasm no chore chart can match. In every shared setting the rule is the same: the system belongs to everyone, the standards are written down, and the machine is kept loaded, charged and findable, because a label maker that must be hunted for is a label maker that will be worked around.
Reading a Tape Catalog Without Wasting Money
Tape catalogs look bewildering because they multiply three simple choices: width, finish and color. Width should follow the text, not the machine maximum. Narrow tape suits cables, file spines and small jars; medium tape is the household default for shelves, boxes and containers; wide tape earns its place on storage bins, signage and anything read at a distance. Buying the widest tape for everything wastes material and looks clumsy on small items, while forcing long text onto narrow tape produces cramped, multi-line labels that nobody reads. Finish should follow the environment: laminated tape for kitchens, bathrooms, workshops, gardens and anywhere hands, moisture or sunlight will test the label; standard tape for files, shelves and indoor storage where life is gentle. Color should follow meaning: a consistent household scheme, such as one tape color per room or per owner, turns labels into a code the family reads unconsciously, while random colors turn the same labels into decoration. Build the shelf in that order, width first, finish second, color third, starting with the two or three cartridges your real jobs need and adding specialty tapes only when a project demands them. A small, correct tape shelf beats a large, hopeful one every time, and it is the final piece of the system this guide has described: the right machine, in its place, loaded with the right tape, making the whole house easier to understand one label at a time.
The Drawer Test: Is Your Label Maker Ready Right Now?
Finish with the simplest audit in this guide. Open the place where the label maker lives and answer three questions without moving anything else in the house. Is the machine there, with the tape you use most already loaded? Is it powered, charged or stocked with working batteries, so that a label needed in the next five minutes would actually be printed in those five minutes? And are the example labels or saved templates that define your household formats within reach of the machine? Three yes answers mean the system described in this guide is alive, and the machine will keep paying for itself in small daily rescues. Any no answer names its own one-minute repair. Label makers fail their owners almost never through breakdown and almost always through readiness, and readiness is a habit, not a feature. Keep the machine ready, and it will keep the house readable.
One last thought for buyers hesitating between two of these five: the cost of choosing the nearly right label maker is low, because every pick here will label a home competently, while the cost of buying none and leaving the house unlabeled is paid daily in small searches and guesses. Choose the machine whose way of working matches your hand, confirm its tape shelf, and start with the ten labels your home has been waiting for. The system will teach you the rest as you use it, and within a month the question will no longer be which label maker you bought, but how the house ever managed without one.
Frequently Asked Questions
Are label makers worth it?
If you organize or label regularly, yes. Occasional labels can be handwritten.
Can I use any tape?
No. Use the tape the maker specifies for your model.
Can I print shipping labels with a label maker?
Not usually. Use a 4×6 thermal label printer.
Which is cheaper to run, inkjet or laser?
Laser is usually cheaper per page for text, and ink tank printers are cheaper for color and photos.
How do I connect my printer to Wi-Fi?
Use the printer’s setup menu or the maker’s app. See our Wi-Fi guide.
Do I need genuine ink?
Not always, but some printers restrict third-party ink. Check the terms.
What is the difference between laminated and non-laminated label tape?
Laminated tape seals the printed text between protective layers, so it resists water, scuffing, sunlight and many cleaners. Non-laminated tape is thinner and cheaper, and works for dry indoor labels that are rarely handled. If a label will be touched often or kept in a garage, freezer or workshop, laminated is the safer choice.
Are Brother and DYMO label tapes interchangeable?
No. Brother P-touch machines generally use TZe tape cartridges, while DYMO LabelManager machines use D1 tape, and the two formats do not fit each other. Pick the machine and the tape system together, then confirm the exact cartridge width and type your model supports on the product page before buying spare tape.
What is the best label maker for labeling cables?
Look for a machine that accepts flexible ID tape or heat-shrink tubing, prints in narrow widths and can repeat or number labels in a sequence. A clean cutter helps with small cable flags. Check the listing for supported tape types, since not every basic handheld handles wrapped or shrink labels.
How long do label maker labels last?
It depends on the tape and the environment. Laminated thermal transfer labels can last for years indoors and often hold up outdoors, while cheaper non-laminated labels may scuff or fade sooner. Heat, direct sunlight, moisture and rough surfaces shorten life, so match the tape type to where the label will live.
Do I need a Bluetooth label maker?
Not necessarily. A keyboard handheld is faster to start and has no app to maintain. Bluetooth helps if you want templates, larger on-screen typing, symbols or saved designs, or if you print many labels. If you only label a few items, the added setup may not be worth the extra cost.
Bottom Line
For simple everyday labels, the Brother P-touch PTD210 bundle or DYMO LabelManager 160 are the easy picks. For business use and phone design, look at the Brother P-touch PT-D610BT or CUBE Plus.
Related Reading
- Types of Printers Explained: Inkjet, Laser, Ink Tank and More
- 7 Best Wireless Printers for Home Use
- Rollo USB Shipping Label Printer Review: Is It Worth It?
- Is the Rollo Wireless Label Printer Worth Buying? Review
- Rollo Wireless vs Rollo USB Label Printer: Which Should You Buy?
More Printer Guides
- Best Printers for Home Use
- Best All-in-One Printers
- Best Label Printers
- Best Printers for Work From Home
- What Is an All-in-One Printer?
- Is the Brother PT-D610BT worth it?
- Is the DYMO LabelManager 280 worth it?

