A camera gimbal keeps footage smooth while you walk, pan or orbit a subject. The key questions are how much weight it can carry, whether it folds small enough for a bag, and whether switching to vertical framing takes seconds or minutes. Control cables for your camera model also matter.
The six gimbals below range from a compact 795 g model to larger units with built-in tracking and a heavier payload. Weights, payloads and features come from each product’s listing page. We have not used these gimbals ourselves, and all performance claims are the makers’ own.
As an Amazon Associate we earn from qualifying purchases. Links below are affiliate links, and they do not change the product information we give.

What to Look For
| Feature | Why it matters |
|---|---|
| Payload | Camera, lens and accessories must stay within the maker’s limit |
| Weight and fold size | Lighter units are easier to carry and hold for long takes |
| Vertical mode | Quick switching helps with social video |
| Control cable | Some packs include only one camera brand’s cable |
| Tracking | Built-in modules follow a subject without extra parts |
In this guide
Specs at a Glance
| Gimbal | Weight | Payload (maker) | Notes |
|---|---|---|---|
| DJI RS 3 Mini | 795 g | 2 kg | 1.4 in touchscreen; Bluetooth shutter; vertical arm |
| DJI RS 4 Mini Combo | 1.03 kg | Not shown on listing page | Auto axis locks; tracking module; vertical switch in 10 seconds |
| FeiyuTech SCORP 2 | 1070 g | 2.5 kg | Built-in AI tracking; 1.3 in touchscreen; Bluetooth or cable |
| Zhiyun Weebill 3E | 990 g | 3 kg | Vertical plate; Bluetooth shutter; Panasonic cable only in box |
| FeiyuTech SCORP-C | 1200 g | Not shown on listing page | Hanging handle; folding bracket; Arca-style plate |
| Zhiyun Weebill S | 926 g | Listing gives both 5.5 kg and 2.5 kg | Sling mode; optional image transmission module |
The 6 Best Gimbals for Cameras
Top pickBest for travel with a light mirrorless setup
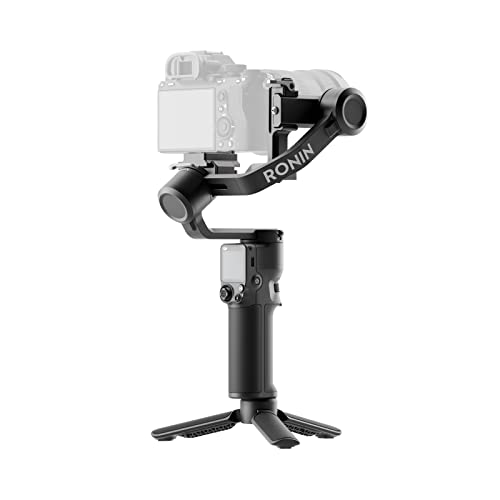
1. DJI RS 3 Mini
An ultra-compact 795 g gimbal with a 2 kg load capacity, a 1.4 inch color touchscreen, Bluetooth shutter control and native vertical shooting by moving the quick-release plate to the vertical arm. The box includes a tripod and a USB-C control cable.
Suits: travel with a light mirrorless setup. Strengths: low weight and a touchscreen. Weaknesses: a 2 kg limit rules out heavy lenses. Skip it if you carry a large telephoto.


Best for quick setup between shots
2. DJI RS 4 Mini Combo
A 1.03 kg gimbal with auto axis locks, a tracking module in the combo, teflon-enhanced balancing and a vertical switch the maker says takes about 10 seconds. The listing says it handles both cameras and smartphones. The payload figure was not readable on the page we saw.
Suits: quick setup between shots. Strengths: auto locks and the tracking module. Weaknesses: payload not confirmed here. Skip it if you must check the weight limit before choosing.


Best for tracking without extra parts
3. FeiyuTech SCORP 2
A 1070 g gimbal with a 2.5 kg payload, a built-in AI tracking sensor that responds to hand gestures, an L-shaped plate for vertical shooting and a 1.3 inch touchscreen. It connects to the camera by Bluetooth or a control cable, and seven cables come in the box.
Suits: tracking without extra parts. Strengths: built-in tracking and many cables. Weaknesses: heavier than the mini models. Skip it if you want the lightest body.


Best for heavier camera and lens pairs
4. ZHIYUN CINEPEER Weebill 3E
A 990 g gimbal about the size of a sheet of paper when folded, with a maker-stated 3 kg payload, native vertical shooting and Bluetooth shutter control. A sling grip and wrist rest are sold separately. The box holds only a Panasonic control cable, so other brands need their own.
Suits: heavier camera and lens pairs. Strengths: the 3 kg figure and a flat fold. Weaknesses: one cable type included. Skip it if you do not want to buy an extra cable.

Best for underslung low-angle shots
5. FeiyuTech SCORP-C
A 1200 g gimbal with a built-in hanging handle for upright or underslung shooting, a folding bracket that lets it stand without a tripod, a three-axis motor lock, a five-way balance adjustment and an Arca-style quick-release plate. The listing names Sony, Panasonic, Canon, Nikon and Fujifilm bodies.
Suits: underslung low-angle shots. Strengths: a stand-alone fold and a balance memory slider. Weaknesses: the heaviest here and no payload figure. Skip it if you want a light body.
View FeiyuTech SCORP-C Gimbal Stabilizer for Cameras DSLR and Mirrorless Camera on Amazon
Best for long takes with a mid-size camera
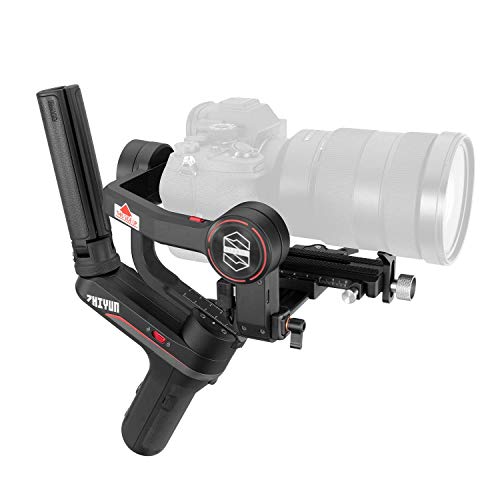
6. Zhiyun Weebill S
A 926 g gimbal with a sling mode for underslung shooting, a stated 14 hours of battery life and an optional image transmission module for 1080p 30fps monitoring. The listing quotes both 5.5 kg and 2.5 kg for weight capacity, so confirm the limit with the maker.
Suits: long takes with a mid-size camera. Strengths: battery life and sling mode. Weaknesses: conflicting payload figures. Skip it if you need a clear load limit.
Setup Tips
- Balance the camera on all axes before powering the gimbal on.
- Check your camera model against the maker’s supported list.
- Buy the correct control cable if it is not in the box.
- Charge fully before a long shoot and keep the firmware current.
Mistakes to Avoid
- Exceeding the maker’s payload with a big lens.
- Skipping the balance step.
- Assuming every cable is included.
- Ignoring the folded size when packing.
Checking Payload With Your Real Kit
Payload is the most important number for a camera gimbal, and it is easy to get wrong. The stated payload is the maximum weight the motors can handle, and your real load is the camera body, the lens, the battery, a memory card, and anything else attached, such as a microphone, a monitor, a filter or a cage. Weigh the full setup on a kitchen scale, not just the camera body, and compare it with the stated figure for each gimbal.
Staying well below the limit is wise. Motors working near their maximum run hotter, drain batteries faster and may struggle to hold a steady position. A setup that is just within spec may behave unpredictably with small changes, such as a different lens or a heavier battery. Also remember that balance matters as much as weight. A long lens that extends far forward can overload a gimbal even if the weight seems acceptable.
- Weigh your camera, your heaviest lens and all accessories together.
- Check the maker’s supported camera and lens list, not just the weight figure.
- Think about future upgrades, such as a larger lens or a monitor.
- Check whether the listing’s payload applies to all modes, including vertical or underslung.
If your kit is close to the limit, consider a stronger model or a lighter lens. Check the manual for guidance on accessories, since extra weight can change how the gimbal performs.
Balancing the Camera Step by Step
Balancing is the most important setup step and the one beginners often skip. A properly balanced camera stays in position when the motors are off, which means the motors only need to correct small movements. An unbalanced camera forces the motors to work constantly, causing drift, jitter and short battery life.
The general process is similar across models, but check your gimbal’s instructions. Attach the camera on the plate with the lens you plan to use, since changing lenses changes the balance. Then balance each axis in turn, usually front to back, then up and down, then side to side. Make small adjustments and release the camera gently to see which way it tips. When it stays level without drifting, move on to the next axis.
- Balance with the battery and card installed.
- Rebalance when you change the lens or add accessories.
- Lock each axis after you finish adjusting, if the design allows.
- Check the balance again after a few minutes, since parts can shift.
Some models offer an automatic tuning function that adjusts motor strength to the load, but it works best with a good starting balance. If the gimbal still buzzes or drifts after balancing, check the cables, the mounting plate and the firmware.
Shooting Modes and Camera Moves
Gimbals offer different modes that change how the camera follows your movement. Understanding them helps you pick the right one for the shot, and it explains much of the learning curve.
- Follow modes: the camera follows your pan, tilt or both, while smoothing your movement. A common default for walking shots.
- Lock mode: the camera keeps pointing in one direction while you move. Useful for sliding sideways past a subject.
- Underslung or low mode: the gimbal is held upside down or low to the ground for low-angle shots.
- Vertical mode: the camera turns to a portrait orientation for social video, if the model supports it.
- Tracking features: some systems follow a subject using a module or app, if the listing describes them.
Names and exact behavior differ between makers, so read your manual. Practice with simple moves first: walk smoothly, bend your knees and let your arms absorb movement. Walking with a gentle heel-to-toe step reduces bounce. Avoid sudden changes in speed and use both hands where the design allows.
Plan your shots before filming. Think about the start and end positions, and rehearse the move. A smooth gimbal does not fix a rushed shot, and a few rehearsals usually make footage look more professional.
Battery Runtime, Charging and Travel Rules
Battery life determines how long you can shoot, and listings give runtime under ideal conditions. Real runtime depends on payload, balance, temperature and the use of extra features such as tracking or phone charging. Cold weather reduces battery capacity, so keep spare batteries warm in a pocket during winter shoots.
Check how the gimbal charges. Some have built-in batteries, others use replaceable cells. A replaceable system allows you to swap batteries and keep shooting, while a built-in battery requires a power bank or a wait. Check the port type and whether you can charge while using the gimbal.
- Charge fully before each shoot and carry a power bank if the gimbal supports it.
- Do not leave batteries fully drained for long periods.
- Keep batteries away from heat and direct sun.
- Follow the maker’s storage advice for long periods without use.
Travel with batteries has rules. Airlines and security authorities set limits on lithium batteries, particularly for checked luggage. Check current rules with your airline and the relevant authority before you fly, and carry batteries in your hand luggage if required. Protect the terminals from contact with metal, and keep the gimbal in a padded case to protect the motors and arms from knocks. Lock the motors before packing, if the design allows.
Firmware, App Control and Troubleshooting
Many gimbals rely on a phone app and firmware updates for the full set of features. The app may control camera settings, set up tracking, adjust motor strength and allow wireless connection. Check the listing for which apps are supported and which phones they run on. Poor app support can limit features even on a good gimbal.
Keep firmware up to date, since updates can improve camera compatibility and fix bugs. Follow the maker’s update instructions carefully, with a full battery, and avoid interrupting the process. Check release notes for changes that might affect your camera. If you rely on a specific workflow, test it after an update and before an important shoot.
Common problems and quick checks:
- Jitter or buzzing: rebalance, check payload and calibrate if the model offers it.
- Drifting horizon: recalibrate on a flat surface, and check that the camera plate is secure.
- Camera not responding: check the control cable, camera settings and whether the camera is on the supported list.
- Motors shutting off: check for overload, low battery or a blocked axis.
Keep the manual and the maker’s support page at hand. If problems continue after these checks, contact the maker or seller about warranty coverage and any available repair service.
Choosing a Camera Gimbal in More Depth
Payload numbers open the conversation, but balance behaviour decides whether a gimbal is a joy or a chore. Two rigs with the same camera and lens can feel completely different depending on where the combination’s centre of gravity sits, how much adjustment range the arms offer, and whether the motors work quietly near their limits or strain audibly. When you compare the picks in this guide, think in terms of your heaviest realistic combination, camera, the lens you actually shoot with, a microphone or monitor if you use one, and choose a gimbal that balances that load with room to spare rather than at its ceiling.
Physical design details matter on long days: how the gimbal locks for transport, whether it stands on its own feet or a mini tripod while you adjust a shot, and how the grip feels after an hour. A slightly heavier gimbal with confident locks and a comfortable grip often produces better footage than a featherweight that flexes and frustrates. Consider also how the camera mounts and releases; a quick-release system you trust encourages lens changes, while a fiddly plate teaches you to avoid them and narrows your shooting.
Power, Charging and Runtime Planning
Battery claims assume gentle use; real shoots with heavier loads, cold weather and frequent rebalancing draw power faster. Plan runtime around your longest realistic session, and learn how each pick charges: whether it can top up over USB while working, whether its battery is removable, and how you will carry power for a full day. For paid work, the professional habit is boring and absolute: start every job fully charged, carry a charging plan for the break, and never let the gimbal be the reason a session ends early.
Heat and cold both change behaviour. Motors work harder in cold conditions and batteries deliver less, so winter exteriors demand margin; in hot sun, take breaks in shade and avoid leaving the rig in a parked car. None of this is exotic, but beginners often blame a gimbal for physics. Knowing the environmental limits of your setup lets you schedule around them instead of discovering them mid-take.
Controls, Modes and the Learning Curve
Every gimbal offers follow modes, lock modes and creative moves, but the interface decides whether you will use them under pressure. A clear mode indicator, a responsive joystick and a trigger you can find without looking are worth more than a long feature list buried in an app. Spend your first sessions drilling mode changes and recentring until they are reflexes. The footage difference between a shooter who fights the interface and one who dances with it is visible in every clip.
Companion apps deserve a sober look too. They can add tracking, motion timelapse and firmware updates, but they also add pairing steps and phone battery drain. Test the app workflow at home before a real shoot: connect, update, set your defaults, and learn which functions live on the gimbal itself for the moments when the phone stays in your pocket. Reliability beats novelty when a client or a once-only event is in front of the lens.
Gimbals in Real Shooting Situations
For weddings and events, invisibility is the skill. Move like a guest, anticipate rather than chase, and favour smooth medium shots over showy orbits that draw attention and risk collisions. Pre-balance for the lens you will use most, keep a second setup in mind for the camera you will grab for stills, and agree signals with any second shooter so you do not cross each other’s frames. The best event gimbal work is the footage nobody realised was stabilised until the edit.
For real estate and interiors, slow, straight, level movement is the whole craft. Walk heel-to-toe at half your natural pace, keep verticals honest, and let rooms reveal themselves through doorways rather than whipping around corners. A gimbal that holds a locked, level frame patiently while you glide is worth more here than one with acrobatic modes. Shoot each space in both directions; the edit will thank you for the choice.
For travel and vlogging, weight and setup speed dominate. A rig that balances in a minute and packs without a puzzle gets used at golden hour in a strange city; a rig that needs a table, tools and patience stays in the hotel. Practise your full routine, unpack, balance, power, first shot, until it is a single flowing minute. Then protect the habit: same pocket for the spare battery, same check before you walk away from a location.
Balancing Discipline, Care and Troubleshooting
Balance is not a one-time setup; it is a per-configuration ritual. Any change, lens, filter, microphone, even a different battery, shifts the balance, and motors compensating for poor balance drain power and add micro-jitter that no setting removes. Learn the order your gimbal prefers, axis by axis, and rebalance without resentment whenever the rig changes. Mark your common positions with small tape dots or notes so repeat setups take seconds.
When footage shows a rhythmic wobble, diagnose before you adjust: check balance first, then payload against the gimbal’s comfortable range, then your own walking pattern, then motor settings. Increasing motor strength to mask bad balance is the classic beginner error; it trades wobble for vibration and heat. The fix is almost always mechanical and boring, which is good news, because mechanical fixes stay fixed.
Store the gimbal locked, in its case, with motors unpowered, and keep firmware updates for quiet days at home rather than the morning of a shoot. Clean the arms and plates of grit before balancing, since a grain of sand in a sliding joint mimics a balance problem. Treat the rig as the precision instrument it is and it will repay you with uneventful reliability, the highest praise working gear can earn.
How the Picks Differ in Practice
The DJI options in this guide emphasise compact design and an ecosystem many shooters already know, suiting creators who value fast setup and familiar controls. The FeiyuTech picks tend to reward tinkerers, with broad adjustment and value for larger or more varied rigs. The Zhiyun models split between the travel-friendly Weebill line and the CINEPEER approach to compact power. None of these philosophies wins outright; they map to different rigs and temperaments, and the per-pick notes in this guide exist to help you match them honestly.
Decide by your next three shoots, not your dream shoot. List the camera and lens combinations those shoots actually require, the spaces you will move through and the hours you will work. The gimbal that covers that list comfortably, with battery and balance to spare, is your gimbal, even if another model boasts a higher ceiling you may never visit.
Building a Gimbal Shot List You Can Actually Execute
Great gimbal footage begins as a list, not as improvisation. For any shoot that matters, write the five to eight movements the story genuinely needs: the establishing glide, the follow, the reveal, the detail pass, the exit. Assign each a location, a direction and a lens, and rehearse the awkward ones before the day. A shot list converts the gimbal from a toy of opportunity into an instrument of intention, and clients can feel the difference in the finished edit within seconds.
Sequence the list by geography, not by the edit’s order. Shoot everything in one corner of a location before moving to the next, because every relocation costs balance checks, light changes and momentum. Within each position, capture a safety version, slower and simpler than the ambitious version, before attempting the flourish. Editors forgive a plain shot that exists; they cannot use a brilliant shot that was never quite landed.
Build rest into the list. Arms tire, batteries drain and attention frays, and the footage from the last hour of an unrested shoot shows all three. Alternate gimbal sequences with tripod or handheld work where the story allows, and schedule the most demanding moves while you are fresh. Professional smoothness is partly physiology, and managing your own energy is as much a production skill as balancing the rig.
Review the day’s footage the same evening, at normal speed, on the largest screen available, and grade your own work honestly: which moves held, which wobbled, which started or ended with a twitch. Note the pattern, because gimbal faults are habitual and therefore fixable. The shooter who reviews nightly improves weekly; the shooter who never reviews repeats the same invisible wobble for a year and calls it the gimbal’s character.
Over months, the list habit compounds into a personal style: the moves you execute flawlessly become your signature, and productions begin to be planned around them. That is the real destination of gimbal ownership, not a larger rig or a longer feature list, but a small set of movements so deeply practised that they look effortless, because by then, for you, they nearly are.
Working With a Second Shooter or a Tripod Partner
On two-camera shoots, agree the division of labour before the event: who moves and who holds, who takes wides and who takes details, and how you will signal a swap. The gimbal shooter owns movement; the tripod shooter owns stability and the long, patient frames. Confusion between the two produces duplicated coverage of the easy shots and silence where the story needed both. Ten minutes of planning buys an edit with choices.
Match your looks in advance: same picture settings philosophy, same frame-rate intentions, and a shared understanding of how the footage will be graded. Gimbal footage intercuts beautifully with locked-off work when the underlying image agrees; it fights when every setting was an independent decision. Test the pairing on a short rehearsal clip and watch it edited together before the real day makes the lesson expensive.
After the shoot, review together with the editor’s eye: which movements earned their place, which tripod frames saved a sequence, where a third angle was missed. The debrief, kept kind and specific, is how a two-shooter team becomes a unit rather than two freelancers sharing a postcode. Gimbals reward teams that learn together, because movement is a language and fluency is shared.
More Notes From the Field With a Gimbal
Film your practice walks and review them at normal speed with fresh eyes the next day. Wobble that felt invisible while shooting announces itself on a big screen, and specific faults, a bob at each left step, a pan that accelerates at the end, become fixable once named. Keep the clips; comparing month one with month three is the most encouraging record of progress a shooter can own.
Build two or three signature moves you can execute perfectly rather than ten you perform approximately: a slow push-in, a clean reveal around a corner, a steady orbit of a static subject. Clients and audiences respond to confidence, and a small repertoire performed flawlessly reads as professionalism far more than ambitious moves performed nearly.
Keep a small field notebook or a notes app entry for every outing: subject, light, settings that worked and settings that failed. Patterns appear quickly. The combination that nailed a sharp frame in flat morning light will not be the combination that works at dusk, and having your own record beats generic advice because it describes your hands, your support and your typical subjects. Review the notes monthly and turn repeats into defaults.
Clean gear on a schedule rather than on a panic basis. Dust and fingerprints accumulate gradually, so image quality slides gradually too, and it is easy to blame the equipment for what is really a dirty front element or a smudged screen. A blower, a soft brush and a microfibre cloth kept in the bag handle most of it. Anything beyond that, follow the maker guidance for your specific model.
Back up on the same day you shoot. Cards fail, bags get left in cars, and files that exist in exactly one place are files you are in the process of losing. A simple routine, card to computer to a second drive or cloud folder, takes minutes and protects hours of work. Format cards in the camera afterwards rather than deleting files one by one, which keeps the file system tidy.
Practise the boring fundamentals at home so they are automatic in the field: changing settings without looking, swapping cards and batteries by feel, and recovering from a missed shot without fussing. The moments worth capturing rarely wait while you scroll menus. Ten quiet minutes of drills each week does more for your hit rate than another accessory purchase.
Judge your results at the size you actually share or print. Pixel-level inspection has its place when you are diagnosing a problem, but most images live on screens and modest prints, where composition, timing and light matter far more than microscopic sharpness. Chasing perfection in the corners can talk you out of a tool that would serve you well for years.
Buy for the subjects you shoot most, not the subjects you imagine shooting once. A kit optimised for a rare trip and wrong for weekly use becomes shelf decoration. List your last stretch of real outings, count the subjects honestly, and let that tally steer the decision. The right tool is the one that disappears into the routine you already have.
Keep your expectations calibrated by the work, not the advertisements. Every camera system in this guide was designed around real compromises made by real engineers, and the photographers who thrive are the ones who learn their own system’s compromises so thoroughly that they stop experiencing them as limits. That fluency, knowing exactly what your gear will do before you press the shutter, is worth more than any single upgrade, and it is acquired free, one deliberate outing at a time.
Share your work and invite honest critique from people whose photographs you respect. Fresh eyes find the recurring habits, the horizon that always tilts, the background you never notice, that solitary review cannot. Critique stings briefly and teaches permanently. Pair it with studying photographs you admire and asking precisely what the photographer did, with position, timing and light, to earn the effect, and your own practice gains a curriculum.
Print something regularly, even small. A print is an honest editor: it reveals focus, colour and composition truths that a glowing screen forgives, and it turns photographs into objects your household actually lives with. The discipline of choosing what deserves paper sharpens every upstream decision, from which lens leaves the house to which frame survives the evening cull.
Revisit old photographs with new skills before buying new equipment. Archives are full of frames that were limited by the editor you were, not the camera you had, and reworking them is both free education and a useful audit of whether your limitations are truly technical. More than one photographer has cancelled an upgrade after discovering their old files were better than their old processing.
Camera Gimbal FAQ
Can one gimbal fit any camera?
No. Weight, size and control cables differ, so check the supported list for your body and lens.
Do these shoot vertical video?
The listings for the DJI, FeiyuTech SCORP 2 and Weebill 3E models describe vertical modes. Check the others before buying.
Do I need to balance my camera every time?
You need to rebalance whenever you change the lens or add or remove accessories. If the setup is unchanged, a quick check is usually enough.
Can a gimbal stabilise a heavy lens?
Only if the total weight and balance are within the maker's limits. Heavy or long lenses may need a stronger model, and the supported list is worth checking.
How do I walk smoothly with a gimbal?
Bend your knees slightly, step heel to toe and let your arms absorb movement. Avoid sudden speed changes and practice the move before filming.
Why does my gimbal drift?
Poor balance, a loose plate or an uncalibrated sensor can cause drift. Rebalance, check the mounting and run calibration as the manual describes.
Can I fly with a gimbal?
Usually yes, but lithium battery rules apply. Check current airline and security rules, and carry batteries in your hand luggage if required.
Do I need the app to use the gimbal?
Basic use often works without it, but features such as tracking, settings and updates may require the app. Check the listing for details.
How long does a gimbal battery last?
It depends on payload, temperature and features used. The listing's runtime is under set conditions, so expect variation and carry spare power if you shoot long days.
Choosing a Gimbal by the Kind of Filming You Do
Gimbals solve different problems for different shooters. Starting with your typical project helps you avoid paying for features you will not use.
Solo vlogger or travel creator
You hold the camera at arm’s length, often in one hand all day. Weight and fold-down size matter most, along with a quick way to switch between horizontal and vertical framing. A compact handle with a good grip will be more useful than extra payload you never reach.
Wedding and event shooter
Long days call for a comfortable grip, reliable batteries and fast balancing between lens changes. Many event shooters pair a gimbal with a monopod or a support arm to reduce fatigue. Quick-release plates save time when you switch between a gimbal and a tripod.
Run-and-gun documentary or short film
Here the setup must survive changing conditions. Smooth tracking, dependable camera control and a handle that works well in tight spaces help you stay mobile. Think about how you will carry a rig through crowds or over uneven ground.
Product and social media content
Controlled movements such as slow orbits or reveals call for precise motion modes and a stable base. A gimbal that stands on its own and can be mounted on a tripod gives you hands-free flexibility.
If your filming is mostly static or tripod-based, a gimbal is a luxury, not a necessity. Be realistic about how often you will use the motion, since the learning curve is real.
Accessories That Change How a Gimbal Feels
The gimbal itself is rarely the whole story. A few add-ons can turn a good setup into a more comfortable one, while others are nice to have but easy to skip.
- Quick-release plates: a spare plate for each camera lets you swap bodies without rebalancing from scratch.
- Extension handle or grip: raises or lowers the camera angle, which is useful for low-angle shots or reaching over a crowd.
- Tripod base: many handles screw onto a small tripod, giving you a stable stand for time-lapses or interviews.
- Counterweights: make it possible to balance heavier lenses on some models.
- Follow focus or remote control: lets a second person adjust focus or zoom while you walk.
- Phone mount or monitor mount: handy if the camera’s own screen is hard to see from the angle of your hold.
Before you buy, check whether accessories are bundled or sold separately. A combo package costs more upfront, but it can come out cheaper than buying pieces one at a time. Confirm that the mounts use standard threads, so third-party accessories can attach.
Also check what the mount does with your lens hood or large microphone. A gimbal that cannot clear them forces awkward workarounds. Planning your whole kit on paper saves frustration at the first shoot.
Gimbal and In-Camera Stabilization Together
Many modern cameras and lenses include stabilization of their own, and it is natural to wonder how that interacts with a gimbal. In most cases, the two systems can work side by side, but they can also fight each other.
Some shooters turn off in-body or lens stabilization when using a gimbal to avoid tiny corrections that make footage look jittery. Others leave it on for added smoothness at long focal lengths. Experiment with both settings on a short walk and watch the results on a large screen. The right answer depends on your camera, lens and the type of movement.
A gimbal is designed to smooth larger movements, such as steps and turns, while in-camera systems handle fine shake. Neither can hide a shaky technique entirely. If your framing is wobbly or your steps are heavy, no stabilizer will give you a cinematic result.
Also consider post-production stabilization in editing software. It can clean up minor issues, though it crops the image and can introduce warping. Treat it as a rescue tool rather than a plan.
Practical Technique for Smoother Footage
Good habits make a bigger difference than extra features. Bend your knees slightly and walk with a heel-to-toe roll to absorb the bounce. Hold the gimbal close to your body for stability, and use both hands when you can. Let the gimbal handle the pan and tilt while you control direction with your feet and hips.
Plan your shot before pressing record. Decide where you start, where you finish and what is in the frame along the way. Walk the route once without the camera, looking for obstacles and uneven ground. Slow movements usually look better than fast ones, and a gentle start and stop keeps motion from feeling abrupt.
Keep the horizon level and avoid sudden changes in height unless they serve the shot. If your gimbal offers a motion mode that follows the handle or locks the angle, choose the one that matches the movement you want. Finally, review footage on a larger screen after each session, so you notice problems that a small display hides.
Frequently Asked Questions
Should I turn off lens stabilization when using a gimbal?
It depends on the camera and lens. Some shooters switch it off to avoid small conflicting corrections, while others keep it on for long focal lengths. Test both settings with a short walking clip and compare the footage on a larger screen.
What accessories are worth buying with a camera gimbal?
A spare quick-release plate, a small tripod base and an extension grip are the most commonly useful. Follow focus or remote control helps if you work with a partner. Check whether your combo already includes them before buying separately.
Is a gimbal good for wedding or event video?
It can be, especially for walking shots and moving through a venue. Long days are tiring, so look for a comfortable grip, reliable batteries and quick balancing. Many shooters pair it with a monopod or support arm.
Can I use a gimbal on a tripod?
Many gimbals have a threaded base that screws onto a tripod or small stand, which allows hands-free shooting for time-lapses and interviews. Confirm the thread type and that the tripod can handle the total weight.
How long does it take to learn smooth gimbal walking?
Basic smoothness arrives within a few practice sessions if you walk deliberately: knees soft, steps heel-to-toe, arms relaxed and the gimbal held close to your body rather than at arm’s length. The ninja walk feels theatrical and works. Refinement, clean starts and stops, gentle pans that begin and end without a twitch, takes a few weeks of regular use. Practise on ordinary subjects at home so real shoots get the benefit.
Can I use a camera gimbal in the rain?
Treat most gimbals as splash-cautious rather than weather-sealed unless the maker states otherwise. Motors, ports and the camera itself all dislike water. For light drizzle, work quickly, shield the rig with your body or an umbrella held by a helper, and dry everything thoroughly afterwards. For sustained rain, a simpler handheld or tripod approach with a rain cover for the camera is usually the wiser production choice.
Why does my gimbal drift or lose the horizon?
Slow drift usually means the balance is slightly off, the gimbal was powered on while moving, or it needs a calibration performed on a still, level surface. Set the rig down properly, rebalance carefully, calibrate as the manual directs, and power on while holding it steady. If drift follows a firmware change or a knock, recalibrate before suspecting a fault; gimbals are honest about their setup and punish shortcuts quietly.
Do I still need a tripod if I own a gimbal?
Yes, because they solve different problems. A gimbal smooths movement; a tripod eliminates it, and interviews, timelapses, long exposures and locked-off detail shots all belong on solid support. Many shooters mount the camera on a quick-release system that moves between the two in seconds. Owning both, and knowing which the shot in front of you wants, is the mark of a settled kit.
How should I transport a gimbal safely?
Power it down, engage the axis locks, and carry it in its fitted case or a padded compartment where the arms cannot be forced. Never carry a powered gimbal by one arm or let it swing loose in a bag; the motors and joints are strong in use and vulnerable in transit. At the location, unlock in order, check balance before powering on, and make that sequence a habit you never skip.
The Short Version
For the lightest body, the DJI RS 3 Mini. For quick locks and tracking, the RS 4 Mini Combo. For built-in tracking, the SCORP 2. For the highest stated payload, the Weebill 3E. For underslung shots, the SCORP-C. For long battery life, the Weebill S.

