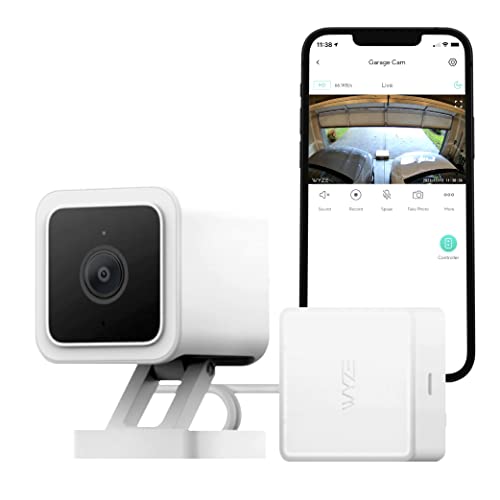
A DIY security system is a kit of sensors, a hub or keypad and sometimes cameras that you install yourself, usually without drilling or a technician visit. Most connect to a phone app, and many can be expanded later. Kits differ a great deal in what they include, how they connect and whether they need a monthly plan to unlock key features.
We have not used these products ourselves, so this guide makes no promises about performance. It describes features and construction only, and shows how to read a listing so you can compare kits on the same terms. Use the table below to line up the details, and keep in mind that no system can guarantee an outcome.
As an Amazon Associate we earn from qualifying purchases. Links on this site are affiliate links, and they do not change the information we give.

In this guide
Quick Picks
| Pick | Product | Best For |
|---|---|---|
| 1 | Ring Alarm 8-Piece Kit (2nd Gen) | Best overall for most homes |
| 2 | SimpliSafe 9-Piece Wireless Home Security System | Best for optional monitoring with no contract |
| 3 | abode Smart Security Kit (4-Piece) | Best for smart-home integration |
| 4 | eufy Security 5-Piece Home Alarm Kit | Best with no monthly fees |
| 5 | Ring Alarm Pro 8-Piece Kit | Best with a built-in router and backup internet |
Our Picks
Top pick
1. Ring Alarm 8-Piece Kit (2nd Gen) — Best overall for most homes
This eight-piece Ring Alarm kit covers a one-to-two-bedroom home out of the box: a base station, a keypad, four contact sensors for doors or windows, one motion detector and a range extender. The base station connects by Ethernet or Wi-Fi, links its sensors over Z-Wave, carries a built-in 104 dB siren and has a rechargeable battery backup rated for up to 24 hours, which answers the hub-connection checks in the guide above. Everything is configured in the Ring app, the system expands with extra Ring sensors, and it works with Alexa. Read the monitoring row carefully before buying: without a Ring Home plan you arm and disarm at the keypad only, while app control, notifications, cellular backup and professional monitoring sit behind the subscription. If you accept that trade-off, this is the most straightforward mainstream kit here — widely stocked parts, a mature app and sensor coverage that matches a typical flat or small house without buying add-ons on day one.
View Ring Alarm 8-Piece Kit (2nd Gen) on Amazon
2. SimpliSafe 9-Piece Wireless Home Security System — Best for optional monitoring with no contract
This nine-piece SimpliSafe kit (model SS3-AMZ-3) includes a base station, a keypad, four entry sensors, two motion sensors and a wired SimpliCam indoor HD camera, so it covers more entry points and adds video in one box — two of the main checklist rows above. The sensors connect wirelessly to the base station, setup is adhesive-based and tool-free, and the system works with Alexa and Google Assistant. SimpliSafe’s pitch is flexibility on monitoring: you can self-monitor through the app or add 24/7 professional monitoring, and the listing stresses that no contract is required, so the plan can be started and stopped as your situation changes. That makes the kit a fit for renters and for anyone who wants the option of a monitoring centre without a long commitment. Check which app features need a plan before ordering, and count your doors against the four entry sensors to see whether you need extras.
View SimpliSafe 9-Piece Wireless Home Security System on Amazon
3. abode Smart Security Kit (4-Piece) — Best for smart-home integration
The abode Smart Security Kit is the smallest bundle here — a Smart Security Hub, one mini door/window sensor, one motion sensor and a key fob — but the hub is the most open one in this list. It connects to your router by Ethernet and speaks Z-Wave and Zigbee as well as working with Apple HomeKit, Amazon Alexa and Google Home, so sensors and automations can be shared with the rest of a smart home rather than living in one app. The hub has a built-in 93 dB siren, and abode sells a wide range of add-on sensors, so the expandability row of the checklist is well covered even though the starter box is small. Professional monitoring is optional and contract-free. Choose this kit if you already run HomeKit, Alexa or Google Home and want the alarm to be one part of a bigger setup — and budget for extra entry sensors, because one door sensor only covers the first door.
View abode Smart Security Kit (4-Piece) on Amazon
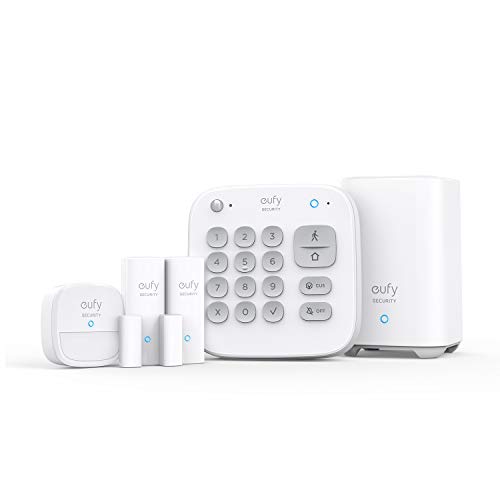
4. eufy Security 5-Piece Home Alarm Kit — Best with no monthly fees
The eufy kit (model T8990121) pairs a HomeBase hub with a keypad, one motion sensor and two entry sensors, and its selling point is what it does not charge: app control, alerts and arming are included with no monthly fee, which answers the monitoring-options row of the guide in the simplest way. The HomeBase connects to your router by Ethernet for setup, stores video locally for compatible eufy cameras such as the eufyCam range, and sounds the alarm from the hub itself. Maker figures put entry-sensor battery life at up to two years and the keypad at up to six months, and both adhesive and screw mounts are included, which suits renters. The trade-off is that this is a self-monitored system — alerts come to your phone rather than a monitoring centre. If you want a DIY alarm that keeps working fully without a subscription, and you are happy responding to alerts yourself, this is the pick built around that idea.
View eufy Security 5-Piece Home Alarm Kit on Amazon

5. Ring Alarm Pro 8-Piece Kit — Best with a built-in router and backup internet
The Alarm Pro kit uses the same sensor set as the standard Ring kit — base station, keypad, four contact sensors, one motion detector and a range extender — but the base station is also an eero Wi-Fi 6 router rated for coverage up to 1,500 square feet. It keeps the 104 dB siren, Ethernet connection and up to 24 hours of battery backup, and with a Ring Home Premium plan it can add 24/7 Backup Internet, using a cellular connection (3 GB of data a month included on the plan) to keep the alarm and other devices online during an outage. Two setup facts matter: the Pro base station must be your primary router, wired directly to the modem, and app control plus cellular features need the subscription. Pick this kit if your router is due for replacement anyway and you want the alarm and the home network in one box — it removes a separate router purchase while keeping the expandability of the Ring sensor range.
View Ring Alarm Pro 8-Piece Kit on Amazon
What to Look For
| Factor | Why it matters | What to check |
|---|---|---|
| Kit contents | Entry-level bundles vary widely in how many sensors they include. | Count door and window sensors, motion detectors, keypads and sirens against your home layout. |
| Hub connection | The hub links every device, so its connection matters. | Look for wired network, Wi-Fi or cellular backup, and battery backup during a power cut. |
| Cameras and doorbells | Video adds context to alerts. | Check resolution, field of view, night vision, and where recordings are stored. |
| Monitoring options | Some kits work on their own, others rely on a paid plan. | Read what is free, what needs a subscription, and whether contracts are required. |
| App and integrations | The app is how you arm, disarm and see alerts. | Confirm phone compatibility and links to voice assistants or smart home platforms. |
| Expandability | Needs change as you add rooms or outbuildings. | See how many devices the hub supports and whether add-ons are sold separately. |
Setup and Care Tips
- Sketch a floor plan first and mark entry doors, ground-floor windows and the hallways people walk through.
- Place the hub near the center of the home, away from large metal objects that can weaken wireless signals.
- Follow the maker’s guidance on sensor height and distance, and keep adhesive surfaces clean and dry before sticking anything on.
- Replace batteries on the schedule the maker lists, and run a periodic check of every sensor in the app.
- Use a strong, unique password for the account and turn on any extra login protection the app offers.
Mistakes to Avoid
- Buying the smallest kit and then finding it covers only a fraction of the entry points.
- Overlooking subscription terms that limit video history or alerts.
- Placing motion detectors where pets, heating vents or sunlight can trigger them.
- Relying on Wi-Fi alone when the hub offers a wired or cellular backup option.
- Skipping the app permission and privacy settings during setup.
How do you pick a DIY security system for your home?
Pick a DIY security system by counting your entry points, deciding how you want to receive alerts and choosing how much you want to expand later. A kit that fits your layout beats a bigger one you only half install.
Begin with a walk through the home. Count the exterior doors, the ground-floor windows and the main hallways. A small flat may need only a few sensors, while a larger house or a home with a garage and basement needs more. Starter kits often cover the first few openings, so plan for extras.
Then decide on monitoring. Self-monitoring sends alerts to your phone, and you decide what to do. Professional monitoring adds a call center that can contact emergency services, usually for a fee. Neither is right for everyone, so choose based on whether you will always be able to respond.
- Renters: favor adhesive mounts and plug-in hubs, and check the lease.
- Homeowners: consider expandability and outdoor options.
- Smart home users: check which platforms the hub works with.
- Anyone on a tight budget: compare what needs a subscription before comparing the sticker.
No system can guarantee an outcome. A good setup raises awareness and makes entry harder to miss, and that is the honest limit of what any kit offers.
Which DIY security system should you buy?
The right kit depends on whether you value subscription-free use, monitoring flexibility, smart-home links or built-in networking. These matches use the kits named above.
- If you want a mainstream kit that covers a small home out of the box, go for the Ring Alarm 8-Piece Kit (2nd Gen). Remember that app control and monitoring sit behind its plan.
- If you want optional monitoring with no contract and a camera in the box, choose the SimpliSafe 9-Piece Wireless Home Security System.
- If you run HomeKit, Alexa or Google Home, the abode Smart Security Kit (4-Piece) has the most open hub, though you will want extra entry sensors.
- If you do not want a monthly fee, the eufy Security 5-Piece Home Alarm Kit includes app control and alerts without one, but it is self-monitored.
- If your router is due for replacement, the Ring Alarm Pro 8-Piece Kit combines the alarm base with a router and offers backup internet through a plan.
Two rules help break ties. First, favor the kit whose sensors match your count of doors and windows, because adding sensors later increases the real cost. Second, read the subscription details before you decide, since a cheap box with expensive features behind a plan is not cheap.
If you are unsure, the simplest approach is to choose the kit that matches the way you want to be alerted, then add sensors only where you need them.
Subscription vs no subscription: how do DIY security system costs really work?
The box price is only part of the cost, because many DIY security systems lock features such as app control, video history or cellular backup behind a monthly plan. Read what works for free and what does not before you buy.
Think in three layers. The first is the hardware you pay for once. The second is any plan that unlocks app alerts, cloud video or cellular backup. The third is optional professional monitoring, which adds a call center.
- No plan needed: some kits work fully on their own, with alerts to your phone and local storage.
- Plan for convenience: some kits work at the keypad without a plan but need one for the app.
- Plan for monitoring: professional monitoring is a separate service and can often be started or stopped, depending on the maker’s terms.
Ask a few direct questions. Does the alarm still sound if the plan lapses? Can I arm and disarm from the app without a plan? Is video stored locally or in the cloud, and for how long? Is there a contract, or can I cancel?
Check the terms on the current listing and the maker’s page, because plans change. A no-fee system suits someone who is happy to respond personally. A plan-based system suits someone who wants a call center and cellular backup. Choose by habit, not just by headline price.
What should you check before you buy a DIY security system?
Before you buy, confirm the kit contents, how the hub connects and what needs a subscription. A short checklist keeps you from buying a system that does not cover your home.
- Sensor count: compare the number of entry sensors and motion detectors with your doors, windows and hallways.
- Hub connection: look for Ethernet, Wi-Fi or cellular options, and battery backup for power cuts.
- Siren: check that the hub or a separate siren is included and loud enough for your home.
- Compatibility: confirm the app works with your phone and any voice assistant or smart home platform you use.
- Camera details: if video is included, check where it records and what a plan changes.
- Mounting: adhesive or screw mounts, and whether they suit your doors and frames.
- Expandability: see how many devices the hub supports and whether add-ons are sold separately.
- Batteries: note the battery types and how often the maker says to replace them.
- Warranty and returns: read the terms on the listing, and check the return window.
- Setup demands: some hubs must be connected as your primary router or placed near the modem.
Look at how many people rated the kit and what they say about the app, false alerts and customer support, rather than a single score. Repeated comments about the same issue matter more than one-off complaints.
If the listing leaves a question open, read the maker’s support page before ordering.
How do you install a DIY alarm and avoid false alarms?
Install it with a floor plan, a central hub and careful sensor placement, then test every device. Most false alarms come from poor placement rather than faulty hardware.
Place the hub near the center of the home, away from large metal objects and thick walls that weaken signals. If the maker offers a range extender, use it for far corners. Mount contact sensors on the frame and door in line with each other, with the gap the instructions allow.
Motion detectors need thought. Keep them away from heating vents, direct sunlight, fireplaces and curtains that move. If you have pets, look at the maker’s pet guidance and follow the recommended height.
- Clean surfaces before using adhesive, and let it set as directed.
- Test each sensor in the app after mounting.
- Walk through the home with the system armed to check coverage.
- Set entry and exit delays that suit your routine.
- Tell everyone in the household how to arm and disarm it.
Protect the account as well. Use a strong, unique password and turn on any extra login protection the app offers. Review who has access and remove old users.
Keep the system healthy. Replace batteries on the maker’s schedule, check each sensor now and then and update the app. If a sensor goes offline, move it closer, check the battery and re-pair it following the manual.
Are DIY security systems worth it, and who should skip them?
A DIY security system is worth it if you want flexible, self-installed coverage and are willing to set it up and maintain it. It is not the right fit for everyone.
Is it worth paying more for a larger kit or a plan? If your home has many entry points, a larger kit saves buying extras one by one. A plan is worth it if you want cellular backup or professional monitoring. If you are happy with phone alerts, a subscription-free system can be enough.
What are the downsides?
- You are responsible for setup, testing and battery changes.
- Self-monitoring only works if you can respond to alerts.
- Features may sit behind a subscription.
- Wireless signals can be weakened by walls and metal.
- No kit can guarantee protection.
Who should skip it? If you want a company to design, install and monitor everything, a professionally installed system may suit better. If you cannot keep a phone with you or maintain batteries, a DIY system may not be reliable for you. If you only need to watch a doorway, a camera or doorbell alone may be enough.
If a DIY system still fits, compare the picks above, check the current listing for the sensor count and plan terms, then choose the kit that matches your doors, your phone and how you want to be alerted.
A Deeper Look at Choosing Diy Security Systems
The shortlists above give you a strong starting point, but the right choice among diy security systems depends far less on any single feature than on how well a product fits your space, your routine and your expectations. This extra section slows the decision down and works through the questions experienced buyers ask before they commit. None of it replaces the details in the individual reviews above; instead, it gives you a framework for reading those reviews with your own situation in mind, so the strengths and compromises of each pick become easier to weigh.
Start by writing down the job you actually need done, in plain language, before you look at any product names again. Many disappointing purchases happen because the buyer solved a slightly different problem from the one they had: they bought for the largest, loudest or most occasional scenario instead of the ordinary Tuesday that repeats all year. If your honest description mentions one main use, one secondary use and one frustration you want to avoid, you already have a better buying brief than most shoppers ever make, and you can test every option among the diy security systems against those three lines.
Size, Fit and the Space You Really Have
Measure before you fall in love with a particular model. Record the width, depth and height of the space, then add the clearance needed to open, move, clean or comfortably use the product once it is in place. Doorways, stairs, cupboard doors and tight corners all count, because a product that technically fits its final spot can still be miserable to get there. With diy security systems, the difference between a good fit and a daily annoyance is often a small margin that only a tape measure will reveal, so take the measurements twice and keep them in your phone while you shop.
Fit also means fitting the people involved. Consider heights, reach, strength and mobility in your household, and whether children, older relatives, guests or pets will interact with the product as well. Controls, handles, openings and adjustments should be comfortable for the person who will use them most, not just acceptable in a showroom moment. If two people will share the diy security systems, agree in advance whose priorities win on the points where you disagree, because shared products that suit nobody in particular tend to be replaced fastest.
Materials, Build Quality and Honest Durability
You can learn a lot about likely durability without any technical knowledge. Look for even finishes, tidy joins or seams, parts that move without grating or wobbling, and fixings that feel firmly seated rather than decorative. Where the maker describes materials, think about what those materials are good at and what they ask of you in return: some shrug off moisture but mark easily, others feel premium yet need regular care. The right answer among diy security systems is the material whose maintenance rhythm matches the time you will genuinely give it.
Pay particular attention to the parts that will be touched, loaded or exposed every day, because those are the places wear appears first. Hinges, handles, edges, feet, fastenings and contact surfaces tell you more about long-term satisfaction than a rarely used extra feature. If a listing is vague about the parts that matter, treat that vagueness as information in itself and favour the option whose construction is described clearly and modestly. Honest descriptions that mention limits usually come from makers who expect their diy security systems to be used hard and judged fairly.
Ease of Use in Ordinary Daily Life
Imagine the full routine, not just the main event. How does the product arrive, where does it live between uses, how long does setup take, and what has to be cleaned, charged, emptied, folded or put away afterwards? A design that saves a minute during use but costs five minutes of fiddly preparation will quietly fall out of favour. The most satisfying diy security systems tend to disappear into the routine: they are ready when needed, forgiving when you are tired, and simple to hand over to someone else without a long explanation.
With any connected or powered product, set aside time for the unglamorous essentials: firmware or software updates, account security, cable management and a sensible backup of your settings. These steps rarely feature in advertisements, yet they decide how reliable the diy security systems feel after six months of daily use. A short setup session done carefully at the start prevents most of the frustration people blame on the hardware later.
Getting the Most From Your Diy Security Systems
Setup and the First Few Days
Unpack carefully and keep everything together until you are sure the product is staying. Photograph the unboxing if parts are numerous, lay pieces out in the order the instructions use them, and resist the urge to force anything that resists: a pause to reread one step is cheaper than a damaged fitting. Once your diy security systems are assembled or installed, run through the basic functions gently, check that everything operates as described, and only then move packaging out of the way. Register the warranty if the maker offers one, and save the receipt and manual somewhere you can actually find them again.
Treat the first week as a trial you are conducting, not a verdict you have already reached. Use the product in the situations you bought it for, notice where you hesitate or improvise, and adjust placement, settings or accessories before deciding anything is wrong. Small changes in position, order or routine often transform the experience. If a genuine fault or mismatch appears, early notes with dates and photographs make any conversation with the seller far easier, and they help you distinguish a real defect from a setup detail among your diy security systems that simply needs correcting.
Cleaning, Care and Storage Habits
Regular light care beats occasional heroic cleaning almost every time. Wipe, empty, shake out or inspect on the rhythm the maker recommends, using the mildest cleaning approach that does the job, and dry parts fully before storing or closing them away. Damp left in seams, folds or enclosed spaces is a quiet cause of odours and deterioration, whatever the product. Build the care step into the routine it belongs to, such as after the last use of the day or the end of the week, so maintaining your diy security systems never becomes a separate project you keep postponing.
Storage matters as much as cleaning. Keep the product in the conditions the maker describes, away from extremes of heat, cold or damp where possible, with any cables, accessories or small parts stored together rather than scattered through drawers. If space is tight, store the items you use together in one place so setup stays quick. Before a longer period without use, clean everything, check for wear while you can still act on it, and make a note of anything that needs attention when the diy security systems come back into service, rather than discovering it at the busiest moment.
Compatibility is worth checking twice before you buy. Look at the connections, formats, operating systems or mounting standards your current setup already uses, and confirm the new addition speaks the same language. Keep a note of model details, passwords stored in your password manager, and any adapters you rely on, stored somewhere you can find them when you add the next piece of equipment or troubleshoot a problem.
How the Picks in This Guide Compare
Read the individual reviews above as a set rather than as a ranking to obey blindly. Each pick earned its place for a particular kind of buyer, and the short labels are the quickest guide to those differences. The notes below simply restate the positioning already given in the guide, in a form that makes side-by-side thinking easier when two options both look appealing.
Choosing Between Two Close Options
When two options among the diy security systems remain after you have eliminated the rest, stop looking for new features and start looking at friction. Which one will be easier to live with on a tired evening, quicker to clean, simpler to store, or less annoying for the other people who share your space? Which one has the limitation you are more willing to accept for years? Buyers rarely regret choosing the product with the kinder daily routine, whereas a small advantage on paper that demands constant workarounds wears thin remarkably quickly.
It can also help to imagine owning each finalist after the novelty has gone. Picture the product a little dusty, the household a little busier, and your enthusiasm replaced by habit. The option that still seems sensible in that picture is usually the right purchase. If you remain torn, revisit the measurements and the original three-line brief you wrote at the start of this section; one of the finalists almost always answers that brief more directly, and that answer matters more than any extra flourish either diy security systems can offer.
A Final Practical Check Before You Decide
Decision-making gets easier when you separate needs from preferences. Needs are the points where the wrong choice stops the product working for you at all, such as a size that does not fit, a function you rely on daily, or a care requirement you cannot meet. Preferences are everything else: finishes, styling details and nice-to-have extras. Among diy security systems, spend your attention and your budget on the needs first, let preferences break ties between otherwise equal options, and be suspicious of any product that asks you to trade a genuine need for an attractive extra.
Talk to the people who will share the product before you order, not after it arrives. A five-minute conversation about where the diy security systems will live, who will clean or move them, and what would genuinely annoy each person prevents the quiet resentment that builds around a purchase nobody else chose. Households that agree the practical basics in advance almost always end up happier with the result, and the discussion often surfaces a requirement, such as storage space or noise, that the main buyer had not considered at all.
Think about accessories and consumables as part of the purchase, even if you buy them later. Some diy security systems need covers, refills, replacement parts, batteries, cleaning products or a particular storage solution to work at their best, and discovering that afterwards can turn a bargain into a false economy. You do not need to buy everything at once, but knowing what ownership involves helps you compare options fairly and plan the order in which extras are genuinely worth adding.
Keep a simple ownership note once you have bought. The date of purchase, where the receipt lives, any warranty registration, and a line about settings or arrangements that worked well will save you surprising amounts of time later. When something eventually needs adjusting, repairing or replacing, that note turns a vague memory into clear information, and it helps anyone else in the household understand the diy security systems without having to repeat your whole learning process from the beginning.
Finally, give yourself permission to choose the sensible option. Marketing rewards the newest, largest and most feature-filled version of everything, yet most households are best served by the product that matches their space, does the main job reliably and asks little of them in return. If one of the diy security systems above keeps meeting your brief while the others need excuses, that consistency is the answer. A calm, well-matched purchase used happily for years beats an exciting one that never quite fits your life.
Seasonal changes are a useful prompt to reassess. When the weather, your schedule or the household changes, walk through how the diy security systems are performing: what gets used, what gets avoided, and what small adjustment would help. Moving a product to a better spot, changing the order of a routine or replacing a worn accessory can restore most of the original satisfaction without a new purchase, and it teaches you what to prioritise if you do buy again in the future.
When you read any guide, including this one, remember that recommendations assume an average household that may not resemble yours. Treat the picks above as a well-researched shortlist to test against your measurements, your routine and your honest limitations, rather than as instructions. That mindset protects you from the two commonest disappointments with diy security systems: buying the most praised option for somebody else’s life, and dismissing a modest option that would have suited your own life perfectly.
FAQ
Do DIY systems need professional monitoring?
No. Many let you receive alerts on your own phone and manage everything yourself. Some also offer optional professional monitoring for a fee. Decide how you want to respond to alerts, then check which plans the maker offers.
Can I use a DIY kit in a rental?
Often, yes. Many kits use adhesive mounts and plug-in hubs that avoid drilling. Check your lease, and look at how each sensor attaches and whether it leaves marks when removed.
How many sensors do I need for a DIY security system?
Start by counting your exterior doors, ground-floor windows and main hallways. Most kits cover a small number of openings, so plan to add extras. Cover the likely entry points first and expand later.
Do DIY security systems work without Wi-Fi?
Some alarms still sound locally and can be controlled at the keypad without internet. App alerts usually need a connection. A wired or cellular backup, where the kit offers it, helps keep the system online.
Can a DIY security system be hacked?
Any connected device carries some risk, which is why a strong unique password and extra login protection matter. Keep the app and firmware updated. Check what the maker says about encryption on its product page.
What happens during a power outage?
Many hubs have a battery backup that keeps the system running for a limited time. Check the maker's stated backup duration on the listing. Cellular backup, where available, can keep alerts going if your internet is down too.
Do I need a camera with a DIY alarm?
Not always. Door, window and motion sensors cover entry detection, and a camera adds video context to alerts. Check where recordings are stored and which features need a plan.
Are DIY security systems good for apartments?
Often yes, since many use adhesive mounts and plug-in hubs that avoid drilling. Check your lease and how each sensor attaches. A smaller kit is usually enough for an apartment.
Can I add more sensors to my kit later?
Most systems are expandable, but only with compatible devices from the same maker or platform. Check how many devices the hub supports. Buy add-ons that are listed as compatible with your kit.
How do I know which size or style of diy security systems is right for me?
Start from the space and the people, not from the product page. Measure where the item will live and be used, think about who will use it most often, and match those facts against the guidance in the reviews above. If you fall between two sizes or styles, the safer choice is usually the one that leaves you comfortable clearance and room to adjust, rather than the one that only just fits on paper and leaves no margin for ordinary life.
What should I check as soon as my diy security systems arrive?
Check the contents against the packing list, look over seams, surfaces, moving parts and fastenings for transit damage, and test the basic functions before you throw any packaging away. Photograph anything that looks wrong straight away. A calm ten-minute inspection on delivery day is far easier than discovering a problem weeks later, and keeping the packaging until you are satisfied protects your options if an exchange turns out to be necessary.
How often should I clean and maintain diy security systems?
Follow the maker’s guidance first, and otherwise adopt a little-and-often approach: a brief wipe, empty or inspection after regular use, and a more thorough clean at sensible intervals such as the change of season or before storage. Maintenance done early is almost always quicker, because dirt, moisture and loose fittings are easier to deal with before they combine into a bigger problem that affects how the product works.
What is the most common mistake people make with diy security systems?
Buying for an imagined routine instead of the real one. People overestimate how much time they will spend on setup and care, underestimate the space a product needs in use, and choose features for rare occasions while tolerating daily inconveniences. The reviews above flag the honest limitations of each pick; take those limitations seriously, because living with a limitation every day feels very different from reading about it once.
Can I return or exchange diy security systems if they do not suit my home?
That depends on the seller and on the condition of the product, so read the returns terms before you order and keep receipts, packaging and accessories together during the first days. Use the product fairly but carefully while you decide, note any problem promptly, and contact the seller sooner rather than later if something is wrong. Clear, polite messages with dates and photographs usually resolve issues faster than waiting and hoping the problem will settle by itself.
How long should good diy security systems be expected to last?
There is no single honest answer, because lifespan depends on materials, frequency of use, conditions and care far more than on the calendar. Well-made products that are used as intended, cleaned on a sensible rhythm and stored properly will generally serve for years, while heavy use in harsh conditions shortens the life of almost anything. Judge value over the whole period of ownership, including how easy the product is to maintain, rather than by the purchase moment alone.
What else is worth knowing before buying diy security systems?
Read the individual review of the pick you favour one more time, paying attention to the limitation it names and the buyer it is said to suit. Most returns and regrets come from details that were visible before purchase but easy to skim past. Confirm your measurements, your storage plan and your care routine, and make sure everyone who will use the product is comfortable with the choice. That final, unhurried check takes minutes and protects years of use, which is why experienced buyers treat it as part of the purchase rather than an optional extra to skip when a product looks appealing at first glance.
One more thing worth knowing (2) before buying diy security systems?
Read the individual review of the pick you favour one more time, paying attention to the limitation it names and the buyer it is said to suit. Most returns and regrets come from details that were visible before purchase but easy to skim past. Confirm your measurements, your storage plan and your care routine, and make sure everyone who will use the product is comfortable with the choice. That final, unhurried check takes minutes and protects years of use, which is why experienced buyers treat it as part of the purchase rather than an optional extra to skip when a product looks appealing at first glance.
One more thing worth knowing (3) before buying diy security systems?
Read the individual review of the pick you favour one more time, paying attention to the limitation it names and the buyer it is said to suit. Most returns and regrets come from details that were visible before purchase but easy to skim past. Confirm your measurements, your storage plan and your care routine, and make sure everyone who will use the product is comfortable with the choice. That final, unhurried check takes minutes and protects years of use, which is why experienced buyers treat it as part of the purchase rather than an optional extra to skip when a product looks appealing at first glance.
One more thing worth knowing (4) before buying diy security systems?
Read the individual review of the pick you favour one more time, paying attention to the limitation it names and the buyer it is said to suit. Most returns and regrets come from details that were visible before purchase but easy to skim past. Confirm your measurements, your storage plan and your care routine, and make sure everyone who will use the product is comfortable with the choice. That final, unhurried check takes minutes and protects years of use, which is why experienced buyers treat it as part of the purchase rather than an optional extra to skip when a product looks appealing at first glance.
The Short Version
Match the kit to your layout, check how the hub connects, and read the subscription details before buying. A modest system that covers your real entry points is more useful than a large bundle you only half install.
Related Guides
- How to Choose the Best Home Security Systems: A Buyer's Guide
- How to Choose the Best Wireless Security Systems (2026 Guide)
- How to Choose the Best Window Security Bars: A Buyer's Guide
- How to Choose the Best Window Security Sensors: A Buyer's Guide
- How to Choose the Best Closet Systems: Buyer's Guide (2026)