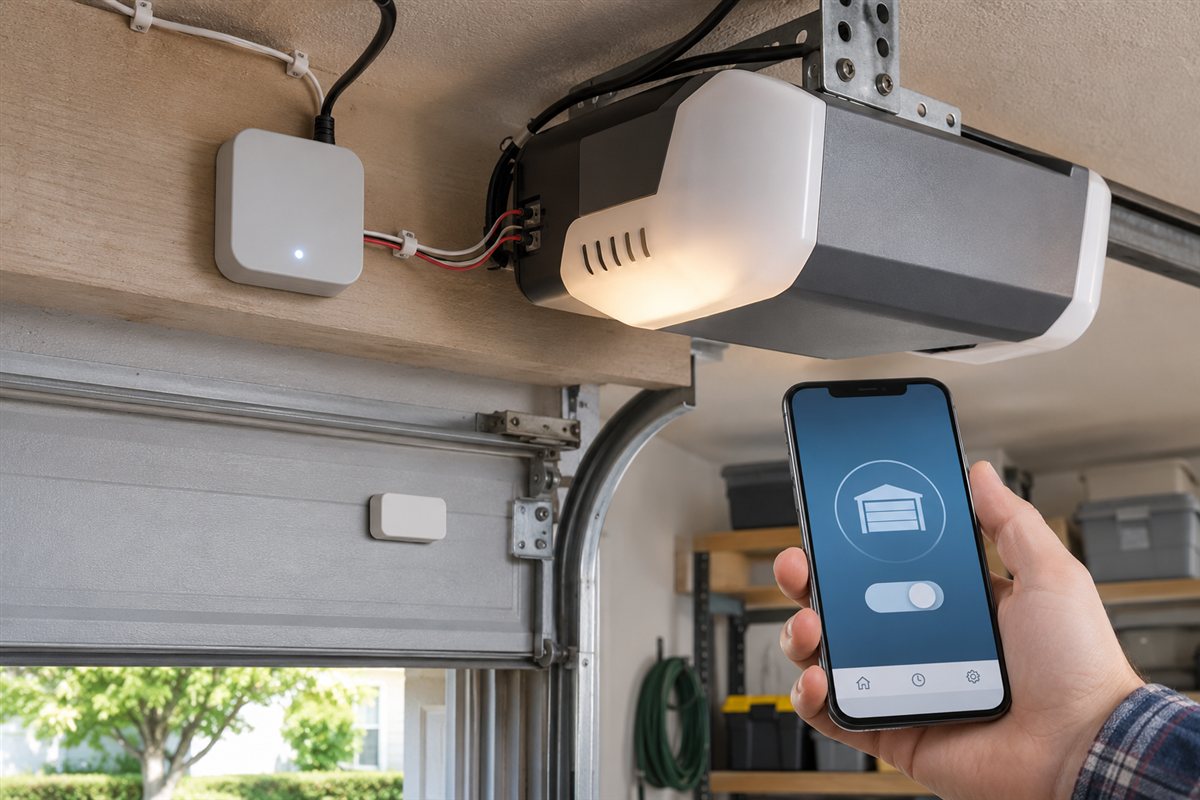
A smart garage controller is a small module that connects an existing garage door opener to your home network, so you can open, close and check the door from a phone app. We have not used these products ourselves, so this guide covers features and construction only and makes no performance promises.
Most controllers wire into the opener’s terminals and add a tilt sensor on the door. Compatibility with your opener, the assistants you use and your Wi-Fi coverage all matter more than looks. The table below lists the factors to weigh, and each maker’s listing should confirm the details for your exact opener.
As an Amazon Associate we earn from qualifying purchases. Links on this site are affiliate links, and they do not change the information we give.
In this guide
Quick Picks
| Pick | Product | Best For |
|---|---|---|
| Best Overall | Chamberlain myQ Smart Garage Control (MYQ-G0401-ES) | Most single-door garages that want simple, proven app control |
| Best for Multiple Doors | Meross MSG200 Smart Garage Door Opener Remote | Homes with up to three doors or weak Wi-Fi at the garage |
| Best for Chamberlain and LiftMaster | Meross MSG150 Smart Garage Door Opener Remote | Security+ 1.0 and 2.0 openers that usually need an extra adapter |
| Best Budget | Refoss Smart Wi-Fi Garage Door Opener (RSG100) | Straightforward app and voice control with no hub |
| Best for Local Control | ismartgate PRO Smart Garage Door Opener Remote | Multi-platform homes that prefer data stored locally, not in a cloud |
Our Picks
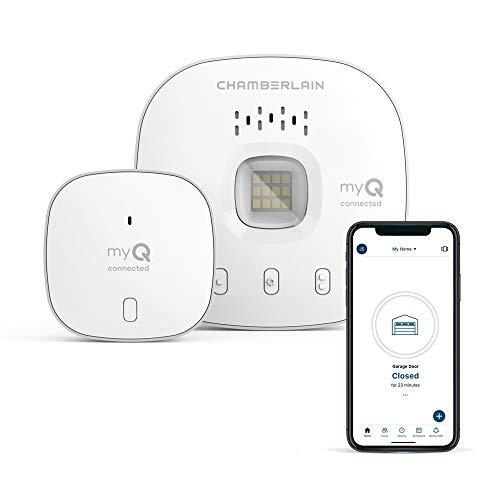
1. Chamberlain myQ Smart Garage Control (MYQ-G0401-ES) — Best for most single-door garages
The myQ Smart Garage Control is the add-on kit from Chamberlain, the maker behind many of the openers already hanging in North American garages. The box pairs a wireless hub with a door sensor: the hub connects to your home Wi-Fi, talks to the opener, and the sensor reports whether the door is open or closed, so the myQ app can show real status rather than just sending a blind toggle command. Bluetooth is built in to make the first setup pairing easier. From the app you can open, close and check the door from anywhere, and set up the alerts and schedules the guide above recommends, such as a notice when the door has been left open. Because the same company supports a huge share of installed openers, its compatibility guidance is detailed, but still check your exact model against Chamberlain’s list before ordering, especially on very new openers whose wall controls use restricted protocols. For a single door and a mainstream opener, this is the most direct route.
2. Meross MSG200 Smart Garage Door Opener Remote — Best for multiple doors
Most controllers handle one door per module, but the Meross MSG200 can run up to three single doors from one unit, with a wired door sensor in the box and additional sensor kits available for the extra doors. That makes it a tidy fit for two- and three-car garages where separate hubs would clutter the ceiling. The second headline feature is the external antenna, which gives the 2.4 GHz Wi-Fi radio a better chance in exactly the situation this guide warns about: a garage at the edge of router range, behind concrete and a metal door. Platform support is broad, covering Apple HomeKit, Amazon Alexa, Google Assistant and Samsung SmartThings, and no separate hub is required. Meross rates the family for hundreds of opener brands, and openers using Chamberlain’s Security+ 1.0 or 2.0 can work, though some need a free adapter accessory from Meross, so run your model through their compatibility check first. If you have several doors and marginal signal, start here.
3. Meross MSG150 Smart Garage Door Opener Remote — Best for Chamberlain and LiftMaster openers
The MSG150 is Meross’s newer take on its single-door controller, aimed squarely at the compatibility headache described above. Many add-on modules cannot talk directly to Chamberlain, LiftMaster and Craftsman openers that use the Security+ 1.0 and 2.0 wall-control protocols, and need a separate adapter wired in before anything works. Meross designed the MSG150 to work with those openers seamlessly, without the extra adapter, while still covering a wide range of other brands. Platform support matches the rest of the current Meross line: Apple HomeKit, Amazon Alexa, Google Assistant, Samsung SmartThings and CarPlay, so voice control and arrival routines are available once it is paired. Like most controllers here it works on the 2.4 GHz Wi-Fi band and uses a wired door sensor so the app can report open or closed status and send left-open notifications. If your opener is a recent Chamberlain-group model and other kits keep pointing you to an adapter, this is the one to check first.
4. Refoss Smart Wi-Fi Garage Door Opener (RSG100) — Best budget pick
Refoss is the sister brand to Meross, and the RSG100 covers the essentials of this category at the simple end of the range: app control from your phone, voice control through Amazon Alexa and Google Assistant, and no hub to buy or configure. The kit wires into the opener’s wall-button terminals and includes a wired door sensor, a test wire and the fixings you need. Refoss publishes a wide compatibility table covering hundreds of brands and models, and suggests a quick hands-on test before you buy: if briefly shorting the wall-button terminals makes the door run, the RSG100 can control it. Some Chamberlain, LiftMaster and Craftsman openers need a small accessory, which Refoss support will supply if you send them your opener model or learn-button colour. You give up the multi-door capacity and external antenna of the bigger Meross unit, and platform support is narrower, but for one door and basic open, close and status checking, it does the core job cleanly.
5. ismartgate PRO Smart Garage Door Opener Remote — Best for local control
The ismartgate PRO takes a different approach to the privacy question raised in this guide: instead of depending on the maker’s cloud, it stores its data locally on the device, and it can even keep working on a local network where internet access is poor. One PRO unit controls up to three garage doors, with a wireless door sensor included for the first door, so it suits larger garages as well as gates. Platform support is the widest here, spanning Apple HomeKit, Amazon Alexa, Google Assistant, Samsung SmartThings and IFTTT, which makes it a natural fit for homes that mix ecosystems or run their own automations. It is compatible with the major opener brands, with one caveat worth checking before you order: Chamberlain, Craftsman and LiftMaster openers with a yellow learn button need ismartgate’s switch adaptor, which is sold separately. Access can be given to family members through their own accounts rather than a shared login. For buyers who want multi-door control without handing their door history to a cloud service, this is the strongest match.
What to Look For
| Factor | Why it matters | What to check |
|---|---|---|
| Opener compatibility | Not every opener accepts an add-on controller or dry contact wiring | The maker’s compatibility list and your opener’s model label |
| Wi-Fi band | Many modules work only on the 2.4 GHz band | Your router settings and signal strength in the garage |
| Door sensor | The sensor reports whether the door is open or closed | Sensor power source, wire length and mounting method |
| Assistant support | Voice and automation options differ between models | Which home platforms the listing names as supported |
| Wiring method | Some kits need only two low voltage wires | Terminal type and whether the kit includes wire and clips |
| Alerts and logs | Notices tell you when the door stays open | App features such as timers, schedules and activity history |
Setup and Care Tips
- Check your router and move closer or add a Wi-Fi extender if the signal in the garage is weak.
- Disconnect power to the opener before you touch any wiring, and follow the maker’s manual.
- Mount the door sensor on a flat clean surface so its angle reading stays steady.
- Name the door clearly in the app, and set alerts for a door left open.
- Update the app and module firmware from time to time, and keep a wall button or remote as a backup.
Mistakes to Avoid
- Buying a controller without checking whether your opener model is on the compatibility list.
- Assuming the module works on any Wi-Fi band when it supports only one.
- Placing the sensor on a curved or dusty surface where it will not stay in place.
- Sharing app login details widely instead of inviting each person with their own account.
- Removing the old wall button, which is useful when the network is down.
How an Add-On Controller Talks to Your Opener
A smart garage controller is a small Wi-Fi module that mimics the wall button. It connects to the opener’s low-voltage terminals and, when you press a button in the app or give a voice command, briefly closes a circuit just as a push of the wall button would. Because it works through the same input, it usually does not need to know the opener’s brand, which is why many controllers are described as broadly compatible. That said, some openers use proprietary wall-control protocols, some have security features that affect add-ons, and some newer models restrict third-party devices, so always compare your opener’s model number with the compatibility list.
A separate sensor tells the controller whether the door is open or closed. Without it, the app can only send a toggle command and cannot say what state the door is in. The sensor may be wired or wireless, and some use a tilt reading that measures the door’s angle. Compare how each kit reports state and what happens if the sensor loses contact.
Because the controller simply triggers the opener, the usual safety features such as the door’s auto-reverse and photo-eye sensors stay in place. Check the opener’s manual about remote operation rules in your area.
Wi-Fi Signal and Network Checks Before You Buy
Garages are a hard place for Wi-Fi. Concrete walls, metal doors, and distance from the router all weaken signals. Before you buy, test the signal in the garage near the opener with a phone, ideally at the spot where the module will sit. If it is weak or drops out, consider a mesh node, an extender or an access point closer to the garage.
Many controllers support only the 2.4 GHz band, as the listing should state. If your router combines bands under a single name, pairing can sometimes fail, and you may need to use a guest network or temporarily turn off the other band. Give the controller a stable network name and avoid special characters in the password if the app struggles.
Consider reserving an address for the module in your router settings so it does not change, which helps with automations. Keep in mind that app control depends on your internet connection, and remember that the wall button and remotes keep working when the network is down. Think about what you want to happen during a power cut, since some modules lose connection until power returns.
Smart Home Platforms, Voice Control and Automations
Check which platforms the listing names as supported: major voice assistants, home hubs or open standards. Support is not always equal. Some assistants require a PIN before closing or opening the door by voice, some do not allow opening by voice at all, and some only allow closing. Read the maker’s notes carefully for these limits, as they are often intentional safety choices.
Automations are where a smart controller becomes useful. Examples include closing the door at a set time each evening, sending an alert if the door has been open for a long period, opening the door when your phone nears home, or turning on lights when the door opens. Location-based triggers can be convenient, but think about security and reliability before enabling open-on-arrival. Many people prefer notifications and manual confirmation for opening.
Look at the app itself. A clear interface, quick response, activity history and the ability to share access with family without sharing your own login all make daily use smoother. Compare the update history and whether the maker states how long it supports the product. Check whether features require a subscription.
Installation, Wiring and Sensor Placement
Installing a controller usually involves running two thin wires from the module to the opener’s wall-button terminals. Disconnect power to the opener first, as a precaution, and follow the maker’s wiring diagram, since terminal labels differ. Use the wire supplied or suitable low-voltage wire, and secure it with clips so it cannot hang in the door’s path. Keep the module away from moving parts, hot surfaces and moisture, and place it where the Wi-Fi signal is best.
Mount the door sensor according to the instructions. A tilt sensor needs a flat, clean surface on the door panel, and its orientation matters. Wipe dust and oil off the surface before sticking it on, and check that it holds in cold or heat. If the sensor is battery powered, note the battery type and life described by the maker, and set a reminder to change it. Wired sensors avoid batteries but need a cable run along the door, which must flex with the door movement.
Test the full cycle: open, close, sensor status in the app and alert settings. Test the auto-reverse feature and the opener’s safety sensors afterward, as the manual describes, to make sure nothing was disturbed.
Security, Privacy and Backup Access
A garage door is an entry point to your home, so treat the controller as a security device. Use a strong, unique password for the app account and turn on two-step verification if offered. Give family members their own accounts or invitations and remove access for people who no longer need it. Keep the app and module firmware updated, as updates often fix security issues.
Read the privacy policy to see what data is collected, such as door history and location, and how it is stored. Check whether the product works locally or relies completely on the maker’s cloud, and think about what happens if the service changes or ends. Where a listing describes local control, confirm what that means.
Keep the physical backups. Retain your wall button, remotes and any keypad, and make sure there is a way to open the door during a network or power failure, such as the opener’s emergency release cord. Do not share screenshots of codes, and check your door is closed before leaving. If an alert shows the door open at an unusual time, treat it seriously and check in person.
Which smart garage controller should you buy?
The best smart garage controller is the one that is confirmed to work with your opener and your Wi-Fi, so start from your own situation and match it to the picks above.
- One door and a mainstream opener: the Chamberlain myQ Smart Garage Control (MYQ-G0401-ES) is the direct route, with a hub and door sensor in the box.
- Two or three doors, or weak Wi-Fi: the Meross MSG200 Smart Garage Door Opener Remote can run up to three doors and has an external antenna.
- A recent Chamberlain or LiftMaster opener: check the Meross MSG150 Smart Garage Door Opener Remote first, since it is designed to work with Security+ 1.0 and 2.0 openers without the usual extra adapter.
- Basic app and voice control for one door: the Refoss Smart Wi-Fi Garage Door Opener (RSG100) covers the essentials with no hub.
- Local data storage and mixed ecosystems: the ismartgate PRO Smart Garage Door Opener Remote stores data locally and supports a wide range of platforms.
If you are still undecided, run your opener’s model number through each maker’s compatibility check, because that single step removes most of the wrong choices.
What to check before you buy a smart garage controller, and who should skip it
Garage controllers are inexpensive compared with replacing an opener, but a mismatch means returns and rewiring. Confirm these points on the current listing.
- Your opener’s brand and model number against the maker’s compatibility list.
- Whether your opener uses a protocol or learn button that needs a separate adapter, which is sold separately by some makers.
- The Wi-Fi band the module supports and the signal strength where it will be mounted.
- How many doors one unit controls and whether extra sensors are needed.
- The sensor type, its wire length or battery, and where it will mount on the door.
- Which voice assistants and home platforms the listing names, and any limits on opening by voice.
- Whether features rely on the maker’s cloud, and what the warranty and return terms say.
Weigh the trade-offs honestly. A cloud-based controller depends on the maker’s service and your internet, while local control options may offer fewer app polish features. Installation involves low-voltage wiring, which is straightforward for many people but not everyone. Opening the door by phone or arrival automation adds convenience and also adds a security consideration that you should think through.
You may want to skip a smart controller if your opener already has built-in Wi-Fi and an app you like, if your garage has no usable Wi-Fi and you do not want to add an extender, or if you would rather not have a network-connected entry point at all. A good wall button and remotes remain a reliable choice.
Compare the picks above, check the current listing for size and what is included, then choose the one that fits how you will use it.
Compatibility in Depth: Why Some Openers Say No
An add-on garage controller has one essential job — imitate your wall button — and compatibility is the story of how openers accept that imitation. Older openers with simple two-wire wall controls are the easy case: the controller bridges the same contacts the button does, and almost any unit works. Newer openers with digital, encoded wall panels are the hard case, because the wire carries a coded conversation rather than a simple contact closure, and the controller must speak the code or use an adapter, a pre-wired remote, or the maker’s own accessory path. This is why compatibility lists exist and why they are organised by brand, era and the colour or type of the learn button and wall panel. Read the list for your exact opener model before buying, not for your brand in general, and treat a neighbour’s success with a different model year as encouragement, not evidence. If your opener is very new, check whether its maker intends add-on control at all; some recent systems route everything through their own app and accessories, and the honest answer for those doors is the maker’s module, not a workaround.
The door sensor is the other half of compatibility, and the half buyers underrate. A controller that can command a door but cannot reliably report its state is a remote, not a smart system: automations, alerts and peace of mind all hang on knowing whether the door is truly closed. Tilt sensors infer state from their own angle and are simple to fit; wired magnetic contacts report the door’s actual position at the frame and shrug off the vibration that can confuse a tilt sensor on a loose sectional door. Whichever yours uses, fit it exactly as directed, pair it before you tidy the wiring away, and test the reporting with the door at several positions — fully closed, fully open and stopped midway — because a sensor that only ever reports the extremes will mislead every automation you build on it.
Wi-Fi in a garage: the unglamorous deciding factor
Garages are where home Wi-Fi goes to struggle: beyond the house’s insulated walls, behind metal doors, at the far end of the router’s patience. Most controllers speak only the longer-range, wall-penetrating band of Wi-Fi, and they need a stable signal at the opener’s ceiling position, not at the doorway where your phone shows full bars. Test at the exact mounting spot, at the time of day your network is busiest, and judge by whether a video call holds, not by a single optimistic reading. If the signal is marginal, the fixes in order of sanity are: move or add a mesh node or access point so coverage reaches the garage properly, choose a controller with an external antenna option if offered, and only then consider repeaters that halve your patience along with your bandwidth. A controller dropping offline is almost never the controller’s character; it is a signal problem wearing the controller as a disguise, and no brand swap fixes physics.
Automations Worth Having, and Those Worth Skipping
The automations that earn their keep are the quiet, defensive ones. An alert when the door has stood open longer than a period you choose catches the classic forgotten-door evening. An automatic close at a set night hour, announced in the app beforehand, turns a nightly worry into a non-event — provided everyone in the household knows it exists, so nobody’s late return becomes a drama. A notification on every opening and closing builds the log that answers ‘did the door move today?’ without a trip outside. Geofenced closing, where the door shuts as your phone leaves the area, sounds elegant and behaves badly at the edges — phones sleep, locations drift, and a door that closes while a family member is still unloading the car teaches the household to distrust the system. Geofenced opening is the one to refuse outright: a door that opens because a phone wandered near is a security feature working in reverse. Build automations that close, alert and log. Keep opening a deliberate human act, confirmed in the app or by a button you press on purpose.
Sharing access without sharing everything
Households are not single users, and a good setup respects that. Give each regular user their own account or profile where the platform supports it, rather than one shared login whose password ends up on a sticky note. Own accounts mean individual activity in the log, access you can revoke when a phone is lost, and notifications tuned per person. For guests, cleaners and delivery needs, prefer time-limited or supervised arrangements: open the door yourself from the app when they arrive, watch it close when they leave, and let the log confirm both. Treat the garage as the house entrance it is — because it usually leads inside — and apply the same instincts you would to a front-door key. If a service or a tradesperson needs regular access, a keypad with its own code, changed when the arrangement ends, is older technology solving the problem more cleanly than a permanent app invitation.
When Things Go Wrong: A Calm Troubleshooting Order
Most controller problems announce themselves as one of three symptoms, and each has a sensible order of attack. If the app shows the controller offline, suspect power and Wi-Fi before the device: confirm the outlet and adapter, confirm your router has not changed its password or band settings, and power-cycle the controller once, fully, before re-pairing anything. If commands work from the app but the door state is wrong, the fault lives in the sensor — check its battery, its alignment and its mounting, because a sensor knocked askew by a stored ladder lies with complete confidence. If the door moves from the wall button but not the app, the break is between controller and opener: the wired contacts, the adapter, or a compatibility limit reached after an opener firmware change. Work from the wall outward, changing one thing at a time, and write down what you changed. The household that keeps a small note — opener model, controller model, sensor type, the date fitted — solves its second problem in minutes, because the first problem taught it what the questions are.
One failure deserves its own paragraph because it frightens people: the door that seems to move by itself. In practice the causes are mundane — a neighbour’s remote on a shared frequency in older systems, a worn wall button shorting in damp, a remote with a book resting on it in a drawer, or an automation someone in the household created and forgot. Rolling-code systems make the stranger-remote cause rare. The methodical response is to check the app’s activity log first, because a logged command names its source; then inspect buttons and remotes; then, if the mystery survives, clear and re-teach remotes per the opener’s manual. Do not respond by disabling the safety sensors or unplugging the opener’s protections — the cure for a confusing door is information, and the log almost always has it.
Three Smart Garage Controller Scenarios
The one-door suburban garage, phones in every pocket
Buy the mainstream controller your opener’s compatibility list blesses, fit the sensor carefully, and set exactly two automations: open-too-long alerts and a scheduled night close. That modest setup delivers nearly all the lived benefit of the category, and it will still be understood by every member of the household in a year.
The two-door garage with a workshop habit
Multi-door support stops being a bullet point and becomes the decision: one system that sees both doors, with a sensor per door, beats two rival apps arguing on your phone. Name the doors clearly in the app — by what is behind them, not by left and right — and give the workshop door the stricter open-alert timing, because it is the one that stands open with tools on view.
The rental or the house you may sell
Favour the controller that fits without permanent alteration, keep every original part you remove, and document the setup for the next occupant or remove it cleanly when you leave. In a rental, written permission for anything wired is the landlord’s to give; a controller that works through a compatible remote-based route may fit the tenancy better than one that wants the opener’s terminals opened.
A Final Decision Checklist for Smart Garage Controllers
Find your exact opener model on the maker’s compatibility list. Decide the sensor type your door construction suits, and plan its mounting before the box arrives. Test Wi-Fi at the opener’s position, honestly, and fix coverage first if it fails. Confirm the controller keeps working your existing remotes, keypad and safety sensors untouched — it must add to the opener’s system, never bypass it. Set your sharing model: individual accounts, logged activity, guest access by invitation and revocation. Choose your automations from the defensive list — alerts, logging, scheduled closing — and decline automatic opening. Keep the note: models, dates, who has access. A controller chosen this way becomes invisible infrastructure, noticed only on the evening it reminds you the door is open, which is precisely the point.
Account Security: The Door Is Only as Safe as the Login
A smart garage controller moves a physical door through an internet account, so the account deserves the hygiene you would give a banking login. Use a unique password for the garage platform — not the household’s shared favourite — and turn on two-factor authentication wherever the app offers it, because the garage is an entrance to the house and should be guarded like one. Keep the app and the controller’s firmware updated; updates in this category are disproportionately security fixes, and an unpatched controller is a risk that compounds quietly. Review the list of signed-in devices and authorised users once in a while, removing the old phone and the ex-partner and the handyman from six months ago. Be wary of third-party integrations you no longer use, and disconnect them rather than leaving dormant permissions in place. None of this is paranoia; it is the same five minutes of maintenance you would give any lock, applied to the lock that happens to live in software.
Power Cuts, Outages and the Manual Door
Every smart setup should be tested against its worst ordinary day: the power is out, the internet is down, and someone needs the car. Know, before that day, how your door behaves. The opener’s manual release — the red cord — disconnects the door for hand operation, and every adult in the household should know where it is and how to use it, and equally how to re-engage the opener afterwards so the door is secure again. Practise once in daylight; the first attempt should not happen by torchlight in the rain. Understand what your controller does when power returns: most simply reconnect and report, and the door stays exactly where it was, which is the correct behaviour — be wary of any setup that promises to restore a door position automatically, because a door that moves on power restoration moves without witnesses. If outages are routine in your area, the battery question belongs to the opener, not the controller, and it is covered in the companion guide to smart openers. The controller’s job in a crisis is smaller and nobler: to have told you the truth about the door’s state before everything went dark.
Add a Controller or Replace the Opener? Drawing the Line
Every controller purchase hides a fork in the road: some doors should get a controller, and some should get a new opener with the smarts built in, and the difference is the existing opener’s health and age. A controller makes sense when the opener is sound — balanced door, reliable mechanics, safety sensors present and working — and merely lacks connectivity. It stops making sense when the opener is at the age where its logic board, its worn drive or its obsolete safety arrangements are living on borrowed time, because the controller’s modest price is then spent smartening a machine whose replacement will include better smarts as standard. A practical test: if you would happily pay to repair this opener when it fails next year, add the controller. If a failure would send you shopping for a new opener anyway, let the controller budget join the opener budget and buy once. There is a middle case worth naming — the opener that is mechanically sound but whose maker has ended app support for its built-in system. There, a third-party controller is not a compromise but a rescue, restoring connected life to a machine with years of mechanical service left, and it is one of the category’s most satisfying purchases.
Renters, landlords and the permission question
Garage controllers sit in a grey zone of tenancy, because they touch a fixture of the property, and the grey zone is navigable with honesty. The clean cases first: a controller that works entirely through a compatible handheld-remote route, changing nothing wired and leaving no mark, is close to a plug-in appliance — though telling the landlord remains the courteous default. Anything that opens the opener’s case, attaches to its terminals or fixes a sensor with screws is an alteration, and alterations want written permission, which landlords grant more often than tenants expect when the request describes the work precisely and promises reinstatement. Keep every part you remove, photograph the opener’s terminals before you touch them, and leave the setup documented if it stays or invisible if it goes. The same courtesy scales to households: the person who parks in the garage daily is a stakeholder in its door’s behaviour, and a controller installed as a surprise — however well meant — tends to be received as surveillance rather than convenience. Announce, explain, share access properly, and the technology becomes what it should be: a household utility, boring and trusted.
Reading the activity log: the feature that quietly matters most
Ask long-term owners which smart feature they would keep if they could keep only one, and a surprising number name the humblest: the log. A faithful record of every opening and closing, with its source — this phone, that remote, the keypad, the wall button — turns mysteries into answers. It proves the door closed on the morning you left in a rush and cannot remember. It shows the pattern of a teenager’s Friday nights without a single accusation being made or needed. It catches the cleaner arriving and leaving inside the agreed window, and it is the first place to look, and usually the last place you need to, when anything about the door feels unexplained. When you compare systems, therefore, ask log questions with the same seriousness as motor questions: how long is history kept, can it be exported, does it distinguish between users and remotes, and does it survive in the app or vanish behind a subscription after a trial period? A controller is a witness as much as a servant, and the quality of its testimony is a buying criterion in its own right.
The household conversation: privacy and the connected door
A connected garage door generates a quiet stream of household information — comings, goings, the hour the house empties and fills — and a thoughtful setup treats that stream as private by design rather than by accident. Decide as a household who can see the activity history, because the app that reassures a parent can feel like monitoring to a teenager, and the difference is a conversation, not a setting. Deliveries and tradespeople need moments of access, not a permanent window into the household’s rhythm. Review the sharing list together once in a while, remove what has lapsed, and let the log be the family’s shared memory of the door rather than one person’s vantage over the rest. Technology that watches the house should be governed by the house, openly. The controller will faithfully record whatever life it is given; wisdom is choosing, together, what that record is for — safety, convenience and peace of mind, in that order, and never as a substitute for simply asking each other.
A closing thought on expectations: a smart garage controller is a small, honest convenience, not a transformation. It will not make the garage tidier, the car newer or the household more punctual. What it does — reliably, once chosen and fitted with the care this guide describes — is remove one small recurring worry from the day and replace it with a fact you can check from anywhere. Bought for that, sized to your opener and your signal, it will feel like money properly spent within the first week. Bought for a brochure’s worth of features, it will feel like an app you maintain. Choose the small, honest version, and let the door simply be known.
FAQ
Will it work with my current opener?
Many controllers work with openers that have a wall button terminal, but the details vary. Look up your opener’s model number and compare it to the maker’s list before ordering.
What happens if the internet goes out?
Remote control through the app usually needs a connection. Your wall button and remotes still work because they talk to the opener directly, so keep them in working order.
Do I need a door sensor?
Most kits include one because without it the app cannot tell whether the door is open or closed. Without a sensor you can only send a toggle command, which can be risky if you are not sure of the door's state.
Can a controller open the door while I am away?
Technically yes, if it is online. Many people use alerts and manual confirmation instead of automatic opening. Consider security before enabling remote or automatic opening.
Will it bypass my opener's safety features?
It should not, because it acts like the wall button. The auto-reverse and photo-eye features remain part of the opener. Test those after installation as the manual describes.
Why won't my module connect to Wi-Fi?
Common causes are a weak signal, a router that combines bands, a 5 GHz network when only 2.4 GHz is supported, or password issues. Test closer to the router and check the maker's setup notes.
Can more than one door be controlled?
Some systems support multiple modules in one app, while others need one per door. Check the listing, and give each door a clear name.
What if the maker stops supporting the app?
Cloud features can stop working if support ends. Keep the wall button and remotes working and check whether the product offers local control or open standards.
Can I install a smart garage controller myself?
Many people can, because installation usually means connecting two low-voltage wires and mounting a sensor. Disconnect power to the opener first and follow the maker's wiring diagram. If you are unsure about the wiring, ask a professional installer.
Do smart garage controllers work with HomeKit, Alexa and Google Assistant?
It varies by model. The Meross, Refoss and ismartgate listings in this guide name different platforms, so check which assistants each one supports. Also check any limits on opening the door by voice.
Will a smart garage controller work with a keypad or my existing remotes?
Usually yes, because the controller acts like the wall button and leaves the opener's own remotes and keypads in place. Keep them as a backup for when the network or power is down.
Does a smart garage controller need a subscription?
Some makers offer optional paid features, so check the listing and the app's terms before you buy. Basic open, close and status control is often available without a plan, but confirm for your model.
Can I give a guest access to my garage door?
Many apps let you invite family or guests with their own accounts, which is better than sharing your login. Check how access is managed in the app and how you can remove it later.
How do I know if my garage opener is too new or too old for these controllers?
Look up the model number on the opener's label and compare it with the maker's list. Very new openers may use restricted protocols, and very old ones may lack standard wall-button terminals, so a compatibility check is the safest approach.
The Short Version
Confirm opener compatibility first, then Wi-Fi band, sensor style and the assistants you use. Compare the maker’s details in each listing and choose the controller that fits your door and your home network.
Related Guides
- How to Choose the Best Smart Garage Door Openers (2026 Guide)
- How to Choose the Best Garage Cabinets: Buyer's Guide (2026)
- How to Choose the Best Garage Shelving: Buyer's Guide (2026)
- How to Choose the Best Garage Door Opener Kits: A Buyer's Guide
- How to Choose the Best Garage Floor Mats: Buyer's Guide (2026)