A geared tripod head moves the camera with knobs instead of a loose ball, so you can nudge the frame a tiny step on one axis and leave the others alone. That suits architecture, where a vertical line that leans slightly or a horizon that sits a hair off is easy to see and slow to fix on a ball head.
The six heads below range from a compact three-axis head to a two-axis pan and tilt head. Load limits, weights and plates come from each product’s listing page, and they are the makers’ own figures. We have not used these heads ourselves. Where listing details disagree, we say so.
As an Amazon Associate we earn from qualifying purchases. Links below are affiliate links, and they do not change the product information we give.

What to Look For
| Feature | Why it matters |
|---|---|
| Axes | Three geared axes (pan, front tilt, side tilt) give full control; two axes give less |
| Load limit | Should clear your camera, lens and any plate with room to spare |
| Weight | A lighter head is easier to carry to a location |
| Plate system | Arca-type plates share parts with many brackets and L-plates |
| Levels and scales | Bubble levels and angle marks help repeat a setup |
In this guide
Specs at a Glance
| Head | Load limit (maker) | Weight | Notes |
|---|---|---|---|
| Benro GD3WH | 13.2 lb (6 kg) | 1.92 lb (870 g) | Arca-Swiss style PU70 plate; bubble level and scales |
| K&F Concept GD-3W | 13.2 lb (6 kg) | 0.81 kg | Full CNC aluminum; 3/8 in base; removable 1/4 in plate |
| Leofoto GW-01 | 6 kg in the bullets; 17.6 lb in the highlight | 2.2 lb | Tilt 90 degrees forward, 30 back, 90 sideways; 360 degree rotation |
| Manfrotto MHXPRO-3WG | 8.8 lb | 1.65 lb | Geared on all three axes; quick-release plate |
| Sunwayfoto GH-PRO II+ | 4 kg (8.8 lb) | 748 g | Geared base pan and top pan; DP-60G plate; 6 year warranty |
| Neewer TH14 | 13.2 lb | Not clear (see text) | Two-way pan and tilt; panoramic Arca-type plate plus a spare plate |
The 6 Best Geared Tripod Heads for Architecture Photography
Top pickBest for studio, still life and building work
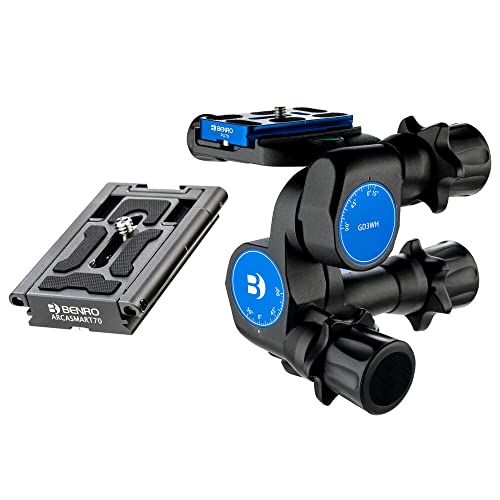
1. Benro GD3WH 3-Way Geared Head
A three-axis geared head with a listed 13.2 lb (6 kg) load limit and a weight of 1.92 lb (870 g). It comes with an Arca-Swiss style quick-release plate and has a bubble level and marked scales for leveling and repeating a setup.
Suits: studio, still life and building work. Strengths: a bubble level, scales and a light body for the load. Weaknesses: the listing’s size figures look like packaging dimensions. Skip it if you want a two-axis head.
Best for a three-axis head with a standard base thread
2. K&F Concept GD-3W 3-Way Geared Head
A CNC aluminum geared head with micro-adjustment knobs on three axes, a 13.2 lb (6 kg) load limit, a 3/8 inch base thread and a removable 1/4 inch quick-release plate. The listing gives its weight as 0.81 kg.
Suits: a three-axis head with a standard base thread. Strengths: a metal body and a 6 kg limit. Weaknesses: the listing names SLR and DSLR cameras, so check plate fit for other bodies. Skip it if you want an Arca-style clamp built in.
View K and F Concept 3-way geared tripod head GD-3W on Amazon
Best for portrait-orientation framing on a geared head
3. Leofoto GW-01 Geared 3-Way Head
A geared head with independent knobs for each axis, 360 degree rotation, 90 degrees of forward tilt, 30 degrees back and 90 degrees sideways for portrait orientation. It weighs 2.2 lb and has a lifetime warranty on the listing.
Suits: portrait-orientation framing on a geared head. Strengths: a wide tilt range and snap-lock knobs. Weaknesses: the listing disagrees with itself on load: 6 kg in the bullets, 17.6 lb in the highlight. Skip it if you need a clear load figure before buying.
View Leofoto GW-01 geared 3-way tripod head on Amazon
Best for lighter camera setups
4. Manfrotto MHXPRO-3WG Geared Head
A geared pan and tilt head that moves one micro step at a time on all three axes. The listing gives its weight as 1.65 lb and its payload as up to 8.8 lb, and says it takes a widely used photographic plate.
Suits: lighter camera setups. Strengths: a low weight and a long-established maker. Weaknesses: the lowest load limit in the group alongside the Sunwayfoto. Skip it if you carry a heavy telephoto.
View Manfrotto XPRO geared 3-way head MHXPRO-3WG on Amazon
Best for landscape and architecture with a lighter kit
5. Sunwayfoto GH-PRO II+ Geared Head
A 748 g geared head with independent base panning, fore-aft tilt, lateral tilt and top panning, an all-metal gear system and a listed 4 kg (8.8 lb) limit. It comes with a DP-60G plate, a 1/4 to 3/8 inch bushing and two Allen wrenches, plus a six-year warranty on the listing.
Suits: landscape and architecture with a lighter kit. Strengths: two panning stages and a long warranty. Weaknesses: a 4 kg limit. Skip it if your camera and lens weigh near that limit.
View Sunwayfoto GH-PRO II+ geared tripod head on Amazon
Best for simple pan and tilt framing
6. Neewer TH14 2-Way Geared Head
A two-axis geared pan and tilt head with -90 to 90 degrees of tilt, 360 degree rotation, a 13.2 lb load limit and fine and large adjustment modes. It includes a panoramic Arca-type plate, a spare plate and a short center column. The listing’s weight of 1.8 ounces looks wrong, so check the weight before you buy.
Suits: simple pan and tilt framing. Strengths: a panoramic plate and a spare plate. Weaknesses: only two axes and an unclear weight. Skip it if you want three geared axes.
View Neewer 2-way geared tripod head TH14 on Amazon
Setup Tips
- Level the tripod first, then use the head for the final tweaks.
- Mount the plate square to the camera so the scales mean something.
- Loosen the quick-adjust knob, set a rough frame, then finish with the fine knobs.
- Re-check the bubble level after you add a heavy lens.
Mistakes to Avoid
- Choosing a head by its load limit alone and ignoring its own weight.
- Assuming every plate fits every clamp.
- Skipping a level check before you tilt.
- Buying a two-axis head when you need side tilt.
Why Geared Control Suits Buildings and Straight Lines
Architecture photography is unforgiving about alignment. A vertical edge that leans a degree or two, or a horizon that droops at one end, is immediately visible in a picture of a building. A ball head moves freely and locks all axes at once, so a small adjustment on one axis can disturb the others. A geared head separates the movements: you turn one knob to tilt forward or back, another to tilt sideways and a third to pan, and each moves in tiny, repeatable steps.
That control matters when you compose carefully on a tripod. You set the camera level, nudge the frame up or down until the lines are right, and then lock it. Because geared knobs resist drifting once set, the frame also tends to stay where you put it when you tighten the locks, though no head is perfectly free from small shifts. The price is speed. Geared heads are slower than ball heads, bulkier and often heavier, so they suit deliberate shooting, such as buildings, interiors, still life and landscape, rather than quick action.
- Choose geared if you compose slowly and care about exact leveling and alignment.
- Choose a ball head if you often move, shoot handheld alternates or need speed.
- Many architecture photographers also use a leveling base or an indexing rotator for panoramas.
Think of a geared head as a precision instrument for a particular style of working, not a general upgrade for everyone.
Two-Axis, Three-Axis and What the Extra Movement Buys You
The number of geared axes decides how much correction the head can do. A three-axis head moves the camera forward and back, side to side and in a pan. That lets you correct a tilt in any direction without moving the tripod legs. A two-axis head offers pan and one tilt, and some also provide a second tilt for portrait orientation. If you need to correct a lean in a vertical line caused by a sideways tilt of the camera, you need a head with side tilt, or a separate leveling tool.
For architecture, a leveled camera is crucial, so check whether the head has a bubble level and whether you can see it from your shooting position. Some heads offer a separate leveling base or a half-ball adapter that sits between the legs and the head. That lets you level the platform first and use the head for the final framing, which is an efficient way of working.
Panning matters when you build a panorama or shoot a sequence of overlapping frames. A scale marked in degrees on the pan axis lets you repeat precise rotations, and a separate base pan lets you rotate the whole head without disturbing the top. Check that the pan has enough friction control and that it does not drift while you move other axes.
- Three axes: more flexibility for correcting a tilted setup.
- Two axes: simpler and lighter but less corrective power.
- Added pan scales and base pans: helpful for stitching.
Load Rating and Real-World Headroom
A head’s load rating is the weight the maker says it will hold. For precise work, you want to be comfortably below that figure, not close to it. The camera, lens, any L-bracket or plate, a flash or a tilt-shift lens adapter all add up. Tilt-shift lenses, popular for architecture, are often heavier than similar standard lenses and sit further from the head, which increases leverage on the tilt knobs.
Balance matters as much as weight. A lens that extends far forward creates a turning force, and a head can creep when a heavy front-loaded setup is not well balanced. Use a plate or lens collar that lets you slide the camera until the center of mass is over the head. If the camera droops when you loosen a lock, the head is overloaded or the setup is unbalanced.
The post lists load figures that come from each maker, and one listing gives two different figures, so verify your numbers before buying. Add the weight of your actual kit, then allow a margin. A rule many photographers follow is to choose a head rated well above the kit, though the exact margin is a matter of preference and use.
Also check the tripod. A heavy-duty head on light legs is not stable, and a precise head on an unstable tripod loses its advantage. Make sure the legs, head and plate work together as a system.
Plates, Clamps and Compatibility With Your Gear
Plate systems determine how your camera attaches and how many accessories you can use. Arca-style plates and clamps are widely used because many brackets, L-plates and straps share the same dovetail profile. If your camera, lens and other gear already use that profile, an Arca-compatible head saves you from buying new adapters. Proprietary plates work only with their own system, which can be a limitation if you change heads.
Check the clamp type. A knob clamp is simple and strong, while a lever clamp is quicker but may need adjusting to fit different plate widths. Make sure the clamp tightens evenly and has a safety stop to prevent the plate sliding out. A plate that is too short for the camera body may rotate. A plate with an anti-twist lip or two screw points helps prevent that.
Also look at thread sizes. Most heads attach to the tripod by a standard 3/8 inch thread, with an adapter for 1/4 inch tripods or plates. Check the listing for the base thread, and confirm that your tripod’s top plate accepts it. Heavy lenses and tilt-shift adapters often have their own foot, and you should check whether it fits the clamp.
- Match plate and clamp styles before buying.
- Check the thread size on your tripod and head.
- Confirm that L-brackets do not interfere with the geared knobs.
- Keep a spare plate and the right hex key in your bag.
Field Technique, Weight Trade-Offs and Care
A geared head works best with a routine. Set up the tripod on firm ground and level the legs as closely as you can, then use the bubble level on the head. Mount the camera square on the plate, balance the lens and use the coarse unlock to bring the frame close to what you want. Switch to the fine knobs for the final move, checking the grid or electronic level in the viewfinder, and then lock the axes. Re-check the frame after locking, since some heads shift slightly.
Weight matters when you carry the kit to a location. Geared heads tend to be heavier than ball heads of similar capacity, so consider the total weight of the head, tripod and bag. If you often walk to sites, a lighter head with a lower load rating may suit a lighter camera, while a studio user may accept more weight for more capacity. Be honest about how far you carry gear.
Care is straightforward. Keep the gears clean and free of grit, especially after use on a beach or at a construction site. Wipe the knobs and the dovetail clamp, and avoid putting oil on friction surfaces unless the maker advises it. Do not force a stuck knob; check for debris first. Store the head with the knobs slightly loosened to avoid putting stress on the gears.
Signs that a head needs service or replacement include play in an axis, a knob that slips, an unreliable lock, a plate that no longer seats firmly and grinding noises when you turn the gears. A head that drifts under load is a risk for expensive equipment, so stop using it and contact the maker.
Why Geared Heads Suit Building Photography
Architecture work rewards patience and precision. Verticals should stay vertical, horizons should sit level, and a tiny nudge can ruin careful framing. Geared heads such as the Benro GD3WH, the K and F Concept GD-3W, the Leofoto GW-01 and the Manfrotto MHXPRO-3WG move each axis with a knob, so you can adjust one direction without disturbing the others.
| Axis | What the knob does | Why it matters for buildings |
|---|---|---|
| Tilt forward and back | Raises or lowers the camera angle | Controls converging verticals |
| Side tilt | Rolls the camera left or right | Levels the horizon precisely |
| Pan | Rotates the camera on its base | Helps with stitched panoramas and exact alignment |
A ball head moves faster, but a geared head trades speed for control. If you shoot interiors or facades on a tripod and take your time, the slower method is often a good fit.
Weight Limits, Plate Type and Setup Notes
The head must support your camera, lens and any accessories with room to spare. Treat the weight limit in the manual as a ceiling, not a target.
- Maximum load: add up camera body, lens, plate and any flash or bracket, then compare with the maker’s stated limit.
- Plate system: check whether the head uses a standard quick-release plate or a proprietary design, since this affects which accessories fit.
- Built-in levels: a bubble level on the head or plate helps with quick leveling.
- Knob placement: make sure you can reach the controls while looking through the viewfinder or screen.
- Weight and size: a heavier head adds stability but is a burden on long walks around a site.
Mount the head on a tripod built for at least the same load. Level the tripod first, using its legs or a leveling base if it has one, then fine-tune the framing with the geared knobs. Tighten locking controls firmly, and avoid knocking the rig after a long exposure begins.
Wipe off dust and moisture after outdoor shoots, and do not force a knob that feels stiff. Lubricating internal gears is best left to the maker’s service team unless the manual says otherwise.
When working near streets, stay aware of traffic and private property rules, and ask permission where it is required.
For interiors, remember that long exposures magnify any shake. Use a remote release or a timer, switch off lens stabilization if the maker advises it for tripod use, and let the rig settle for a moment after you adjust the final knob before pressing the shutter.
Geared Tripod Head FAQ
Is a geared head better than a ball head?
It is slower but more exact. A ball head is quicker for moving subjects.
Do these fit any tripod?
Most use a 3/8 inch base thread. Check each listing for the thread and any adapter.
Do I need a geared head for architecture photography?
No. Many photographers use ball heads, leveling bases or tilt-shift lenses with success. A geared head helps with precise, repeatable adjustments and slow composition. It is a preference, not a requirement.
Is a three-axis geared head better than a two-axis head?
Three axes give more correction, particularly for sideways tilt. Two-axis heads are simpler and sometimes lighter. Choose according to how much correction you need.
Should I use a leveling base with a geared head?
A leveling base can speed up setup, because it allows you to level the platform quickly and then use the head for fine framing. It adds weight and cost, so decide whether you need it.
What load rating should I look for?
Choose a head rated well above the weight of your camera, lens and accessories, since the rating is the maker's figure. Heavier, front-loaded setups need extra headroom.
Will a geared head work with a tilt-shift lens?
Many photographers use them together, but check the weight and balance, and make sure the plate and clamp can support the lens foot. Verify with the maker if you are unsure.
Why does the frame move when I tighten the locks?
Some slight movement is common, because tightening shifts parts a tiny amount. Make your final adjustment, tighten the lock and check the frame again. If it moves a lot, the head may be overloaded or worn.
How do I clean the gears?
Brush off grit with a soft brush and wipe surfaces with a dry cloth. Avoid using lubricants unless the manual says to. If the gears feel gritty, ask the maker for advice.
Can I use a geared head for video?
Some people use geared heads for slow, precise moves, but they are not designed as fluid video heads. Check the head's specifications and consider a dedicated video head if smooth pans matter.
The Short Version
For a balanced three-axis head, the Benro GD3WH or the K&F Concept. For wide tilt, the Leofoto. For a light payload, the Manfrotto. For two panning stages, the Sunwayfoto. For a simple two-axis head, the Neewer.
How to Judge geared tripod head Quality Beyond the Headline Features
The headline features of any geared tripod head are the easiest part to compare, but they are rarely what decides whether you still enjoy using it a year from now. When you are making fine, repeatable camera movements for architecture and product work, the details that matter most tend to be the ones you feel every single day: how smoothly parts move, how predictable the behaviour is, and how much small friction builds up between you and the job you actually want to do. A sensible way to judge quality is to separate the purchase into three layers. The first layer is the core job, the one task the product exists to do. The second layer is everything that supports that job, such as handling, build, compatibility and ease of cleaning or maintenance. The third layer is ownership over time: spare parts, support, and how gracefully the product ages when it is used hard rather than admired on a shelf.
A useful exercise before you buy is to write down the three situations in which you will use the product most often, in plain language, and then test every candidate against those situations rather than against an idealised best case. Products that look similar on a comparison table often separate quickly once you ask concrete questions. What happens on a rushed morning, on a long day, or in awkward conditions? Does the design still make sense when you are tired, hurried or working in a tight space? The options in the main list above were chosen because they cover different answers to those questions, from simple and robust to feature-rich and specialised, so the honest comparison is not which one is best in the abstract but which one matches your three situations most closely.
It also helps to distinguish between limitations you can work around and limitations you cannot. A workaround you perform once, such as an initial setup step or buying one inexpensive accessory, is a minor cost. A workaround you must repeat every single session is a design mismatch, and it will quietly push the product into a drawer or onto a resale listing. As you read the individual reviews above, pay attention to the skip-if notes: they exist precisely to flag those repeat-every-time mismatches, and they are usually a more reliable guide than the headline strengths.
Setting Up and Getting the First Week Right
The first week with a new geared tripod head teaches you more than any specification sheet, provided you use that week deliberately. Start with the simplest possible version of your routine for making fine, repeatable camera movements for architecture and product work. Resist the urge to test every feature at once, because when something disappoints you will not know whether the cause was the product, your settings, or simple unfamiliarity. Change one variable at a time, keep the rest of your routine constant, and note what actually changed. A few lines in a notebook or phone note, written immediately after a session, are worth more than a detailed memory reconstructed days later.
Pay attention to the order in which problems appear. Early problems are usually fit and familiarity problems: things feel awkward because your hands, your workspace or your habits were built around different equipment. Those problems often fade within days. Problems that persist into the second week, and that you find yourself planning around, are the real signals. If you bought from a retailer with a returns window, treat that window as part of the product test rather than as an embarrassment to avoid. A return made for a clear, observed reason is a successful test, not a failed purchase.
Finally, set the product up for the way you will actually store and reach for it. Equipment that lives in its working position gets used; equipment that must be unpacked, assembled or fetched from another room gets skipped on busy days. Where your geared tripod head lives, how it is stored between sessions, and how quickly it returns to a ready state will shape your results as much as any feature on the box.
Technique Matters More Than Most Upgrades
Experienced architecture photographers tend to agree on an unglamorous point: technique explains more of the final result than the difference between good products in the same class. That is good news, because technique is free. The core skill in making fine, repeatable camera movements for architecture and product work is consistency: doing the same sensible steps in the same order until they become automatic, so that when you do change something, the effect is visible and repeatable. Random variation hides cause and effect; consistency reveals it.
Build a short baseline routine and write it down. Include the preparation steps people usually skip, the order of operations, and the one or two checks you perform before you start and after you finish. Then, when a result disappoints, walk the routine backwards and find the first step that differed from the baseline. Most disappointments trace back to a hurried preparation step, a skipped check, or an environmental factor such as temperature, light, clutter or fatigue, rather than to the product itself. Fixing the step is cheaper and more satisfying than replacing the product.
When you do upgrade, upgrade the bottleneck. If your routine is consistent and one specific step still limits you, that step is where money earns its keep. If your routine is inconsistent, a better product mostly gives you more expensive inconsistency. This is why the picks above are organised by use case rather than by a single ranking: the right upgrade for a beginner building consistency is rarely the right upgrade for an experienced user chasing a specific capability.
Common Mistakes and How to Avoid Them
The most common mistake with any geared tripod head is buying for an imagined routine instead of a real one. It is easy to picture the ambitious version of making fine, repeatable camera movements for architecture and product work: the big project, the demanding trip, the elaborate session. Most of life, though, is the ordinary version, and a product optimised for the rare ambitious day often performs worse on the ordinary days that make up ninety percent of its use. Buy for the routine you have, and let the ambitious version be the pleasant surprise rather than the design brief.
A second mistake is ignoring compatibility until after the purchase. Compatibility is not only about whether two things physically connect or fit. It is also about sizes, clearances, weights, power, software, and the accessories you already own. Before ordering, list what the new product must work with, measure the spaces it must fit into, and check the makers’ own compatibility notes rather than relying on a marketplace answer written about a different model. Five minutes with a tape measure and a compatibility list prevents the most frustrating category of return.
A third mistake is neglecting the boring consumables and care items that keep the product working: the correct cleaning method, the replacement part that wears out, the storage condition that prevents damage. Owners who build a tiny maintenance habit, a few minutes on a regular rhythm, routinely get years more service from mid-range products than careless owners get from premium ones. The premium price buys capability; the maintenance habit is what lets you keep it.
Matching the Picks Above to Real Situations
Because the list above covers several different approaches to the same job, it helps to translate the picks into situations. If your priority is simplicity and reliability above all else, favour the pick whose review emphasises straightforward operation and easy care, even if its feature list looks shorter. Features you never use do not merely add nothing; they add weight, cost, cleaning burden and failure points. If your priority is room to grow, favour the pick with the widest compatibility and the most standard fittings, because it will absorb future accessories and changes of routine without forcing a replacement.
If you work in demanding conditions, heat, cold, moisture, dust, travel or long continuous sessions, weight the durability and protection notes in each review more heavily than the convenience notes. Convenience features are designed for comfortable conditions; protection features earn their value precisely when conditions stop being comfortable. Conversely, if your use is entirely at home or in a studio, protection you will never need is dead weight, and the lighter, simpler, easier-to-clean option is usually the smarter buy.
Budget deserves a situation-based answer too. Spending more makes sense when the expensive pick removes a step you perform constantly, solves a compatibility problem you definitely have, or survives conditions you definitely face. Spending more makes little sense when the difference is a capability you might use someday. A practical rule: pay for the problems you already have, not for the problems you can imagine. The comparison notes in each review above are written to help exactly that judgement, pick by pick.
Care, Cleaning and Long-Term Ownership
Long-term ownership of a geared tripod head is mostly a story of small habits. Clean the product the way the maker directs, with the materials the maker approves, and be suspicious of aggressive shortcuts: harsh chemicals, abrasive pads and improvised tools cause more cumulative damage than the dirt they remove. Where the maker is silent, the conservative default is warm water, a soft cloth, mild detergent where appropriate, and patience. Let things dry fully before storage, because trapped moisture is a slow and silent enemy of metals, fabrics, seals and electronics alike.
Inspect wear points on a schedule rather than waiting for failure. Straps, hinges, seals, threads, contacts, edges and moving joints all announce their decline gradually: stiffness, play, fraying, discolouration, roughness or a new noise. Catching wear early usually means a cheap replacement part or a small adjustment; catching it late can mean a ruined session or a damaged companion product. Keep the small spares and tools that came in the box together in one labelled place, because the day you need them is never the day you want to search for them.
Storage deserves the same thought as use. Store the product clean, dry, unloaded where the maker advises it, and away from extremes of heat and damp. If it travels with you, protect it from the two forces that damage equipment most in transit: impact and abrasion. A modest case, wrap or divider system, used consistently, preserves both function and resale value far better than careful intentions.
Understanding the Trade-Offs in This Category
Every geared tripod head design is a bundle of trade-offs, and understanding the main ones makes the reviews above much easier to use. The first trade-off is capability versus simplicity. More capability usually means more adjustments, more modes or more parts, and each addition asks something of you: learning time, setup time, or attention during use. The second trade-off is size and weight versus capacity and comfort. Bigger and heavier designs can carry more, reach further or run longer, but they ask more of your body, your vehicle and your storage space. The third trade-off is specialisation versus versatility. A specialised product does one job beautifully and other jobs reluctantly; a versatile product does everything adequately and nothing perfectly.
None of these trade-offs has a universally right answer, which is why honest reviews describe them instead of hiding them. When a review above lists a limitation, read it as a coordinate rather than a verdict: it tells you where that product sits on the trade-off map. Your job as a buyer is simply to know where you sit on the same map. If you are unsure, versatility and simplicity are the safer defaults, because most people overestimate how specialised their routine really is, and an adequate tool used constantly beats a perfect tool used rarely.
Price interacts with trade-offs in a way worth stating plainly. Higher prices in this category usually buy refinement: smoother operation, better materials, tighter tolerances, better support. They rarely buy a different category of result. A careful user with a mid-priced pick and a consistent routine will outperform a careless user with the flagship almost every time, which is another way of saying that the reviews above matter less than the habits in these added sections.
A Practical Checklist Before You Buy
Before ordering any geared tripod head, run through a short written checklist. First, state the job in one sentence: what will this product do, how often, and where. Second, list everything it must be compatible with, including sizes, fittings, power and the accessories you already own. Third, measure the space it will live in and the space it must pass through. Fourth, decide which single trade-off you care about most, capability, size, simplicity or specialisation, and let that decision rank the shortlist. Fifth, check what ownership requires: cleaning method, wear parts, warranty terms and the maker’s support route.
Sixth, re-read the review of your leading candidate and look specifically for the skip-if line. If it describes you, believe it and move to the next candidate; reviewers include those lines because they are the most common source of returns and regret. Seventh, if two candidates still tie, choose the one that is easier to return, easier to service, or already owned and understood by people whose use resembles yours. Ties are broken better by ownership practicalities than by one more comparison video.
Finally, plan the first week when you order, not when the box arrives. Decide your baseline routine, what you will keep constant, and what single thing you will test first. A purchase approached this way rarely disappoints, because even if the product turns out to be wrong for you, you will know exactly why, and the next choice will be right.
Questions Worth Asking That Spec Sheets Do Not Answer
Specifications answer the questions makers find easy to print. Ownership raises different questions. How does the product behave at the end of a long day rather than the start of a short one? What does it feel like to clean after the messiest realistic session, not the tidiest? Which part will wear first, what does that part cost, and can you replace it yourself? How does the product behave slightly outside its intended conditions, because real life will take it there? The reviews above try to answer several of these from listing information and category knowledge, and where a listing is silent, that silence is itself worth noticing.
Another under-asked question is what the product demands of the rest of your kit. Some products quietly require companions: a particular fitting, a stronger support, a bigger bag, a different workflow. Total cost of ownership is the purchase price plus those companions plus the wear parts over the years you will keep it. A seemingly expensive pick that needs nothing extra can be cheaper to own than a bargain that drags three accessories behind it. When you compare the picks above, compare whole systems, not single items.
The last question is about exit. If your routine changes, can the product adapt, be handed on, or be sold without embarrassment? Standard fittings, transferable warranties and durable construction all preserve options. Unusual proprietary choices can be worth it for a committed specialist, but they narrow your future, and that narrowing should be a conscious decision rather than a surprise.
Building a Routine That Gets the Most From Your Choice
Whichever pick you choose from the list above, the return on it will be decided by the routine you build around making fine, repeatable camera movements for architecture and product work. Keep the routine short enough to survive a busy day: a preparation step you can do in minutes, a consistent working method, and a two-minute reset afterwards that leaves everything ready for next time. Routines fail when they depend on motivation; they succeed when they depend on arrangement. Put things where the routine needs them, in the order the routine needs them, and remove every step that exists only because it has always existed.
Review your routine monthly with fresh eyes. Ask which step produces the most value and which produces the most friction, and be willing to move effort from the second to the first. Small routine improvements compound quietly: a slightly better arrangement, a slightly earlier check, a slightly more consistent setting. Over a season, those small improvements are worth more than most equipment upgrades, and they transfer free of charge to whatever equipment you own next.
Share the routine if you work or live with others who use the same equipment. A shared baseline means anyone can pick up the kit and get a predictable result, and it means problems get diagnosed against a known standard instead of against five private habits. Consistency is a team sport as much as a personal one, and the best-equipped households and studios are usually the ones where the routine is written down, visible and boringly reliable.
More Questions, Answered
How long should a good geared tripod head last with regular use?
With regular use and the basic care described above, a well-made geared tripod head should serve for years rather than months. Lifespan depends far more on handling, cleaning and storage than on the purchase price alone. Wear parts are the exception: items designed to be replaced should be replaced on the maker’s schedule, and doing so on time is what allows the main product to reach its full lifespan.
Is it worth paying more for a premium geared tripod head?
It is worth paying more when the premium version removes friction from a step you perform constantly, solves a compatibility need you definitely have, or offers support and spare parts you will actually use. It is rarely worth paying more for a capability you expect to grow into someday. Buy for the routine you have now, and let a proven, repeated limitation, not enthusiasm, trigger the next upgrade.
What should I check first if results disappoint?
Check your routine before you blame the product. Return to your written baseline, confirm each preparation step was done properly, and change only one variable in the next session. Most disappointing results trace back to a skipped preparation step, an environmental factor, or an unfamiliarity that fades with practice. If the same problem survives several careful, consistent sessions, then the product itself is the likely cause and a different pick from the list is justified.
Can one geared tripod head suit both beginners and experienced users?
Sometimes, but the honest answer is that beginners benefit most from simplicity and forgiveness, while experienced users benefit from control and compatibility. A versatile mid-range pick often serves both reasonably well, which is why several options above aim at that middle ground. What a beginner should avoid is a highly specialised product whose strengths only appear inside a narrow, advanced routine.

