A compound microscope uses two lens systems, the objective near the slide and the eyepiece you look through, to magnify thin, light-passing specimens such as cells, pond water and plant tissue. It suits classrooms, homeschool science and hobby labs, but models vary widely in optics and in how sturdy they feel.
We have not used these products ourselves, so this guide makes no claims about image quality from our own bench. It shows how to choose by looking at the parts that shape what you can see and how easily you can use it, so you can compare listings with confidence.
As an Amazon Associate we earn from qualifying purchases. Links on this site are affiliate links, and they do not change the information we give.

In this guide
Quick Picks
| Pick | Product | Best For |
|---|---|---|
| 1 | AmScope M150C Compound Microscope | Best budget monocular for students and home labs |
| 2 | AmScope B120C Binocular Compound Microscope | Best binocular step-up with a mechanical stage |
| 3 | SWIFT SW350B Compound Microscope | Best research-style binocular for serious hobby use |
| 4 | SWIFT SW350T Trinocular Microscope with 1.3MP Camera | Best for sharing and recording images |
| 5 | AmScope T490B Trinocular Compound Microscope | Best heavy-duty halogen trinocular for lab benches |
Our Picks
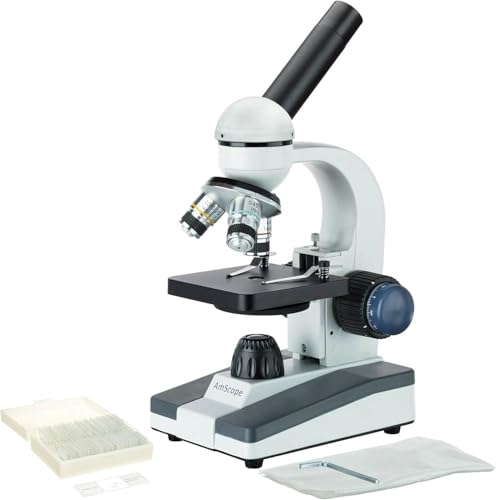
1. AmScope M150C Compound Microscope — Best budget monocular for students and home labs
The M150C is the straightforward student pattern this guide describes: a monocular head, all-metal frame and optical glass lenses rather than plastic. Two wide-field eyepieces, WF10x and WF25x, combine with three DIN achromatic objectives (4x, 10x and 40x) to give a 40X to 1000X range, which covers the pond water, cells and tissue work the FAQ mentions. LED illumination keeps heat off the slide, and this cordless version can run away from a socket, which helps at a kitchen table or in a classroom without free outlets. Coaxial coarse and fine focus knobs sit on the same axis, so you can focus in the order the care tips suggest, starting low and stepping up, and a 0.65 NA single-lens condenser shapes the light. The plain stage uses clips rather than a mechanical slide holder, so pick it for first-time users who value simple handling over precise slide scanning.
View AmScope M150C Compound Microscope on Amazon

2. AmScope B120C Binocular Compound Microscope — Best binocular step-up with a mechanical stage
The B120C answers the two upgrades the buying table points to: a binocular head and a proper mechanical stage. The Siedentopf head adjusts interpupillary distance without losing focus, and pairs of WF10x and WF25x eyepieces work with four achromatic objectives, 4x, 10x, 40x spring and 100x spring oil, to span 40X to 2500X. Brightfield LED illumination feeds a 1.25 NA Abbe condenser with an iris diaphragm, so brightness and contrast can be tuned instead of simply switched on. The double-layer mechanical stage moves the slide on two axes with scale markings, which matters at high power where hand nudges overshoot, and coaxial coarse and fine focus is standard. A bottle of immersion oil is included for the 100x objective. Choose the B120C for regular coursework or hobby lab sessions where longer viewing comfort and repeatable slide positioning justify the step up from a monocular scope.
View AmScope B120C Binocular Compound Microscope on Amazon

3. SWIFT SW350B Compound Microscope — Best research-style binocular for serious hobby use
The SWIFT SW350B follows the same research-grade pattern as the B120C but in SWIFT’s own frame and finish. A swiveling Siedentopf binocular head carries interchangeable wide-field 10X and 25X eyepieces, and four achromatic objectives give the 40X to 2500X range listed by the maker. The two-layer mechanical stage and Abbe condenser with iris diaphragm match the checks in the stage and illumination rows of the table: slides travel smoothly under control, and light can be stopped down for transparent specimens that wash out under full brightness. LED illumination and coaxial coarse and fine focus round out the controls. It suits students moving into regular lab work and hobbyists who want the full control set, mechanical stage, condenser and both eyepiece pairs, in one package without adding a camera. Compare it directly with the B120C on head comfort and stage feel, since the optical specification is similar.
View SWIFT SW350B Compound Microscope on Amazon
4. SWIFT SW350T Trinocular Microscope with 1.3MP Camera — Best for sharing and recording images
The SW350T is the trinocular version of the SW350B, built for the extras row of the buying table: sharing and recording. A third vertical port takes the included 1.3MP camera, which connects to Windows and Mac computers with the supplied software, so a class or family can watch the slide on a screen instead of taking turns at the eyepieces. Under the head it keeps the same specification, Siedentopf binocular viewing, wide-field 10X and 25X eyepieces, four objectives for 40X to 2500X, a two-layer mechanical stage and an Abbe condenser. That makes it a teaching and documentation pick rather than an optical upgrade, and it is the natural choice for homeschool groups, clubs and anyone who keeps a photo record of specimens. Check your computer’s ports and operating system against the camera requirements before ordering, and note the camera shares light with the eyepieces, so the live view is dimmer than direct viewing.
View SWIFT SW350T Trinocular Microscope with 1.3MP Camera on Amazon

5. AmScope T490B Trinocular Compound Microscope — Best heavy-duty halogen trinocular for lab benches
The T490B is the heavy frame in this group, a trinocular lab microscope with a sliding head, WF10x and WF20x eyepiece pairs and four DIN achromatic objectives giving 40X to 2000X. Illumination is halogen rather than LED, which some lab users prefer for its spectrum and which the maker pairs with an Abbe condenser for brightfield work. The two-layer mechanical stage includes a stage stop to protect slides and the 100x oil objective from contact damage, one of the mistakes the guide warns about, and the trinocular port accepts a camera later if you do not need one today. The frame and focus mechanism are built for bench use rather than carrying between rooms, so it fits a fixed lab corner, school prep room or veterinary and clinical bench better than a portable setup. Choose it when build weight, halogen light and an upgrade path to imaging matter more than battery or LED convenience.
View AmScope T490B Trinocular Compound Microscope on Amazon
What to Look For
| Factor | Why it matters | What to check |
|---|---|---|
| Magnification range | Higher numbers are not always more useful; clarity and working distance matter as well. | Multiply eyepiece power by each objective and check the total range listed. |
| Objective lenses | Glass lenses and a good turret give sharper views and smooth switching between powers. | Look for glass optics, a stated lens coating and the number of objectives. |
| Illumination | Light from below passes through the slide, and brightness control affects detail. | Compare LED or halogen options, dimmer control and whether a battery option exists. |
| Stage and focus | A mechanical stage holds slides steady, and coarse and fine focus knobs help you reach a sharp image. | Check for a slide clip or mechanical stage and for both focus knobs. |
| Frame and build | A heavier metal frame resists wobble at high power, while plastic bodies are lighter for travel. | Look at material, weight and any lock on the focus mechanism. |
| Extras | Slides, covers and camera ports can add value if you plan to share or record images. | Read what is in the box and whether a camera or trinocular port is offered. |
Setup and Care Tips
- Carry the microscope with one hand on the arm and the other under the base.
- Begin with the lowest power objective, focus there, then move up in steps.
- Clean lenses only with lens paper or a soft brush, never with rough cloth.
- Turn the light down and unplug the unit when you finish.
- Cover the microscope after use and keep it in a dry place to protect the optics.
Mistakes to Avoid
- Judging a microscope by the biggest magnification number on the box.
- Buying a unit with plastic lenses when glass optics are available.
- Forgetting that slides must be thin and light-passing for this type of scope.
- Skipping the check on whether replacement bulbs or parts are available.
- Lowering the objective toward the slide while looking through the eyepiece.
Reading Optical Specifications Without Getting Lost
Microscope listings pack a lot of numbers into a few lines, and the numbers do not all carry the same weight. Magnification is the figure that gets printed in large type, yet it is the least informative on its own. A system can enlarge an image many times and still show a soft, dim blur if the glass and the light path are poor. Learn to read the supporting details first.
Objective Lenses
Most compound models carry a turret with several objectives, commonly marked 4x, 10x, 40x and sometimes 100x. Each objective also carries a numerical aperture value, often engraved on the barrel. A higher aperture generally means the lens gathers more light and resolves finer detail, so it matters more than a bigger multiplier. Check whether the listing states the objective type, such as achromatic, which is a common and sensible choice for learners.
Eyepieces and Total Magnification
Total magnification is the objective power multiplied by the eyepiece power. A 10x eyepiece with a 40x objective gives 400x. Some sellers advertise very large totals by adding a second lens or by using digital zoom, and those figures say little about real detail. Look for the optical total and treat anything beyond that as marketing.
- Field of view shrinks as you move to higher power.
- Wide-field eyepieces make long sessions more comfortable.
- Glass optics usually hold up better than plastic ones.
Illumination Options and What They Change
Light is half of the microscope. Without even, adjustable illumination, good lenses cannot do their job. Listings usually describe one of three lamp types, and each has a different personality at the bench.
| Light source | Typical traits | Good fit |
|---|---|---|
| LED | Runs cool, uses little power, often works on batteries | Classrooms, travel, young users |
| Halogen | Warm, bright output with a yellowish tint, can get hot | Long bench sessions, stained slides |
| Mirror | Needs an outside lamp or window, no electrical parts | Backup use, very basic setups |
Whichever you pick, look for a dimmer or brightness dial. Thin, pale specimens such as onion skin need low light, while dense tissue needs more. A fixed-brightness lamp forces you to hunt for workarounds. Also note whether the lamp sits below the stage, which is the usual transmitted-light layout for a compound design.
Stage, Focus and Mechanical Feel
The mechanical parts decide how pleasant the instrument is after the novelty wears off. A wobbly stage or a gritty focus knob turns every session into a chore, especially for children who are still learning to handle delicate equipment.
Mechanical Stage Versus Clips
Stage clips simply hold a slide in place, and you slide it by hand. A mechanical stage has two small knobs that move the slide in a controlled way along both axes. At high power, even a slight nudge sends the specimen out of view, so a mechanical stage is a real convenience once you pass the lowest settings.
Coarse and Fine Focus
Coarse focus makes large moves and fine focus makes small ones. Some designs put both on a shared coaxial pair of knobs, which keeps the controls compact. Check whether the listing mentions a tension adjustment, because a tight but smooth knob stays put while a loose one drifts and lets the stage creep downward.
- Metal frames tend to resist flexing better than plastic.
- A solid base reduces vibration at high power.
- Rack-and-pinion focus is common on sturdier instruments.
Monocular, Binocular and Trinocular Heads Compared
The head is the part you look through, and the choice affects comfort, cost and what you can do with the images afterward. None of these is better in every case. Pick the layout that fits how long you sit at the instrument and whether you want to share what you see.
| Head type | What you get | Consider it when |
|---|---|---|
| Monocular | One eyepiece, simple and light | Short sessions, tight budgets, young learners |
| Binocular | Two eyepieces, relaxed viewing | Longer sessions, adult users |
| Trinocular | Two eyepieces plus a camera port | Recording, teaching, sharing images |
Binocular heads usually let you adjust the spacing between the eyepieces to suit your eyes, and many offer a diopter ring to balance differences between left and right. A trinocular head adds a vertical tube for a camera, so confirm which adapter size the listing expects before you plan to attach one.
Slides, Stains and Specimens to Try
An excellent microscope still needs something worth looking at. Many kits include a handful of prepared slides, and they are a fine way to begin because the hard preparation work is already done. Over time, though, most owners want to make their own.
Easy Specimens at Home
- A thin layer of onion skin on a clean slide, with a drop of water.
- A single hair or a thread to study texture.
- A drop of pond or puddle water for tiny moving organisms.
- A leaf peel, made with clear tape lifted from the underside.
- Salt and sugar crystals for a quick comparison of shapes.
Place a thin cover slip over wet mounts to flatten the sample and keep the objective lens dry. Thick specimens block light and refuse to come into focus, so slice or press them as thin as you can. If you use stains or dyes, follow the instructions on the product and work on a protected surface.
Troubleshooting Common Viewing Problems
New users often assume something is broken when the image looks poor. In most cases the fix is a small adjustment rather than a repair.
| Symptom | Likely cause | What to try |
|---|---|---|
| Dark or uneven field | Lamp too low, objective not clicked into place | Raise brightness, rotate the turret until it seats |
| Cannot find focus | Began at too high a power | Return to the lowest objective and refocus |
| Spots that move with the eyepiece | Dust on the eyepiece lens | Clean gently with proper lens tissue |
| Spots that move with the slide | Debris on the slide | Wipe or replace the slide |
| Image drifts out of focus | Loose focus tension | Adjust the tension collar if the model has one |
Always work upward from low power. Centre the specimen, focus, and only then switch to a stronger objective. Use the fine focus control alone at high power, since the coarse knob can drive the lens into the slide.
Glossary of Terms You Will Meet in Listings
- Numerical aperture: a measure of how much light an objective collects, tied to the detail it can resolve.
- Parfocal: objectives set so the image stays roughly in focus when you change power.
- Condenser: a lens beneath the stage that shapes light onto the specimen.
- Diaphragm: an adjustable opening that controls how much light passes through.
- Working distance: the gap between the objective and the slide when in focus.
- Cover slip: a thin square of glass or plastic placed over a mounted sample.
- Wide field: an eyepiece design that offers a larger view.
Knowing these words helps you spot vague descriptions. When a listing leaves out the objective type or the condenser details, treat that as a prompt to look at the maker’s specification sheet.
A Short Checklist Before You Decide
- Decide who will use it and for how long each session runs.
- Choose monocular, binocular or trinocular to match that use.
- Confirm glass optics and a stated objective type.
- Look for adjustable lighting with a dimmer.
- Check for a mechanical stage if you plan to work at high power.
- Note what power source the lamp needs.
- Read what accessories and slides come in the box.
- Check the return and warranty terms on the listing.
Work through these points in order and the choice usually narrows quickly. Keep the dust cover on between sessions, store the instrument in a dry place, and follow the maker’s instructions for cleaning and bulb replacement. A little routine care keeps even a modest instrument useful for years of learning.
Matching the Instrument to the User
The same instrument can feel perfect for one person and frustrating for another, so think about the person first and the hardware second. Age, patience, available desk space and the kind of specimens all shape what will actually get used.
Young Learners
Children do best with a simple, sturdy body, a lamp that stays cool and controls that are easy to reach. A monocular layout is often enough, since sessions tend to be short. Teach the habit of lowering the objective with the coarse knob only while watching from the side, then focusing upward while looking through the eyepiece.
Students and Homeschool Groups
A shared instrument gets handled by many hands, so durability and clear markings count. A binocular head spares tired eyes during a lesson, and a camera port lets a whole group see the same field on a screen. Keep a short written routine beside the instrument so every user cleans up the same way.
Serious Hobbyists
If you plan to study stained tissue or take photographs, put money toward better objectives, a proper condenser and a mechanical stage before you chase extra magnification. Those parts improve the image at every power, while a bigger number alone does not. Space for notes, a lamp and a tidy slide box also makes long sessions far more productive.
FAQ
What magnification do I need?
For many school and hobby uses, a range from about 40x to 1000x covers most needs. Pick based on your specimens, and remember that a sharp image at moderate power is more useful than a blurry one at very high power.
Is a compound microscope the same as a stereo microscope?
No. Compound models view thin, light-passing samples at high power. Stereo models give a lower-power, three-dimensional view of solid objects such as coins, rocks and circuit boards.
Choosing Compound microscopes With Fresh Eyes: The Criteria That Matter Most
Begin by defining the job in plain words: who will use this, how often, where it will live, and what would make you say in a year that it was money well spent. That short brief filters a crowded field faster than any feature list, because it turns vague wants into tests you can apply to each pick in this guide. Next, separate the essentials from the nice extras, and be suspicious of headline claims that do not connect to your brief: capacity you will never use and features you will never switch on add cost, size and upkeep without adding value.
It also helps to think about the full cost of ownership in time and effort, not just the purchase itself. Some compound microscopes ask for regular consumables, replacement parts or a weekly routine, while others mostly ask to be left alone. Neither style is automatically better. The right match is the one whose upkeep fits the time you genuinely have, in the desk or lab bench you genuinely have, across a normal busy month rather than an idealised free weekend. When two picks in this guide look close, that upkeep difference is often the honest tie breaker.
Finally, read the reviews above in a particular order: start with the limitations, not the highlights. Every pick here involves a trade off, and the limitation sections tell you which compromise you would be living with. If a stated drawback touches something you care about daily, such as space, noise, cleaning effort or the size of the people using it, treat that as decisive even when everything else about the pick appeals. If the drawback concerns a situation you will rarely meet, the pick may still be the best fit on this page for you.
Real Situations: Matching Compound microscopes to How You Live
For smaller spaces and tighter rooms
Compact homes expose weak choices quickly. A microscope that fits on paper can still dominate a room, block a door swing or leave nowhere sensible for the accessories it needs. Before ordering, mark the footprint on the floor with tape, walk the route it must travel from the front door, and check where you will stand, sit or reach while using it. Readers in apartments and older houses should also think about floors, neighbours and storage: where does it live between uses, and can you move it alone when cleaning day comes?
For families and shared households
Shared use changes the brief. More people means more wear, more varied heights and habits, and more opinions about what good looks like. Favour the pick whose routine is easiest to explain and repeat, because a system only works in a family home when everyone follows it the same way. Agree the basics early: who cleans what, where things are stored, and what happens when something is damaged or running low. The most successful purchases in busy households are rarely the most specialised; they are the ones that survive being used slightly imperfectly, every day, by everyone.
For occasional, seasonal or guest use
If your microscope will work hard for a few weeks and then rest, your priorities shift again. Storage, protection while idle and a simple restart routine matter more than peak performance. Before the busy period, run a full trial: set it up, use it properly once, clean it and put it away. That rehearsal finds missing parts and unclear steps while there is still time to fix them calmly, and it turns the real occasion into a repeat performance instead of a first attempt under pressure.
Setup, Daily Use and Care: A Practical Routine
Unbox and set up methodically: read the quick start and the safety pages, confirm every part is present, and do the first use in daylight and without time pressure. Small setup choices echo for years, from levelling and placement to the order in which parts are fitted, so adjust carefully at the start rather than living with a wobble, a strain or a workaround. Keep the manual, any spare parts and your proof of purchase together in one place from day one.
Most products fail early from neglect rather than defects: dust, damp, heat and hurried handling do slow damage that a simple routine prevents. Clean as the maker directs, with the mildest method that works, inspect moving parts and fixings on a regular rhythm, and store the item in the conditions it was designed for. When something changes, a new noise, a loose part, a weaker result, deal with it while it is still a small adjustment rather than a repair.
Build a light rhythm around the product rather than relying on memory. A brief check while you are already in the desk or lab bench catches most issues early: a quick look, a quick wipe, a note of anything that has changed. Once a season, go slightly deeper: inspect the parts you normally ignore, clear dust or debris from hidden edges, confirm fixings are firm, and review whether your storage and supplies still make sense. Write the dates on a note kept nearby; a simple record turns guesswork into evidence when you later wonder how long something has lasted or when a part was last replaced.
How the Picks in This Guide Compare With Each Other
This guide covers AmScope M150C Compound Microscope, AmScope B120C Binocular Compound Microscope, SWIFT SW350B Compound Microscope, SWIFT SW350T Trinocular Microscope with 1.3MP Camera, AmScope T490B Trinocular Compound Microscope and Objective Lenses. They are not ranked copies of one another; each earned its place by suiting a different reader, and the reviews above describe those differences in detail. The most useful comparison you can make is therefore not a hunt for a single winner, but a shortlisting exercise: remove any pick whose stated limitation clashes with your non negotiables, then compare what remains on the two or three criteria that matter most in your home.
Consider AmScope M150C Compound Microscope and AmScope B120C Binocular Compound Microscope as a useful contrast. Rather than asking which is better in the abstract, ask which set of compromises described in their reviews you would rather live with, and which routine fits your week. Then set SWIFT SW350B Compound Microscope beside the survivor and repeat the question. This simple knockout method, using only the strengths and honest limitations already set out in this guide, usually leaves one clear choice, and it protects you from being swayed by a single headline feature that your household may never use.
If you are still torn between two finalists, decide by picturing the worst ordinary day, not the best one: the rushed morning, the tired evening, the week when nobody has spare time. The pick that still works on that day, with its cleaning, storage and handling demands included, is almost always the one owners remain happy with. Satisfaction over years comes less from peak performance than from the absence of daily friction.
Mistakes Readers Make Most Often
The first common mistake is buying for an imagined household instead of the real one: guests who rarely come, hobbies that might start next year, children at a different age. Buy for the life you are living this season, with one eye on the change you know is actually coming. The second mistake is skipping the measuring and checking step because a listing looked standard. Sizes, fittings and requirements vary quietly between models that appear identical in a photograph, and ten minutes with a tape measure and the manual prevents most returns and most disappointments.
The third mistake is neglecting the unglamorous supplies and accessories until the moment they are needed. Whatever your chosen microscope requires to work well and stay clean should be in the house before it is, not ordered in a hurry afterwards. And the final mistake is judging too early. Many products feel unfamiliar for the first week simply because they are new. Give the routine a fair trial, adjust the setup once with fresh eyes, and only then decide whether the product or the arrangement around it is the real problem.
More Questions About Compound microscopes
How do I narrow this guide down to one choice?
Write down your three non negotiables first, such as the space available, who will use it and how much upkeep you accept. Cross out any pick whose review names a limitation that clashes with those three, then compare the survivors on daily convenience. Most readers find the decision makes itself once the honest limitations, rather than the highlights, do the filtering.
Should I prioritise size or features when choosing a microscope?
Size and fit come first, because a product that crowds the desk or lab bench or does not suit the user will frustrate you every single day, while a missing extra feature is usually noticed only occasionally. Once fit is settled, choose features that serve your most frequent use, not the most impressive sounding one. Features earn their keep through repetition.
How long should a good microscope last?
Longevity depends far more on matching the product to its workload and caring for it as the maker directs than on any single material or brand claim. Correct setup, gentle routine cleaning, prompt attention to small wear and sensible storage are the habits that separate products retired early from products that serve quietly for years. Keep your proof of purchase and note the purchase date, so any later question starts from facts.
What should I check in the first week of ownership?
Check that everything in the box matches the listing, that all parts fit and move as described, and that the product performs its main job in your desk or lab bench, not just in theory. Keep all packaging until that first week is over. If something is wrong, a missing part, damage or a function that does not match the description, contact the seller promptly while the details and photographs are fresh.
Is it worth buying accessories at the same time?
Only the accessories that the manual or the reviews above identify as necessary for safe, normal use are worth adding immediately. Everything else can wait until a few weeks of real use show you what your household actually reaches for. Buying add ons in advance often fills cupboards with solutions to problems you never turn out to have.
When is it time to replace rather than repair a microscope?
Replace when safety, hygiene or core function is compromised, when parts are no longer available, or when you find yourself working around the same fault every week. Repair or adjust when the issue is isolated, the rest of the product remains sound and the maker still supports it. A simple test helps: if the product vanished tomorrow, would you buy the same one again? The honest answer usually settles the question.
Living With Your Choice: The First Season and Beyond
The first week with a new microscope is about learning, not judging. Everything feels slightly unfamiliar, from where your hands naturally go to how long each step of the routine takes. Resist the urge to rearrange everything on day two. Instead, use the product as intended, notice where friction appears, and write those observations down while they are fresh. Most early complaints trace back to one adjustable detail, such as placement, storage or the order of a routine, rather than to the product itself, and a note made in week one is far more reliable than a memory reconstructed in month three.
By the end of the first month, patterns have usually settled. You know which features you reach for daily and which you have not touched since the unboxing, how long honest upkeep takes in your desk or lab bench, and whether the product suits the people who actually use it. This is the right moment for one deliberate review: adjust the setup once, properly, based on evidence rather than first impressions. Move what needs moving, add the one accessory your notes keep asking for, and simplify any step that everyone in the household quietly skips. A single evidence based adjustment at this stage does more for long term satisfaction than weeks of tolerating a small daily annoyance.
Across a full season, the test becomes durability and consistency. Weather changes, routines change and households change, and a well chosen microscope absorbs those shifts without drama. Keep the light maintenance rhythm described earlier, deal promptly with the first signs of wear rather than the last, and re-read the maker’s guidance once a year, because details you skimmed before purchase often make new sense once you have real experience. Owners who treat ownership as a calm routine, rather than a series of emergencies, consistently get the longest and happiest service from the products in guides like this one.
A Short Planning Checklist Before You Order
Before you commit, run through this plain checklist in order. First, measurements: confirm the space, the access route and any fitting or connection the product depends on, using a tape and the listing details rather than estimates. Second, people: confirm the product suits everyone who will use it, at their real sizes, ages and abilities, not at an average. Third, routine: name who will clean, check and store it, and how often, and be honest about whether that rhythm survives a busy month. Fourth, supplies: list what must be in the house on day one for safe, normal use, and order those items alongside rather than afterwards.
Fifth, paperwork: decide where the manual, warranty details and proof of purchase will live, and put them there the day the product arrives. Sixth, the trial: plan the first proper use for a calm day, keep the packaging until that trial is complete, and photograph the setup before anything is covered, fixed or hidden. None of these steps is exciting, and together they prevent nearly every regret readers report with compound microscopes: the wrong size, the missing part, the routine nobody kept and the fault discovered one day after the packaging went out. Ten quiet minutes of planning, done in this order, is the cheapest upgrade any purchase in this guide can receive.
One more habit separates satisfied owners from frustrated ones: they revisit their setup after the first month. By then the novelty has faded and the real patterns are visible, including where things actually get stored, which step in the routine everyone skips, and which small annoyance keeps recurring. A single deliberate adjustment at that point, moving an item, changing a storage spot or simplifying a step, often improves daily life more than the original choice between two close products did. Treat the first month as a trial you are allowed to learn from, not a verdict you must live with unchanged.
It is also worth thinking about who else will encounter this purchase: partners, children, parents, guests, cleaners and tradespeople all interact with household products differently. A choice that depends on one person remembering a special sequence or a delicate touch tends to fail in real homes. Favour arrangements that are obvious to a newcomer, label anything that is not obvious, and keep instructions where the product is used rather than filed away. The goal is a home that works kindly for everyone in it, including on the days when you are not there to explain it.
When you read any guide, including this one, keep a small sense of proportion about conflicting advice. Households differ in water, weather, space, budget and patience, so a method that delights one owner can annoy another without either of them being wrong. Use the reviews and criteria here to form a shortlist and a set of questions, then let your own measurements and a trial period have the final word. Your home is the test laboratory that matters, and its results outrank every general recommendation, ours included.
Planning for the end of a product’s life is part of buying well, even though it is rarely discussed. Keep major packaging only while a return is plausible, then recycle it rather than storing empty boxes for years. When the product eventually wears out, check whether parts, materials or the whole item can be recycled or passed on locally before sending it to landfill. And note what you learned from it in a sentence or two; that small record makes the next purchase in this category faster and wiser, because it is based on your experience rather than on memory alone.
Seasonal changes deserve a place in your thinking too. Heat, cold, humidity, daylight and household routines all shift across the year, and many products behave slightly differently in August than in January. The routine that works in one season may need a small adjustment in another, from ventilation and drying to storage and inspection frequency. A twice yearly review, timed with the clocks changing or another date you already remember, is an easy way to make those adjustments before small seasonal stresses become visible wear.
Another quiet advantage goes to readers who keep expectations anchored in their own brief rather than in marketing language. Words like premium, professional and heavy duty describe positioning, not performance in your home, and they appear on products at every quality level. Translate every claim into a question you can test: heavier in the hand, easier to clean, simpler to store, kinder to the people using it daily? If a claim cannot be turned into such a test, set it gently aside and return to the criteria and limitations set out in the reviews above, which were written to be tested in exactly that way.
Do not underestimate the value of asking one practical question of the seller or maker before you order, especially when a detail in the listing is ambiguous. Ask about the exact dimension, fitting, material or requirement that your home depends on, and keep the reply with your paperwork. Vague listings are common in crowded categories, and a single written answer prevents the most frustrating kind of return: the product that was almost right. If the answer never comes, treat that silence as information too, and favour the pick whose details are stated clearly enough that you did not need to ask.
Finally, remember that the best outcome is rarely a perfect product; it is a good product, well matched, properly set up and calmly maintained. Readers who approach the choice that way tend to stop researching at the right moment, enjoy what they bought and replace it years later without drama. If you have measured honestly, read the limitations with care and chosen the routine your household will actually keep, you have done the real work of buying well, whatever badge appears on the box.
One last small practice is worth adopting: photograph the installed or assembled result, together with any labels, model plates and settings you chose. Those pictures, saved with your paperwork, answer future questions instantly, whether you are ordering a part, asking for advice or selling the item on. Memory blurs details within months; a dated photograph never does.
And if this purchase is part of a larger project, sequence it kindly: finish the dusty, wet or heavy work first, and let this product arrive into a clean, ready space. Rushed installations into unfinished rooms are where scratches, lost parts and early damage usually happen.
The Short Version
Look for glass optics, a smooth focus system, controllable lighting and a steady frame, and choose the magnification range that fits the specimens you plan to study. Read the contents list so you know what is included.
Related Guides
- How to Choose the Best Student Microscopes: Buyer's Guide (2026)
- How to Choose the Best 8×42 Binoculars: Buyer's Guide (2026)
- How to Choose the Best Activity Centers: Buyer's Guide (2026)
- How to Choose the Best Airbrush Kits: Buyer's Guide (2026)
- How to Choose the Best Approach Shoes: Buyer's Guide (2026)