Disclosure: This article contains affiliate links. As an Amazon Associate, reviewstook.com earns from qualifying purchases. Amazon links may earn us a commission at no extra cost to you.
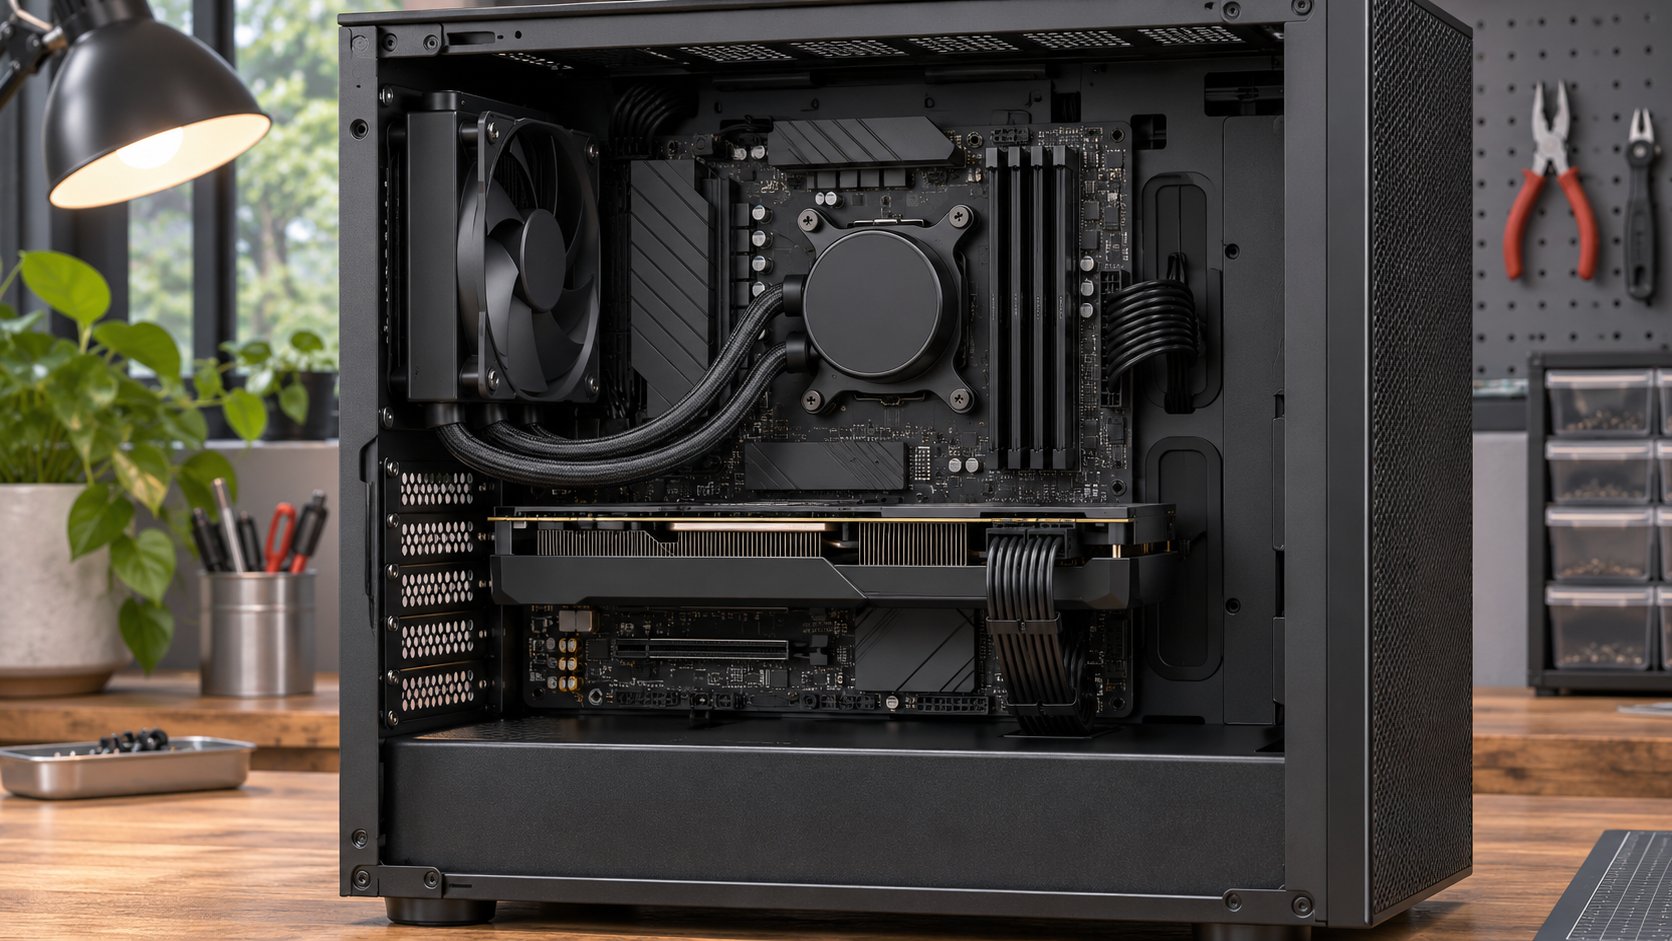
In this guide, “120mm water cooler” means a PC all-in-one liquid CPU cooler with a single 120mm fan and radiator. It does not mean a drinking-water dispenser. The best 120mm AIO is usually the one that fits a case where a larger radiator or tower cooler will not, matches the CPU socket, and leaves room around the motherboard and graphics card. A 120mm radiator is compact, but it is not automatically the best cooling choice for every processor.
This comparison focuses on case clearance, radiator and fan thickness, pump and radiator placement, socket brackets, fan and pump connections, and the performance tradeoffs of a one-fan AIO. It includes Thermaltake TH120 V2 ARGB Sync, Thermalright Aqua Elite 120 V3, SilverStone VIDA 120 Slim, and Cooler Master MasterLiquid 120L Core as examples. Product titles, images, and ASINs linked in the cards were verified through Amazon’s Creators API where available; the Cooler Master link is an exact-model Amazon search because no matching ASIN was verified. Specifications and availability can change, so verify the current model page and manual before buying.
A 120mm AIO is most compelling when your case has a single 120mm radiator position, a large air cooler would collide with memory or a side panel, or you want a compact liquid loop for a moderate-heat CPU. If your case supports a 240mm radiator, compare that option too: two 120mm fans and a longer radiator provide more heat-exchange surface, while adding length, thickness, fan noise, and mounting demands. Our buying-guide method explains how we separate published specifications from independent test claims.
120mm AIO models to compare
These product titles, images, and ASINs were verified through Amazon Creators API. Confirm the exact model suffix, socket mounting kit, radiator dimensions, and current seller before purchasing.

ASIN: B0CCXNXVFC

ASIN: B0CL8ZMPL2

ASIN: B0BFCDCB6B
In this guide
Quick picks by build constraint
Best balanced current 120mm RGB option: Thermaltake TH120 V2 ARGB Sync, model CL-W360-PL12SW-A. Thermaltake lists a 157 × 120 × 27mm radiator, a 120 × 25mm fan, and support for current sockets including LGA1851 and AM5. Check the exact black or white variant code and confirm that your motherboard has a 5V three-pin ARGB header if you want motherboard lighting control.
Best feature-rich alternative for current mainstream sockets: Thermalright Aqua Elite 120 V3. The manufacturer’s published specifications list support for LGA115X/1200/1700/1851 and AM4/AM5, a copper cold plate, PWM pump and fan, and a three-year warranty. Verify exact fan and lighting configuration on the seller page because the Aqua Elite family includes multiple radiator sizes and color variants.
Best when radiator depth is the tight constraint: SilverStone VIDA 120 Slim, model SST-VD120-SLIM. Product listings describe a slim 22mm radiator and 16mm fan, a 38mm combined stack, and a pump integrated into the radiator. It is a specialized option for constrained spaces, and stock can be limited; verify the actual dimensions, socket kit, seller, and warranty before relying on it for a build.
Best simple no-display option: Cooler Master MasterLiquid 120L Core, model MLW-D12M-A17PK-R1. Cooler Master lists a 157 × 119.6 × 27.2mm radiator, a 120mm PWM fan, and support for several Intel and AMD sockets. Its published compatibility list does not include every current socket, so check the live Cooler Master support list and package bracket before buying.
A 120mm cooler can be a good fit, but it should be chosen for fit first and cooling expectations second. If your CPU routinely draws high power, compare the cooler with a larger AIO or a high-capacity air cooler. A compact radiator does not transform an unsuitable thermal design into a high-end solution.
What “120mm” actually tells you
The 120mm label refers to the fan frame width and the radiator mounting pattern, not the full length or depth of the assembly. A single-fan radiator is commonly around 152 to 157mm long because its end tanks extend beyond the fan square. It is often about 120mm wide and roughly 27mm thick, but slim and thicker variants exist. A fan is typically another 25mm thick, giving a standard assembly around 52mm deep before screws, fittings, and nearby components are considered.
These dimensions vary by model. The Thermaltake TH120 V2’s official specifications list a 157 × 120 × 27mm radiator and a 25mm fan. The SilverStone VIDA slim listing describes a 22mm radiator and 16mm fan, a substantially different total depth. That difference can determine whether a cooler clears a graphics card, side panel, or motherboard heatsink in a small-form-factor case.
Do not assume that a case with a 120mm fan mount supports every 120mm radiator. The case may accept a fan but lack the extra length for radiator end tanks or the depth for a fan-and-radiator stack. The mounting holes may also be blocked by a drive cage, cable shroud, power supply, or motherboard component. Use the case maker’s radiator-support chart and manual, and measure the actual interior before ordering.
In a tight build, take measurements from the mounting surface to the nearest obstruction. Include the radiator thickness, fan thickness, screw head, and any cable bend. Check whether the fan is installed on the inside or outside of the chassis bracket; that changes which components it can overlap. If the manufacturer lists maximum radiator support, treat it as position-specific, not a universal clearance guarantee.
1. Thermaltake TH120 V2 ARGB Sync: compact dimensions and current socket support
Thermaltake’s TH120 V2 ARGB Sync is a one-fan AIO that pairs a 27mm aluminum radiator with a 25mm CT120 ARGB fan. The official page lists a radiator dimension of 157 × 120 × 27mm, a 120 × 120 × 25mm fan, 460mm tubes, and a copper cold plate. The included socket support spans Intel LGA1851, 1700, 1200, and several 115x variants plus AMD AM5 and AM4. Check the exact kit for older sockets and the regional SKU.
This configuration is useful if you want a current mounting kit and motherboard-synced lighting in a case with a single 120mm radiator position. Thermaltake says the ARGB connection uses a 5V three-pin motherboard header. Do not connect a 5V ARGB plug to a 12V four-pin RGB header; connector and voltage mismatches can damage LEDs. If you do not have a compatible header, check whether the exact kit includes a controller or choose a non-RGB version.
Its length and depth are ordinary for a single-fan AIO, not ultra-slim. The 157mm radiator extends beyond the fan, so check the case’s supported radiator length rather than relying on a “120mm fan” description. At about 52mm for the 27mm radiator plus 25mm fan, it needs room behind the mounting bracket. A push-pull setup with an extra fan would add more depth and is rarely a safe assumption in a compact case.
The product’s socket list is an important advantage for upgrade planning, but compatibility still depends on the included mounting hardware. A cooler that supports LGA1851 or AM5 on a manufacturer webpage needs the correct bracket in the retail box. Confirm the exact part number on the box and the manual, especially when purchasing old inventory or a regional variant.
2. Thermalright Aqua Elite 120 V3: check the exact bundle
Thermalright’s Aqua Elite 120 V3 is a compact 120mm AIO with a copper-base pump block and an ARGB 120mm fan. The manufacturer’s product information lists Intel LGA115X, 1200, 1700, and 1851, along with AMD AM4 and AM5. It lists a PWM pump, a 120 × 25mm TL-C12B-S V2 fan, a maximum pump speed around 3,300 RPM, and a three-year warranty. These are specifications from the maker, not independent acoustic or thermal measurements.
The model is worth considering when you need a current AM5 or Intel bracket and want a basic single-radiator design. A 120mm AIO can free space above the CPU socket compared with a large tower heatsink, though the radiator and fan occupy a separate case mount. That trade can help with tall memory modules or a small motherboard layout, but the tubing and pump block still need clearance around the socket.
Thermalright sells several Aqua Elite sizes and variants. Search results may mix 120, 240, and 360mm units, white or black versions, and alternative fan bundles. Match the complete model name and radiator size. A product title that includes “120” in one part but lists two fans or a longer radiator may not be the single-fan cooler you intended.
Before buying, inspect the included socket bracket, fan connector, and ARGB connector. A 4-pin PWM fan can be controlled from a motherboard fan header, while a 5V ARGB plug requires a compatible lighting header. If your motherboard lacks that header, choose a controller-compatible variant or plan to leave the lighting unplugged. Cooling can work without lighting, but connector mismatch is avoidable.
3. SilverStone VIDA 120 Slim: a niche option for restricted depth
The SilverStone VIDA 120 Slim is designed around a thinner radiator-and-fan assembly than the usual 27mm radiator plus 25mm fan. Its product listing identifies model SST-VD120-SLIM and describes a 22mm radiator, a 16mm fan, and a total thickness near 38mm. That can help when a case has a narrow radiator slot or when a standard fan would collide with a nearby component. The product family may be harder to find than more current mainstream models, so verify stock and warranty with the seller.
Thin does not mean universally compatible. The radiator still measures about 154mm long and 120mm wide, and the pump block, tubes, connectors, and mounting clips all need space. A case that provides 38mm of depth but lacks radiator-length clearance will still not fit it. Measure every axis and confirm the screw pattern against the manual.
The VIDA’s pump is described as integrated into the radiator, unlike designs with the pump in the CPU block. That changes the shape of the assembly and can affect tube routing. Check whether the block height and orientation fit your motherboard, and plan where the radiator’s pump housing will sit. Do not assume that a thin radiator makes tube routing easier in every small case.
Because this is a specialty product, check seller authorization, warranty duration, and return terms carefully. If it is old stock or a marketplace item without a clear warranty, compare the risk with a current mainstream 120mm AIO or a low-profile air cooler. Small-form-factor clearance is valuable, but support matters if a sealed loop fails.
4. Cooler Master MasterLiquid 120L Core: straightforward single-fan design
Cooler Master’s MasterLiquid 120L Core is a 120mm AIO with a single PWM fan and a 27.2mm-thick aluminum radiator. Cooler Master lists radiator dimensions of 157 × 119.6 × 27.2mm, pump dimensions of 81 × 76 × 47mm, a 120mm fan, and a three-year warranty. Its current product page lists Intel LGA1700, 1200, and several 115x sockets, plus AMD AM5 and AM4 and legacy sockets.
This model is a practical match when its socket kit supports your board and you want a simple cooler without an LCD or complicated software suite. The pump uses a three-pin connector and the fan uses four-pin PWM, according to the manufacturer. Check your motherboard manual for the correct header and whether to set a pump header to full speed or a controlled curve according to Cooler Master’s instructions.
The supported socket list shown on Cooler Master’s page may not include newer revisions as they launch. Do not infer support from a similar 240mm model or another MasterLiquid product. Confirm the exact suffix, mounting kit, and CPU generation before purchase. If the product page or box does not explicitly include your socket, ask the manufacturer or choose a cooler with clear written compatibility.
Cooler Master also sells multiple MasterLiquid Core and Lite models. Some are 120mm, while others use two or three fans. Keep the full product number MLW-D12M-A17PK-R1 with your search so you do not accidentally buy a larger radiator or a different generation.
Does a 120mm AIO make sense for your CPU?
A 120mm AIO has less radiator area than 240mm or 360mm models. It may be sufficient for an entry-level or midrange processor, a low-power system, a compact case, or a build where a larger cooler cannot fit. NZXT’s support guidance for the Kraken 120 describes it for entry- and mid-level CPU families and recommends larger Kraken models for higher-power CPUs. That is a useful caution: cooling capacity should be matched to sustained CPU power, not only socket compatibility.
CPU power can vary significantly by model, motherboard settings, workload, and boost behavior. A processor may draw more power during a long render than during ordinary office use. Check the CPU’s thermal design guidance and measured load behavior from reliable testing if the build is performance-sensitive. A cooler’s “TDP” claim or wattage headline does not guarantee a particular temperature or noise level.
For a high-power gaming or workstation CPU, compare a 240mm AIO, a larger radiator, or a well-reviewed tower air cooler before committing to 120mm. A 120mm AIO may still work under restricted conditions, but fans may need to spin faster and the CPU may run warmer or throttle sooner under sustained load. If your case supports a 240mm radiator, consider using that extra surface area unless another constraint rules it out.
AIOs are not automatically quieter than air coolers. They add pump noise to fan noise, and a small radiator can require more fan speed under heavy load. A large air cooler may run quietly and has no pump. On the other hand, a liquid cooler can move heat to a case mount and free space around the socket. Choose the format for the specific build rather than assuming water cooling is inherently quieter or faster.
Case clearance: measure the whole assembly
Check radiator support at the exact location where you plan to mount it: rear, top, front, side, or another bracket. A case might support a 120mm fan in several locations but support a radiator in only one. The radiator’s longer end tanks can collide with the case frame, and a thick assembly can overlap a motherboard heatsink, memory, graphics card, drive cage, or power supply.
Use the case manufacturer’s manual or radiator chart. Record the radiator’s length, width, and thickness, plus fan thickness. Add space for screw heads, fan clips, tube fittings, and cable routing. If the front radiator is an intake, confirm that it does not reduce GPU length clearance. If top-mounted, check motherboard VRM heatsinks and tall memory modules.
For a standard 27mm radiator and 25mm fan, plan around a 52mm assembly, not just 27mm. A second fan in push-pull roughly doubles the fan depth and may interfere with adjacent parts. For a slim 22mm radiator and 16mm fan, the stack is about 38mm, but the total length, pump placement, and tube bends still matter.
Tube length and exit angle are as important as radiator clearance. Measure from the CPU socket to the chosen mount without sharp bends or tension. Do not kink the tubing or force it against a GPU backplate or case edge. A front mount may be the only option in a small case; choose an orientation that keeps the pump below the loop’s highest point and gives the tubes a gentle path.
Radiator and pump orientation
All-in-one loops contain a small amount of air. Manufacturers recommend placing the radiator so its highest point is above the pump, which lets air collect in the radiator rather than circulate through the pump. A top-mounted radiator is often straightforward if the case supports it. A front-mounted radiator can also work, preferably with the tube connections at the bottom when the case layout allows.
Do not bottom-mount an AIO radiator if that places the pump above the radiator. Air can collect in the pump and contribute to gurgling or wear. Follow the cooler maker’s installation guide for the exact design; an AIO with a pump integrated in the radiator may have different geometry from a pump-on-block model.
Front intake and top exhaust affect case airflow. A front-mounted radiator brings air through the radiator into the case, which can warm air reaching the graphics card. A top exhaust removes CPU heat from the case but may have less clearance. The best orientation is the one that fits the case, keeps the pump below the radiator’s air pocket, and preserves sensible airflow.
After installation, listen for unusual persistent gurgling or rattling and monitor CPU temperatures under a familiar workload. Some brief fluid sounds can occur after installation, but ongoing pump noise or unexpectedly high temperatures deserve troubleshooting. Check the pump header, fan direction, mounting pressure, protective film removal, thermal paste contact, and radiator orientation. Use the manufacturer’s support process if the pump may be failing.
Socket, mounting kit, and motherboard compatibility
Socket support is model-specific. LGA1851, LGA1700, LGA1200, older Intel LGA115x, AMD AM5, and AM4 can require different standoffs or backplates. A manufacturer’s compatibility page may cover a socket, but an older box may lack the newer kit. Check the product listing, included hardware, and current manual before buying.
Pay attention to backplate clearance and motherboard layout. Some cases have a cutout behind the CPU socket for backplate installation, while compact boards can place capacitors or heatsinks close to the pump block. The block must sit flat on the CPU and fit around memory, VRM heatsinks, and motherboard shrouds. A compatible socket does not guarantee that the tubing and block clear every board.
Do not mix screws or spacers from different cooler models. Mounting pressure matters, and improvised hardware can damage the socket, board, or cooler. Use the supplied parts and tighten gradually in the order specified by the manual. If a bracket is missing, request the correct kit from the manufacturer instead of substituting generic screws.
Fan headers, pump headers, and RGB wiring
Most single-fan AIOs use a fan connector, pump connector, and sometimes an ARGB connector. The pump may use three-pin DC or four-pin PWM; the fan generally uses four-pin PWM. Follow the cooler’s manual for the designated motherboard header and BIOS settings. Some coolers expect a pump header to run at full speed, while others allow PWM control.
RGB connectors are especially easy to confuse. A 5V three-pin addressable RGB plug is not the same as a 12V four-pin RGB plug. Thermaltake warns that its motherboard-sync connector supports only a 5V header. Check the connector key and motherboard label before plugging it in. If the board has no compatible header, use the included controller if supplied or leave lighting disconnected.
Route fan and pump wires so they cannot touch the fan blades. Use the motherboard’s fan-control software or BIOS to create a sensible curve. A pump’s noise and longevity can be affected by how it is controlled, so use the manufacturer’s recommended settings rather than copying an arbitrary forum profile.
120mm AIO versus tower air cooler or 240mm radiator
A tower air cooler uses heat pipes and fins to move heat directly to air. It has no pump or coolant, and many models are inexpensive and easy to maintain. Its main compatibility concerns are height, RAM clearance, and board layout. In a compact case with a rear 120mm radiator mount but little vertical room above the CPU, an AIO may fit where a tower does not.
A 240mm AIO uses two 120mm fans and a longer radiator. It usually offers more radiator surface and can reduce the fan speed needed at a given thermal load, though results depend on pump, fan, radiator, and CPU. It needs a larger mounting area and more clearance. If the case supports 240mm and the CPU has high sustained power, this is often a more sensible liquid-cooling starting point than a single 120mm radiator.
A 120mm AIO has the benefit of fitting common single-fan locations and moving heat away from the socket. It also has a pump as another failure point and usually less heat-dissipating surface than larger radiators. If choosing it means using a smaller fan at higher speed, acoustics can be worse than a larger radiator or air cooler. Compare the complete installed assembly, not just the cooler’s footprint.
For a small-form-factor build, compare low-profile air coolers, slim 120mm AIOs, and standard 120mm AIOs. A low-profile air cooler may be simpler if the case has room above the CPU but no radiator clearance. A slim AIO can solve a specific thickness limit, but verify availability, warranty, and the exact fan/radiator stack.
What to inspect before buying a used or discounted AIO
Check whether the cooler is new, renewed, or used. AIOs are sealed loops, so you cannot routinely refill or replace the pump yourself. A used cooler may have unknown service life, dried thermal paste, missing socket hardware, or a worn pump. Consider whether its warranty can transfer and whether the seller is authorized.
Confirm all brackets, screws, washers, and fan cables are present. Verify the radiator is not bent or leaking and the tubes are not kinked. Do not buy a unit with visible coolant residue, corrosion, or damage around fittings. A cheap missing-bracket cooler can be difficult to mount and may not be worth the savings.
Check product names carefully. A model can have RGB and non-RGB variants, different radiator sizes, revised socket kits, or a white edition with a different SKU. For example, the Thermaltake TH120 V2 black and white versions use different model codes; make sure the package matches the Amazon or manufacturer page you reviewed.
The four compared models, read as answers to four different builds
The Thermaltake TH120 V2 ARGB Sync is the mainstream answer: a current-socket, compact single-fan unit for builders who want liquid cooling’s clean look and tidy tubing in a small case without turning the build into a research project. Its natural home is a mainstream gaming or general-purpose system whose processor runs at stock settings and whose owner values straightforward installation and synchronized lighting. The Thermalright Aqua Elite 120 V3 competes on value and bundle discipline; it rewards buyers who read exactly what is in the box, mounting hardware, fan configuration, and lighting control, because budget AIOs vary their bundles more than their radiators. It suits a cost-conscious build that still wants the AIO form, provided the buyer verifies the kit against their socket and case before ordering. The SilverStone VIDA 120 Slim exists for one honest reason: depth. In cases where a standard radiator-plus-fan stack simply does not fit, its slim profile keeps the 120mm AIO option alive, and it should be judged as a fit solution first and a cooling solution second, which is exactly how its buyers actually use it. The Cooler Master MasterLiquid 120L Core is the conservative choice, a straightforward single-fan design from a maker with deep mounting support, suited to builders who want the category’s basics done predictably, in a small workstation or a modest gaming system, without paying for spectacle. None of the four repeals the physics discussed in this guide: a single 120mm radiator is a modest heat exchanger, and all four are best understood as fit and form decisions for processors whose heat they can genuinely carry.
Installation walkthrough: where 120mm builds actually go wrong
Most 120mm AIO disappointments are installation stories, not product stories, and they cluster in a few avoidable places. The first is mounting pressure and pattern: the cold plate must meet the processor evenly, tightened progressively in a cross pattern as the maker’s instructions direct, because a plate cocked by one corner tightened fully first will run hot forever and be blamed on the radiator. Thermal paste application belongs to the same step; whether the unit arrives pre-applied or expects the builder’s own, the goal is a thin, complete interface, and more paste is not more cooling. The second failure cluster is tubing and radiator placement fighting each other: tubes kinked by a forced route, a radiator mounted where its tubes strain at the fittings, or the radiator positioned so its top sits below the pump in a way that invites air to live in the pump, producing the gurgle and the temperature mystery that forum posts are made of. Route tubes in gentle curves, keep the radiator’s highest point above the pump where the case allows, and consult the orientation guidance earlier in this guide before improvising. The third cluster is wiring afterthought: pump and fan headers connected to the wrong motherboard points, so the pump does not run at its intended constant speed or the fan curve answers the wrong sensor, and lighting cables left to be discovered after the side panel is on. Wire deliberately before the panel closes, confirm in the BIOS or monitoring software that the pump reports its speed and the fan responds to temperature, and the build’s first hour will be boring, which is the sound of an AIO installed correctly.
Noise character: the small radiator’s acoustic bargain
A 120mm AIO asks one fan to do the work that larger radiators divide among two or three, and its noise character follows from that arithmetic. Under sustained load, that single fan must spin faster to move the same heat, so the honest comparison is not idle noise, where any modern cooler is quiet, but the sound of the system an hour into its real workload. Builders sensitive to noise should therefore judge a 120mm unit by their processor’s sustained behavior: a modest processor that rarely sustains high load will keep the fan in its civilized range, while a hot processor under rendering or compiling loads will hold the fan at speeds where a tower air cooler or a larger radiator would simply be calmer. Fan quality and curve discipline mediate the bargain considerably. A well-chosen fan with a smooth bearing and a curve set to rise gradually, rather than chasing every temperature flicker, can make a 120mm system pleasant in ordinary use; a curve left at an aggressive default makes the same hardware breathe in a way the whole room notices. Pump noise is the other voice, usually a faint hum that mounting and orientation influence, and a pump that gurgles is reporting air where air should not be, a fixable installation fact rather than an acoustic fate. Set expectations with your ears informed and a 120mm AIO can be a quiet tool for the right processor; expect it to silence a hot one and it will be blamed for physics.
Longevity, monitoring, and knowing when an AIO is done
Sealed AIOs are consumables with long lives rather than permanent fixtures, and treating them that way prevents the classic failure story, a system that slowly runs hotter for a year while its owner upgrades everything except the cooler. Permeation gradually reduces the coolant inside any sealed loop over years, pumps wear, and the cold plate’s interface ages; the symptoms are rising temperatures under loads the machine used to shrug off, new pump sounds, and fan curves working harder to hold the same line. Build a monitoring habit from day one: note the temperatures under a repeatable load when the system is new, and re-check against that baseline a few times a year, so decline is a measured trend with a date rather than a suspicion. Keep the radiator’s fins and the fan clean, because dust insulation mimics cooler decline convincingly and washes off in minutes. When a unit does reach its end, through pump failure, persistent air, or temperatures that cleaning and re-pasting cannot restore, replace it as a unit; sealed loops are not designed for the home refilling their marketing sometimes winks at, and a processor’s safety is worth more than a heroic repair. Buyers who plan on this lifecycle, choosing the AIO as a several-year component with a baseline and a budget line, get the format’s real benefits without its one real surprise.
More questions about 120mm water coolers
Will a 120mm AIO survive a house move or a shipped PC?
It is one of the format’s genuine advantages: with the radiator screwed to the case and no heavy tower hanging off the motherboard, a 120mm AIO travels better than a large air cooler, which is why system builders favor liquid for shipped machines. Still inspect after any move, confirm the radiator and pump mounts are tight, and listen on first startup for a pump that has swallowed an air bubble in transit; a gentle tilt of the case while running usually walks the bubble home.
Does the radiator work better as intake or exhaust?
Each choice taxes a different component. As intake, the radiator drinks the room’s coolest air and the processor runs coolest, while the case’s other parts receive the radiator’s warmed exhaust. As exhaust, the processor’s coolant breathes air the graphics card has already heated, and its temperatures rise somewhat, while the rest of the system lives easier. In a 120mm build the processor is usually the component the cooler exists for, so intake is the common preference where the case’s layout allows it, with the understanding that dust filters then need the attention intake always demands.
Can I replace the fan on a 120mm AIO with a quieter one?
Generally yes, and it is the most effective upgrade the format allows, provided the replacement is designed for radiator duty, with the static pressure to push air through fins rather than merely move it in open space. Keep the original fan as the control in your experiment: swap, measure under the same load, and believe the thermometer over the marketing, because a fan that is quieter by being weaker has not upgraded anything.
What temperatures should worry me?
Judge against your own baseline rather than universal numbers, since processors differ in their design limits and sensors report differently. The worrying pattern is change: a system that once held a familiar load comfortably and now climbs toward throttling, with fans at speeds that used to be unnecessary, is telling you to clean, re-paste, and then suspect the loop, in that order. Sudden spikes with pump noise are an installation conversation; slow rises over seasons are a lifecycle one.
Choose a 120mm AIO for the build it genuinely fits, install it with even pressure and honest wiring, set its curves with patience, and keep a temperature baseline like you mean to own the machine for years. Within those disciplines, the smallest liquid coolers are exactly what their best users say they are: a tidy, quiet, space-saving answer for processors whose heat respects the format’s limits.
Small-form-factor builds: where the 120mm decision is really made
Compact cases are the 120mm AIO’s native country, and they punish vague planning more than any other build type. In a small enclosure, the radiator competes for the same cubic centimeters as the power supply, the graphics card’s length, and the cable runs, so the build should be planned in three dimensions on paper: radiator and fan stack thickness against the exact obstruction it will face, tube bend radius against the side panel, and the cold plate and pump block’s height against memory and motherboard components that share its neighborhood. Measure the case’s stated radiator support against the specific unit’s dimensions rather than the category’s, because slim and standard 120mm units differ precisely where small cases have no forgiveness. Airflow planning matters doubly in small volumes: a single radiator fan may be the case’s only meaningful exhaust or intake, which makes its direction a whole-system decision affecting the graphics card and drives, not just the processor. Builders who succeed in this format share a habit: they assemble loosely first, route tubes and cables with the panels off, verify clearances with the panels on, and only then finalize mounting and curves. The 120mm AIO rewards that patience by giving small builds a cooling option that leaves room for everything else, which is, in the end, the entire reason the format exists and the standard by which every model in this guide should be judged.
A pre-purchase measurement checklist for tight cases
- Radiator length, width, and thickness, plus the fan’s thickness, added together and compared against the case’s clearance at the exact mount point, not the mount point you wish existed.
- Pump block height against memory module and motherboard heatsink clearance around the socket.
- Tube length and flexibility against the route from socket to radiator, with bend radius respected rather than negotiated.
- Socket support confirmed for your exact processor generation, including any adapter kit the bundle does or does not include.
- Header inventory on the motherboard: a place for the pump to run at its intended speed, a fan header for the radiator fan, and any lighting connection your chosen model expects.
- A plan for which component the radiator’s air serves, intake for the processor’s benefit or exhaust for the system’s, decided before the first screw rather than discovered at the first temperature reading.
Frequently asked questions
Is a 120mm AIO enough for gaming?
It can be enough for a modest-power CPU and a case where a larger cooler will not fit, but it is not the best default for every gaming processor. Sustained CPU power, case airflow, fan curve, and radiator design all matter. Check independent thermal testing for your CPU class and compare with a 240mm AIO or tower air cooler.
Is a 120mm AIO better than an air cooler?
Not automatically. A tower air cooler may match or exceed a small AIO while avoiding pump noise and a sealed-loop failure point. A 120mm AIO can help with physical clearance or aesthetics. Compare dimensions, CPU load, noise, price, warranty, and the exact case layout.
How much space does a 120mm radiator need?
It needs more space than a 120mm fan. Many radiators are around 152–157mm long and about 27mm thick, plus a 25mm fan, but dimensions vary. Slim models may use a thinner radiator and fan. Check the exact radiator and fan dimensions against the case manual and nearby components.
Can I mount a 120mm AIO on the rear fan position?
Only if the case supports a radiator there, not merely a fan. Check radiator length, fan/radiator thickness, tube reach, and whether the CPU pump will sit below the loop’s highest point. The case’s manual may list different support for fans and radiators.
Should the radiator be above or below the pump?
For common pump-on-block AIOs, keep the radiator’s highest point above the pump so air collects in the radiator rather than at the pump. A top mount often makes this straightforward; a front mount can also work. Follow the cooler’s instructions, especially if its pump is integrated into the radiator.
Can I refill or repair an AIO?
Most consumer AIOs are sealed and not designed for user refilling or pump replacement. Opening one can void the warranty and create a leak. Follow manufacturer guidance and warranty service procedures rather than dismantling the loop.
Do I need an RGB motherboard header?
No, cooling can work without lighting. If you want motherboard-controlled lighting, check whether the cooler uses 5V three-pin ARGB or 12V four-pin RGB and confirm that your board has the matching header. Never connect a 5V ARGB plug to a 12V RGB header.
Bottom line: buy a 120mm AIO for the fit, not the label
For a conventional 120mm build, Thermaltake’s TH120 V2 ARGB Sync offers a well-documented compact radiator and current socket list. Thermalright’s Aqua Elite 120 V3 is another current socket option with a PWM pump and fan. SilverStone’s VIDA 120 Slim is worth investigating when stack depth is unusually constrained, but verify stock and warranty. Cooler Master’s MasterLiquid 120L Core is a straightforward one-fan cooler when its exact socket kit matches your system.
Measure the full radiator-and-fan assembly, check case support at the exact position, confirm socket hardware and wiring, and mount the loop according to the manufacturer’s pump-orientation guidance. If a 240mm radiator or a tower air cooler fits, compare those alternatives before accepting the lower heat-dissipating area of a single 120mm radiator. The best choice is the smallest cooler that safely meets your CPU’s real workload and case constraints.
Amazon content disclosure: As an Amazon Associate, reviewstook.com earns from qualifying purchases. Prices and availability are accurate only when checked and may change. Amazon and the Amazon logo are trademarks of Amazon.com, Inc. or its affiliates.