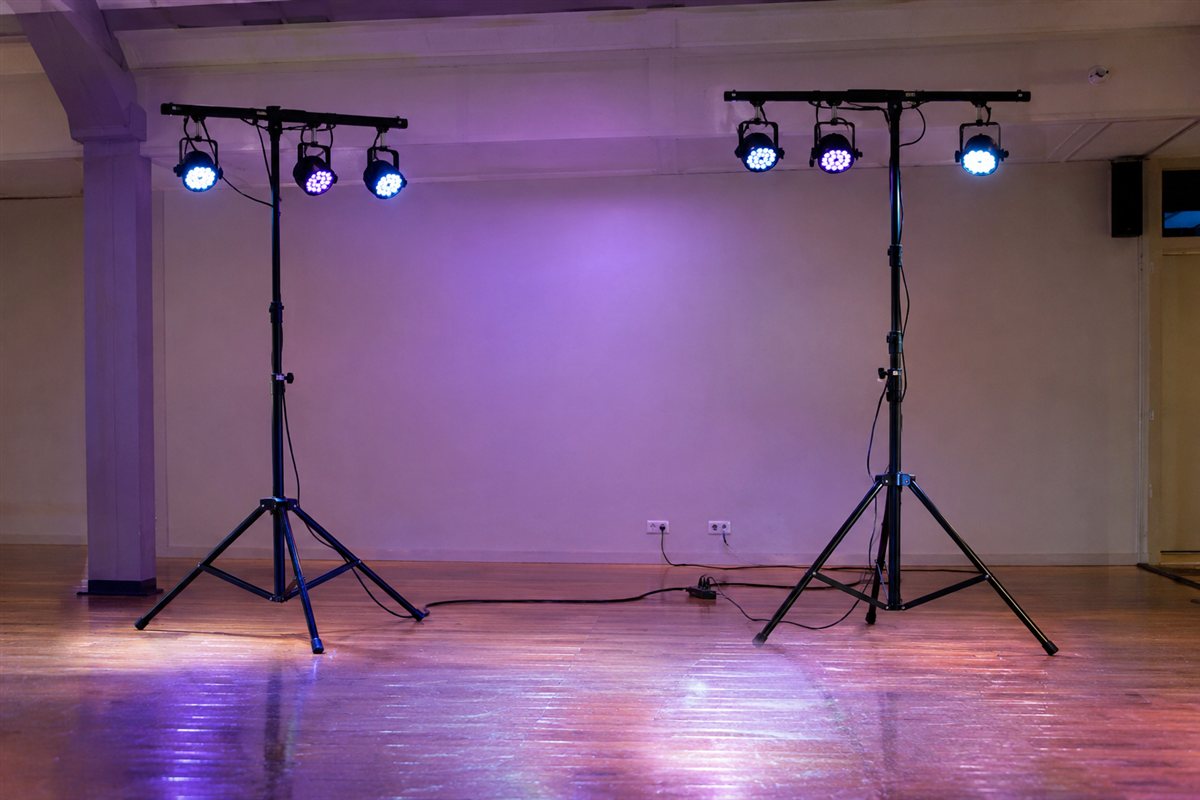
A stage lighting stand holds fixtures above the stage or dance floor. Basic versions are tripod stands with an adjustable pole, while others include a crossbar for several lights or a T-bar. Pick a stand that matches the weight and number of fixtures you plan to use. This guide covers what to weigh before you buy.
These stands suit mobile DJs, bands, churches, schools and small theaters. We have not used these products ourselves. Our picks compare listing information and maker descriptions, so read each listing closely before you decide, and follow the maker’s load limits.
As an Amazon Associate we earn from qualifying purchases. Links on this site are affiliate links, and they do not change the information we give.
In this guide
Quick Picks
| Pick | Product | Best For |
|---|---|---|
| 1 | CHAUVET DJ CH-06 T-Bar Tripod Stand | Best compact T-bar for mobile DJs |
| 2 | On-Stage LS7730 Lighting Stand with Truss | Best truss system for bigger rigs |
| 3 | ProX T-LS35C-STAND Crank Stands (Set of 2) | Best crank-up pair for truss |
| 4 | ProX XT-CRANK14FT-220 Crank Stand | Best heavy-duty tall crank stand |
| 5 | On-Stage LS7720BLT Lighting Stand | Best single stand with side bars |
Our Picks

1. CHAUVET DJ CH-06 T-Bar Tripod Stand — Best compact T-bar for mobile DJs
The CH-06 is the classic single-stand answer for mobile DJs and small stages: a tripod base topped by a 39.5-inch T-bar with eight mounting points, and the mounting hardware is included in the box. It raises fixtures to a maximum height of 9 feet and is rated for a 50 lb load spread evenly across the bar, which covers a typical row of LED PARs and small effect lights. CHAUVET also includes an adaptor for mounting a moving head or followspot at the centre of the bar, something most basic T-bar stands treat as an afterthought. At just 11 lb the stand itself is easy to carry in one hand, and the tripod legs fold down for transport between gigs. Match your total fixture weight against the 50 lb rating before you buy, and plan on sandbags when the stand works in busy rooms with foot traffic.
View CHAUVET DJ CH-06 on Amazon

2. On-Stage LS7730 Lighting Stand with Truss — Best truss system for bigger rigs
When one T-bar is not enough, the LS7730 steps up to a full truss layout: two tripod stands joined by two 5-foot truss sections, giving you a 10-foot span rated for 200 lb of evenly distributed load and room for up to 16 PAR cans. Maximum height is 11.5 feet, high enough to clear a dancefloor or small stage, and the aluminium construction keeps the whole system at roughly 40 lb. On-Stage rates the system for static lights only, so moving heads belong on a different support, and the wide base spread at each end needs real floor space rather than a cramped corner. For bands, school stages and houses of worship that fly the same wash rig show after show, this is the natural upgrade from a pair of independent stands, and it breaks down into the two stands and truss sections for transport.
View On-Stage LS7730 on Amazon

3. ProX T-LS35C-STAND Crank Stands (Set of 2) — Best crank-up pair for truss
Crank-up stands remove the hardest part of rigging: lifting a loaded bar or truss overhead by hand. This ProX set pairs two crank stands that raise to 8.5 feet, each fitted with a T-bar adapter made for ProX triangle truss segments, so the pair can lift a truss run together or work as two independent crank stands at separate positions. ProX rates the pair for up to 360 lb evenly distributed across both stands, comfortably above what a 10-foot truss loaded with modern LED fixtures weighs. The winch lets one person raise the rig in small, controlled increments and lock it off at height, which is exactly the locking behaviour the guide above tells you to check on any crank stand. If you already own or plan to buy ProX triangle truss, this is the matched lifting pair for it.
View ProX T-LS35C-STAND on Amazon
4. ProX XT-CRANK14FT-220 Crank Stand — Best heavy-duty tall crank stand
For production work that outgrows DJ stands, the XT-CRANK14FT-220 is a single heavy-duty crank stand rated for a 220 lb maximum vertical load and a full 14 feet of height, and it ships with a 5-foot T-bar included, so it can fly fixtures straight out of the box. The base opens to a 63-inch diameter for stability under tall, heavy loads, the winch raises and lowers the mast under control rather than by muscle, and the stand carries TUV certification for its safety testing. At 46 lb it is a deliberate two-handed carry, and it also accepts ProX T-adapters for lifting truss sections when paired with a second stand. This is the pick for rental houses, production companies and venues that need one stand to cover everything from a T-bar of wash lights to one end of a serious truss span.
View ProX XT-CRANK14FT-220 on Amazon

5. On-Stage LS7720BLT Lighting Stand — Best single stand with side bars
The LS7720BLT fills the gap between a plain T-bar and a full truss system: a single aluminium tripod stand with a top T-bar plus two side bars, giving mounting space for up to eight PAR cans and a 110 lb evenly distributed capacity. Height adjusts from 60 to 120 inches, so it covers everything from low side-lighting positions to a full 10 feet over a small stage. Aluminium construction keeps the stand itself to about 15.4 lb, easy for one person to carry, position and set up, and the tripod base spreads wide for a stable footprint under a full bar. The side bars are the real difference-maker here, letting effect lights sit outboard of the main bar instead of crowding the centre with the wash lights. For DJs and bands that want one stand to carry a complete small light show, this is the most versatile single-stand layout in the roundup.
View On-Stage LS7720BLT on Amazon
What to Look For
| Factor | Why it matters | What to check |
|---|---|---|
| Maximum height | Higher placement widens the light spread | Compare stated minimum and maximum heights |
| Load capacity | The stand must carry your fixtures with a margin | Add up your fixture weights and compare with the stated limit |
| Base design | Wide bases resist tipping better than narrow ones | Check footprint and leg spread in the listing |
| Crossbar or T-bar | Lets you mount two or more lights on one stand | Look for bar length and clamp style |
| Material | Steel and aluminum differ in weight and sturdiness | Read the material and finish wording |
| Locking system | Controls how reliably the height stays put | Check the clutch, knob or pin style |
| Warranty | Shows how much the maker stands behind the stand | Read the warranty terms in the listing |
Setup and Care Tips
- Place the stand on a flat, firm surface with the legs fully open.
- Mount heavier fixtures low on the stand and raise the pole last.
- Use the safety cable or clamp that comes with each fixture, as the maker directs.
- Add sandbags or weights to the base if the maker allows it.
- Keep cables taped down or routed away from foot traffic.
Mistakes to Avoid
- Ignoring the stated load limit.
- Extending the pole to full height with a narrow base.
- Mixing clamps that do not match the bar diameter.
- Leaving cables where people can trip.
- Skipping the warranty details in the listing.
Stand Types and Configurations
Lighting stands come in several forms, and the right one depends on what you hang and where. Look at the types below before comparing details.
- Single tripod stands: A pole on three legs, with a mounting spigot or top plate. The most common and flexible type for one or two lights.
- T-bar stands: A tripod with a crossbar at the top, which holds several lights side by side.
- Crank-up or winch stands: Use a crank to raise the load. These help with heavier fixtures, and some makers add locks for safety.
- Truss systems: Frames that span between towers. These carry many lights and suit larger shows, though they take longer to set up.
- Boom or side-arm stands: Hold lights out to one side. Useful for side lighting but need a stable base.
Pick the type for the number and weight of your fixtures. A pair of small wash lights suits a T-bar on a compact tripod. Several heavier moving heads may call for a sturdier stand or truss. Check what each listing says about fixtures and mounting, and make sure the top fitting matches your lights.
Height Range, Folded Size and Weight
Stands have a minimum and maximum height, and the numbers matter. Maximum height decides how high you can place the lights, while minimum height and folded length determine how easily the stand packs into a car. Check both before you order.
Think about the room. In a small room with a low ceiling, a tall stand is a hazard, as the fixture may touch the ceiling. In a large hall, a taller stand helps beams clear the crowd. Many people place lights above head height so the beams do not shine into the audience’s eyes.
Weight is a trade-off. Light stands are easier to carry but may be less stable, especially at full height. Heavy stands are steadier but harder to transport. For frequent setup and teardown, compare how each stand folds, whether the legs lock and how many parts you need to carry.
Questions to ask before buying:
- What are the minimum and maximum heights?
- How long is the stand when folded?
- How much does it weigh?
- Does it come with a carry bag?
- Do the height locks hold firmly, and are they easy to use with gloves?
Load Ratings, Base Design and Stability
The stated load limit is the most important figure on a lighting stand, and it is set by the maker. Add up the weight of the fixtures, clamps, cables and any accessories attached to the stand, and compare the total with the limit. Stay well under it, rather than aiming for it. The load limit may also assume a certain height and base arrangement, so read the notes.
The base matters. A wide leg span resists tipping, while a narrow base on a tall stand can topple, especially with a top-heavy load or a bump from a passerby. Look for legs that lock in the open position and feet that grip the floor. On slippery surfaces, rubber feet help.
Many stands allow ballast. Sandbags or weights hung on the base lower the center of gravity, but only if the maker allows it and gives a method. Do not hang heavy items from the stand in ways the maker does not describe.
Wind and crowds affect stability. Outdoors, even a light breeze can push a tall stand, and in a crowded venue people may knock a stand. Consider the setting, and keep stands out of walkways when possible.
Check the locking system. Clamp-style locks and screw knobs both work, but the lock must hold the pole firmly with no slipping. Test it with the weight before the show.
Fittings, Safety and Care
Compatibility between the stand and your fixtures is key. Check the spigot or mounting size and the clamps used to attach the lights. Clamps must match the bar diameter, and mismatched clamps can slip. Use the safety cable or secondary attachment that the maker describes for each fixture.
Think about cable handling. Route cables along the stand legs and tape them down in walkways. Leave enough slack so the cable does not pull the stand. Never let cables hang where people can catch them.
Before every use, inspect the stand. Check that legs open and lock, knobs tighten, poles slide smoothly and there is no bending or cracking. Replace any stand with damaged parts instead of trying to bend it back. A dented pole can fail under load.
Keep stands clean and dry. Wipe off dust and moisture, and store them folded in a bag or case. Lubricate or clean moving parts only as the maker advises.
Signs it is time to replace a stand include bent poles, loose or cracked locks, wobbling legs, worn threads and rust. Budget tiers are easy to describe: basic stands suit light fixtures, mid-range ones add better locks and heavier ratings, and higher tiers offer stronger materials and crank mechanisms. Check the warranty in each listing.
A Setup Checklist Before the Show
Lighting stands look simple, yet a rushed setup is how stands tip and fixtures fall. Go through this checklist at every venue, whether you are a mobile DJ, a band or a small theater crew.
- Check each stand for bent tubes, missing pins, cracked feet or stripped knobs before loading it in the car.
- Confirm the total weight of the fixtures on each stand, including clamps and cables.
- Pick level ground and open the legs fully before raising the stand.
- Tighten every locking knob and test that sections do not slip under load.
- Route cables away from walkways and tape or cover them where people walk.
- Add sandbags or weights on the base if the maker or your venue suggests it.
The CHAUVET DJ CH-06, the On-Stage LS7730 and LS7720BLT and the ProX crank stands in this guide each have a different intended use, from a compact T-bar for a DJ booth to a taller crank stand for a bigger rig. Read the specific maker guidance for the load each one supports.
T-Bar, Truss and Crank Stands Compared
| Type | Good for | Keep in mind |
|---|---|---|
| T-bar tripod | Two to four small fixtures, quick DJ setups | Limited height and load, check the crossbar width |
| Truss stand | Larger rigs with a row of fixtures | Needs more space and a longer setup |
| Crank-up stand | Raising a heavy load safely from the ground | Heavier and bulkier to carry |
| Single stand with side bars | Small stages or corner accents | Check how the side bars hold the fixtures |
If you often load in alone, a lighter stand with fewer parts saves time. If you carry heavy moving heads, a sturdy crank stand makes more sense.
Why Weight Limits Shrink as a Stand Rises
Always follow the weight limit printed by the maker, and remember that the limit applies when the stand is on a flat surface and fully extended. Heavy fixtures at the top of a tall stand raise the center of gravity, which makes tipping easier. A wide base and weighted legs help, and sandbags on the feet add stability when permitted.
Keep stands away from crowd traffic and speaker stacks that may be bumped. Outdoor stages add wind to the equation, so check the venue guidance and lower the stand if gusts rise.
Transport, Folded Size and Storage
Look at the folded length, because a stand that does not fit your vehicle will not leave the garage. A carry bag protects finishes and keeps small parts together. After each show, wipe down the tubes, check the knobs for wear and store the stand with the sections retracted so springs and locks stay relaxed.
Mistakes That Lead to Tipped Stands
Most accidents come from a short list of habits. Using a stand at full height with a heavy load on top is the first, because the weight limit usually drops as the stand extends. Overloading a T-bar with more fixtures than the crossbar is built for is the second, and stacking lights on one side without balancing them is the third.
Another common problem is skipping the safety cable. Most fixtures include a loop for a secondary attachment, and using it adds a layer of protection if a clamp loosens. Keep clamps tight, and check them again after the first few minutes, since vibration from nearby speakers can loosen knobs.
Finally, be careful when you move a stand with fixtures attached. Lower it, balance the load and ask for help rather than walking a tall rig across a stage. A moment of caution beats a broken light or an injury, and your venue may have its own rules.
How to Read a Stand Listing
Pay attention to maximum height, minimum height, tube diameter, base footprint and weight capacity. Some listings give the capacity per stand and others per set, which changes the math. Check whether the stand includes a spigot size that matches your fixtures or truss, and look at photos of the locking mechanism, since a robust knob or collar is easier to trust on a dark stage.
Going Deeper: The Decisions That Shape Living With a lighting stand
The picks and guidance above cover what to buy. This section covers how to judge — the criteria experienced owners of a lighting stand weigh most heavily once the first impressions fade, and the ones that decide whether a purchase still feels right a year from now.
Load capacity with honest headroom
Add up the real weight of every fixture, clamp, and cable the stand will carry, then choose a stand rated comfortably above that figure. Ratings assume a centered, balanced load on level ground; real stages add tilt, vibration, and the occasional bumped leg. Headroom is not waste — it is what keeps a stand stable when a cable gets tugged mid-show.
Height and footprint together
Taller stands need wider leg spreads to stay stable, and that footprint competes with drum kits, monitors, and dance floors. Check both numbers: the maximum height you will actually use, and the floor space the legs claim at that height. In cramped venues, a slightly shorter stand that fits the room beats a tall one folded into a corner at half height.
Lift mechanism and effort
Crank-up stands trade money for backs: heavy bars rise smoothly without a deadlift, while friction-lock tripod stands are lighter and faster for small loads. Consider who sets up, how often, and how heavy the bar really is at the end of a long load-in. The mechanism you curse every gig is the wrong mechanism, whatever the brochure says.
Build materials and joints
Steel stands are heavier and tougher; aluminum travels easier and resists rust. Either way, the joints, collars, and leg braces decide longevity — those are the parts that loosen, crack, or seize. Inspect how the locking knobs feel and whether replacement parts exist, because stands usually die at one small joint, not all at once.
Compatibility with your fixtures
T-bars, truss sections, and speaker-style top mounts each expect particular fittings. Confirm the mounting pattern, bar length, and whether your fixtures’ clamps match before buying. Adapters exist for most mismatches, but every adapter adds wobble and setup time, so a stand that fits your bar natively is worth more than a cheaper one plus a bag of workarounds.
Stability features and safety
Air-cushioned sections lower gently instead of crashing down on fingers, and leveling legs handle uneven floors and outdoor ground. Safety pins or secondary locks matter when loads hang over people. Treat these as core features rather than luxuries: a stand’s job is not just to hold lights up, but to keep them up when the room gets lively.
Lighting stand in Real Life: Situations Worked Through
Specifications and feature lists become real only inside actual routines. Here is how the choice of a lighting stand plays out in the situations buyers describe most often — and which priorities rise to the top in each.
A solo DJ with one lighting bar
The priority is a stand that one person can carry, open, and raise safely while the bar is attached. A compact T-bar tripod with a sensible height range covers most function rooms, and quick setup beats maximum altitude. Keep the footprint in mind for tight corners beside the booth, where a wide leg spread may simply not fit.
A band running a small truss
Truss systems spread weight across two stands, so matched pairs and even cranking matter more than any single stand’s rating. The pair must rise together without twisting the truss, which is where crank mechanisms earn their cost. Plan the floor space honestly: truss footprints are generous, and pub stages are not.
A school or venue install crew
Where different volunteers set up each event, stands should be forgiving: clear locks, captive knobs that cannot be lost, and sections that cannot over-extend. Label each stand with its load limit in plain language. The best venue stand is the one a new helper can deploy correctly after a two-minute briefing.
Outdoor events on grass or gravel
Outdoors adds wind and uneven ground. Wider stances, leveling legs, and ballast — sandbags or weights used as the maker allows — become essential rather than optional. Lower maximum heights in gusty conditions, and never leave a loaded stand unattended outside; weather changes faster than set lists.
Step by Step: Getting the Most From Your Lighting stand
Whether this is your first lighting stand or a replacement for a worn-out favorite, the sequence below — setup, first use, and the habits that follow — is where good purchases become good ownership.
Inspect before you load
Check legs, collars, cranks, and cables for damage, and confirm every knob and pin is present. A stand with a cracked collar should be retired from overhead duty until repaired.
Set the footprint first
Open the legs fully on the flattest ground available and lock the braces. Position the stand where it will finally live before adding weight — dragging a loaded stand is how legs bend.
Mount fixtures at low height
Attach the bar or fixtures while the stand is low, connect cables with enough slack for the raise, and fit safety cables. It is far easier to fix a clamp now than at full extension.
Raise in stages, checking balance
Extend or crank one section at a time, watching that the load stays centered and cables are not snagging. Lock and pin each section as you go rather than trusting friction alone.
Add ballast and manage cables
If the situation calls for it, add sandbags or weights to the legs as the design allows. Tape down or route cables so nobody’s foot can test your stability for you.
Lower in reverse order after the show
Bring the load down slowly, one section at a time, keeping hands clear of pinch points. Remove fixtures at low height, coil cables loosely, and note any wobble or stiffness while you still remember it.
Care and Upkeep Over Time
Stands fail gradually, then suddenly. Wipe down sections after outdoor or smoky gigs so grit does not grind inside the tubes, and work each collar and crank through its full range every few months to keep threads and gears free. A drop of suitable lubricant on crank gears, used sparingly, keeps the mechanism honest; oil on friction surfaces that are meant to grip is a mistake, so follow the maker’s guidance for your model.
Store stands vertically or in their bags, not under piles of heavier gear that bend legs and bars. Tighten loose rivets and replace worn knobs early — small parts are cheap, while a collapsed stand costs fixtures and possibly injures someone. Keep a simple rule in the crew: any stand that wobbles under load gets tagged and checked before its next show, no exceptions.
Common Mistakes That Shorten the Honeymoon
Most disappointment with a lighting stand is not caused by the product at all, but by a handful of repeatable mistakes new owners make. Here are the ones worth avoiding from day one.
Loading to the exact rating
A stand at its paper limit, off-center, on a real floor, is overloaded in practice. Headroom is the rating you actually bought.
Raising before securing
Extending a stand and then discovering an unlocked collar or a missing pin turns setup into gambling. Lock as you go, every section.
Dragging a loaded stand
Dragging bends legs and loosens braces. Lower it, move it, raise it again — the two minutes are cheaper than the stand.
Ignoring cable pull
A taut cable yanking sideways on a raised stand is a real sideways load. Leave slack, route sensibly, and let no cable become a tripwire attached to your lighting.
Skipping the post-show inspection
Wobbles and stiffness noticed at teardown get forgotten by the next gig. Tag and note problems while your hands are still on the stand.
Troubleshooting: When Something Seems Off
Before assuming the worst — or booking help — work through the common problems below. Most lighting stand issues have ordinary causes and unglamorous fixes.
Problem: a section will not lock
Clean grit from the collar, check for a bent tube or a worn knob, and never force it. A section that cannot lock retires the stand from overhead duty until repaired.
Problem: the crank feels gritty or stiff
Debris in the gear or a dry mechanism is the usual cause. Clean it, lubricate only as the maker directs, and work the mechanism through its range unloaded before trusting it with a bar.
Problem: the stand rocks on a flat floor
One leg is bent, a brace is loose, or a foot is damaged. Set the stand unloaded, find the rocking corner, and repair the cause — shimming a rocking stand under load is a story that ends badly.
How the Options Compare — and How to Choose Between Them
Among the picks above, the compact T-bar stand suits light bars and fast solo setups, the truss system suits wider, heavier rigs shared across two stands, and the crank stands suit anyone lifting serious weight without a second pair of hands. The heavy-duty tall option earns its place for high throws in larger rooms, while the single stand with a side bar balances capacity and simplicity. Match the stand to the heaviest load you actually hang and the tightest floor you actually play; buying for an imaginary arena helps nobody.
Ownership, Month One Versus Year One
The first month with a new lighting stand teaches lessons no listing can: the feature you use daily is rarely the one that sold you, and the small friction you noticed on day two is the one that decides whether the product earns its place. This is why experienced buyers judge a lighting stand twice — once against the checklist before purchase, and once against their actual routine a few weeks later. If the second judgment fails, return windows and resale options matter more than pride. If it passes, you have bought well in the only sense that counts: the product fits the life it was bought for, not the life in the advertisement. Keep notes during that first month — what delighted, what annoyed, what you would check first next time — because those notes are the most personalized buying guide you will ever own, and they make the next purchase in this category dramatically easier to get right.
The Total Cost Nobody Lists
The purchase price of a lighting stand is only the entry fee. Ownership adds consumables, replacement wear parts, occasional professional help, storage, and the time cost of maintenance done properly — or the larger cost of maintenance skipped. None of this argues against buying; it argues for buying with open eyes. A slightly better-made lighting stand whose parts are available and whose upkeep is simple often costs less across five years than a cheaper one that fights its owner monthly. When you compare options, mentally add a year of realistic running costs and care time to each, and notice how the ranking shifts. The cheapest lighting stand is frequently the one you maintain without resentment, because maintained equipment lasts, and lasting equipment is where the savings actually live.
When Something Goes Wrong: A Calm Troubleshooting Order
Every lighting stand eventually misbehaves, and the order in which you investigate decides whether the fix is free or expensive. Start with the obvious and the external: power, connections, settings, fit, cleanliness — the causes that require no parts and no tools beyond your hands. Then consult the manual’s troubleshooting section, which exists because your problem has happened to thousands of owners before you. Only after those steps should you suspect component failure and start pricing repairs or replacements. Keep a simple log of symptoms and what fixed them; patterns in that log predict future issues and make any conversation with support or a repairer ten minutes shorter. Most importantly, stop using a lighting stand that behaves in a way that feels unsafe, however inconvenient the pause is — equipment can be replaced on a schedule that injuries cannot.
Buying for the Household, Not Just the Buyer
A lighting stand rarely serves one person. Partners, children, grandparents, guests, and helpers all interact with it, and the best purchase is the one the least confident user can operate safely and happily. That means controls that explain themselves, routines that can be taught in minutes, and documentation kept where the household actually looks. Before buying, walk through the product’s daily routine as each likely user — including the one who will never read the manual — and let their experience veto options that only work for enthusiasts. This household test also reveals hidden requirements: storage another person can manage, cleaning another person will actually do, and safety steps that survive being performed by a tired human at the end of a long day. Products that pass it become shared tools; products that fail it become one person’s burden and everyone’s complaint.
Seasonal Rhythms and Storage
Most lighting stands have a season — of heavy use, of storage, or of weather that tests them — and planning for that rhythm prevents the classic failures that happen at transitions. Before a storage season, clean and inspect the lighting stand, complete any pending maintenance, and store it in the conditions its materials prefer: dry, temperate, and protected from crushing, sunlight, or pests as appropriate. Before the busy season returns, reverse the ritual: retrieve it early, run a full function check, refresh consumables, and fix small issues while there is still time to order parts. Owners who keep this twice-a-year rhythm rarely face a dead product on the one day it is truly needed, and their equipment lasts noticeably longer than identical items owned by people who meet it again only in an emergency.
Passing It On: Resale, Hand-Me-Downs, and Honest Condition
A well-kept lighting stand often has a second life — sold, gifted, or handed down — and its condition at that moment is the final grade on your ownership. Keeping manuals, receipts, and spare parts together, maintaining the product on schedule, and being honest about wear when passing it on all protect the next owner and your own reputation. If you are on the receiving end of a used lighting stand, inspect it as this guide suggests: function first, wear points second, safety always, and price in the consumables and parts it will need immediately. Retire rather than pass on anything whose safety-critical parts are worn beyond honest repair. The secondhand market in lighting stands works beautifully when both sides treat condition as information rather than advertising.
The Upgrade Question: When Better Is Worth It
Sooner or later every owner of a lighting stand wonders about upgrading, and the honest trigger is a specific, recurring limitation — not a launch event. Write down the exact moments your current one fails you: the job it cannot do, the friction it repeats, the user it excludes. If the list is empty, your lighting stand is not outdated; it is sufficient, which is the best state equipment can be in. If the list is real, it becomes your shopping brief, and it will protect you from paying for improvements in areas you never struggled with while missing the one upgrade that matters. Sell or pass on the old one while it still serves someone well, and the upgrade costs less in every sense. Chasing novelty is expensive; answering a written list is shopping.
A Short Decision Worksheet Before You Buy
Reading guides is not the same as deciding. Work through the six prompts below — each distils one of the criteria above into a question about your own life with a lighting stand. Ten honest minutes here prevents most returns, exchanges, and quiet disappointments.
Load capacity with honest headroom
Before you commit, turn this into a question about your own situation and answer it in writing. If your answer is vague, that vagueness is the finding: it marks the point where a little more measuring, testing, or honest thinking will do more for your satisfaction than any further comparison of listings.
Height and footprint together
Write your answer down rather than holding it in your head. Buyers consistently overestimate how well they remember their own requirements once the shopping begins, and a written answer from before the excitement started is the most trustworthy advice you will get during it.
Lift mechanism and effort
This is the criterion to test physically wherever you can — in a shop, with a tape measure, or by rehearsing the routine the product will join. Assumptions about it are cheap to make and expensive to live with, while a five-minute test now settles it permanently.
Build materials and joints
Discuss this one with anyone else who will live with the purchase. Requirements that seem obvious to the buyer often look different to the person who will clean, store, share, or rely on the same product, and their answer belongs in the decision before money moves.
Compatibility with your fixtures
Rank this against the other criteria rather than judging it alone. Almost no lighting stand wins on everything; the right purchase is the one that wins on the criteria your life actually stresses, and accepts its compromises where your life is forgiving.
Stability features and safety
If you are torn between two options, let this criterion referee. Note how each candidate performs on it in your specific circumstances — not in the manufacturer’s scenario — and give the point to the one that serves your routine rather than your imagination.
FAQ
How high should a lighting stand be?
Many people place lights above head height so the beams do not shine into the audience. The right height depends on the venue.
Can one stand hold several lights?
Yes, with a crossbar or T-bar, as long as the combined weight stays within the maker’s stated limit.
What is the difference between a tripod stand and a T-bar stand?
A tripod stand has a single pole with a top mount, while a T-bar adds a crossbar to hold several lights. Choose by the number of fixtures you plan to mount.
How do I know how much weight a stand can hold?
Look for the maker's stated load limit in the listing or manual. Add up the weight of the fixtures, clamps and accessories, and stay under the limit.
Can I use camera or photography stands for stage lights?
Some may work, but they are designed for different loads. Check the maker's guidance and make sure the stand's rating and fittings suit your fixtures.
Do I need sandbags?
They can help stability on tall stands or when loads are top-heavy, but only if the maker allows them. Read the manual and use the method it describes.
How can I make a stand more stable outdoors?
Use a wide base, add ballast where the maker allows and avoid raising the pole higher than needed. Take extra care in wind, and consider whether it is safe to use at all.
How do I check clamp size?
Measure the diameter of the bar or pole and compare it with the clamp's stated range. Check both the listing for the clamp and the fixture's mounting notes.
How much weight can I safely put on a lighting stand?
Stay within the maker’s rated capacity, and leave headroom for the reality that loads are rarely perfectly centered. Include the bar, clamps, fixtures, and the pull of cables in your total. If you are close to the limit on paper, you are over it in practice — move up a class of stand.
Are crank stands worth it for small rigs?
For a light bar you raise twice a night, probably not; a simple tripod is faster and lighter. Cranks earn their keep when the load is heavy, the height is high, or the same person sets up alone every time. Judge by your back at load-out, not by the showroom floor.
Can I use a speaker stand for lights?
Some stands share fittings, but a speaker stand is designed for a centered vertical load, not a wide bar with off-center fixtures and cable pull. Unless the maker rates it for lighting use, treat it as the wrong tool. Purpose-built lighting stands add the bars, pins, and bracing the job expects.
How do I stop a stand from wobbling?
Start with fully spread legs on level ground and every collar properly locked. Check that the load is centered and that no section is extended beyond its stop. Persistent wobble usually means a worn collar or bent leg — retire and repair rather than compensating with tape and hope.
Do I need sandbags indoors?
On a stable floor with a modest load and no passing crowd, usually not. Near dance floors, exits, or anywhere the stand can be bumped, ballast is cheap insurance. Follow the stand maker’s guidance on where weight may be added, because hanging bags from the wrong point can make things worse.
What height should front lights be for a band?
High enough to clear the performers’ heads and light faces from slightly above, which usually means the bar sits comfortably above head height with fixtures angled down. Too low creates glare and harsh shadows; too high turns eye sockets into caves. Check from the audience and adjust in small steps.
Can one stand hold a truss by itself?
No — truss sections are designed to be supported at both ends by a matched pair of stands. Running a truss on a single stand overloads it off-center and invites collapse. If space forbids a pair, use a T-bar stand designed for the load instead.
How long should a good stand last?
With sensible loads and basic care, a quality stand serves for many years of regular gigs. The wear points are collars, knobs, and leg braces; replace those as they tire and the frame keeps working. Stands that live in damp vans or get routinely overloaded live much shorter lives.
The Short Version
The right stand holds your lights steadily at the height you need. Compare load limits, base design and locks, read the warranty, and choose a stand sized for your fixtures.
Related Guides
- How to Choose the Best Stage Lighting Packages: A Buyer's Guide
- How to Choose the Best Stage Lighting: Buyer's Guide (2026)
- How to Choose the Best Two Stage Snow Blowers: A Buyer's Guide
- How to Choose the Best Deck Lighting: Buyer's Guide (2026)
- How to Choose the Best Landscape Lighting: Buyer's Guide (2026)