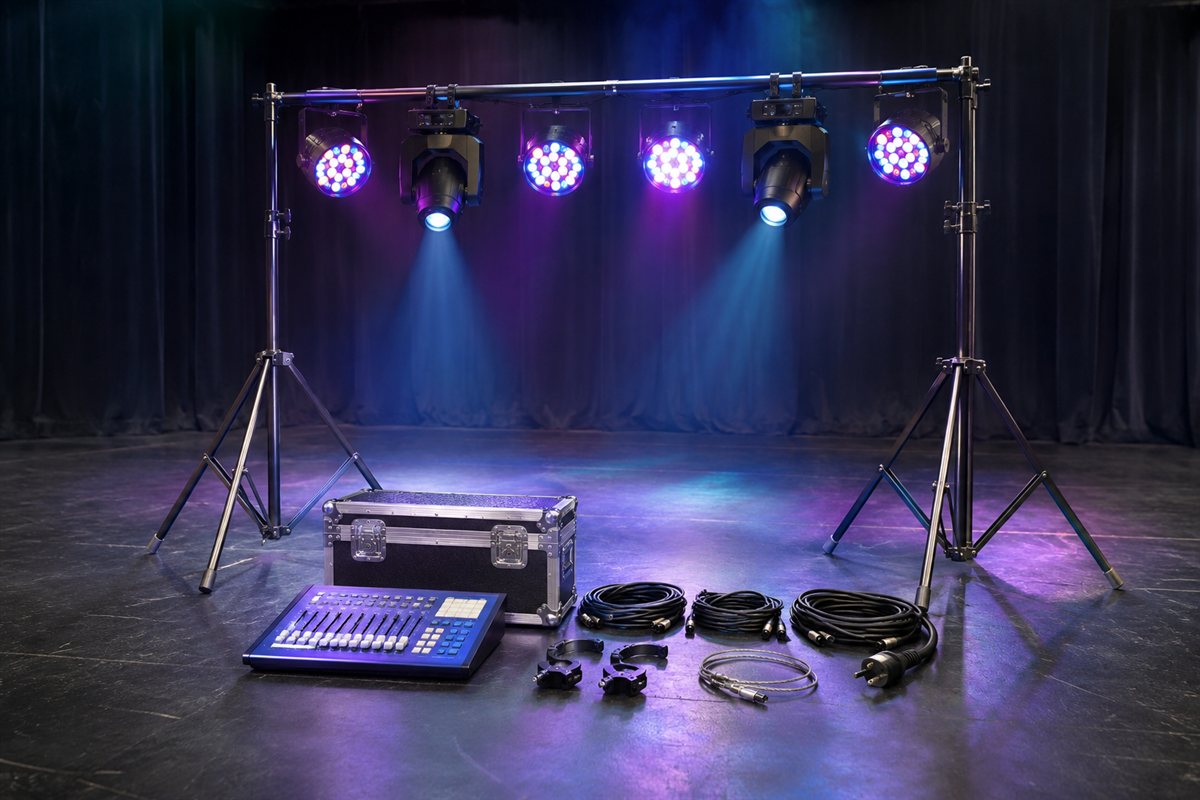
A stage lighting package bundles several fixtures with the stands, cables and often a controller so you can light a show without piecing parts together. Common kits mix wash lights, spot effects and a DMX controller. This guide covers what to weigh before you buy.
These packages suit bands, mobile DJs, theaters, schools and event crews. We have not used these products ourselves. Our picks compare listing information and maker descriptions, so read each listing closely before you decide.
As an Amazon Associate we earn from qualifying purchases. Links on this site are affiliate links, and they do not change the information we give.
In this guide
Quick Picks
| Pick | Product | Best For |
|---|---|---|
| 1 | CHAUVET DJ GigBAR Move + ILS | Best overall lighting package |
| 2 | CHAUVET DJ GigBAR 2 | Best value all-in-one bar |
| 3 | ADJ Mega Flat Hex Pak | Best wash and uplighting kit |
| 4 | U`King Stage Lights 10-Pack, 36LED RGB Par Lights | Best budget multi-fixture package |
| 5 | U`King Battery Powered Stage Lights, 8-Pack | Best wireless uplighting package |
Our Picks
1. CHAUVET DJ GigBAR Move + ILS — Best overall lighting package
The GigBAR Move + ILS is the most complete single-bar package in this category: moving heads, derbies, wash lights, a laser and strobes all pre-mounted on one bar, so the whole rig goes from case to working light show in minutes. The two moving heads use 32-watt cool-white LEDs with separate color and gobo wheels, and a Totem mode keeps the beams aimed at the floor when the bar is mounted high. Control is where it pulls ahead — 3, 29 or 51 DMX channels, built-in D-Fi wireless, and CHAUVET’s ILS system, which lets compatible fixtures across the room synchronize without a DMX cable run. The package includes the tripod, wireless footswitch, RF remote and carry bags. At 250 watts total draw and about 31 pounds, it is a serious mobile rig for weddings and mid-size venues rather than a living-room toy, and it is priced like one.
View CHAUVET DJ GigBAR Move + ILS on Amazon
2. CHAUVET DJ GigBAR 2 — Best value all-in-one bar
The GigBAR 2 has been the default recommendation in this category for years because it packs four effect types onto one bar at a mid-level price: a pair of LED derby fixtures, LED pars, a red-and-green laser, and four high-power LED strobes. The pars and strobes include UV, which adds blacklight effects and better color mixing than plain RGB. Control options cover most real-world use — stand-alone and sound-activated programs, the included IRC-6 remote and wireless footswitch, or DMX in 3, 11 or 23 channel modes — and up to eight units can be power-linked. The tripod, tripod bag and carry bags are in the box. Total draw is just 68 watts and the bar weighs about 25.6 pounds, so one person can transport and set it up easily. It lacks moving heads, which is exactly the step up the GigBAR Move models above it are selling.
View CHAUVET DJ GigBAR 2 on Amazon
3. ADJ Mega Flat Hex Pak — Best wash and uplighting kit
Not every stage needs derby effects and lasers — sometimes the job is clean, even color wash and uplighting, and that is what this ADJ kit is built for. The Pak bundles four Mega Hex Par fixtures, each running five 6-watt 6-in-1 LEDs in red, green, blue, amber, white and UV, which gives far better color rendering and pastel range than basic RGB pars. The fixtures use ADJ’s sit-flat design with power and DMX connections on the side, so they sit flush on the floor for uplighting or inside truss without a scissor yoke fighting you. Crucially for a package, the cabling is included: four IEC-to-Edison power cables, three 6-foot DMX cables, a UC IR wireless remote and a padded carry case. Buy it as the wash foundation of a larger rig, or as a complete uplighting package for weddings and corporate rooms on its own.
View ADJ Mega Flat Hex Pak on Amazon

4. U`King Stage Lights 10-Pack, 36LED RGB Par Lights — Best budget multi-fixture package
If the budget matters more than brand badges, this U`King package puts ten par fixtures in the box for less than a single pro-grade light bar. Each unit carries 36 RGB LEDs and runs on 7 DMX channels, with DMX512, remote control, sound-activated and automatic modes, plus strobe and fade effects. Brackets and screws are included, so the lights can stand on the floor as uplights or hang from a truss or T-bar. Ten fixtures give you real placement flexibility — wash a back wall, uplight columns, and still have units left for the dance floor — which is something a single bar system cannot do at any price. The trade-offs are the ones you would expect at this level: build and brightness are aimed at parties, bars and small stages rather than touring, and you will need your own stand and DMX cables to build the full rig.
View U`King Stage Lights 10-Pack on Amazon

5. U`King Battery Powered Stage Lights, 8-Pack — Best wireless uplighting package
Cable runs are the slowest, ugliest part of uplighting a venue, and this eight-pack removes them. Each fixture is a rechargeable par with 18 two-watt RGB LEDs, so you place the lights where they look best — along a wall, under a head table, inside architectural features — without hunting for outlets or taping down cords. Control runs over wireless DMX512 across 7 channels, with sound-activated modes for parties where no controller is present. The adjustable bracket tilts each light to the angle you want, with a beam angle of about 30 degrees that suits wall-wash duty. Battery power is the headline, but plan around it: charge fully before the event and treat these as event-duration lights rather than install fixtures. For wedding and event uplighting where setup time is tight and the room has no convenient power, this is the most practical package here.
View U`King Battery Powered Stage Lights 8-Pack on Amazon
What to Look For
| Factor | Why it matters | What to check |
|---|---|---|
| Fixture type | Wash, spot and effect lights do different jobs | Check which fixtures are in the kit and how many |
| Control | Decides how easily you can change looks | Look for DMX, sound-active modes and included controllers |
| Brightness and beam | Room size and distance change what you need | Compare watts and beam angle in the listing |
| Power and cabling | Total draw must suit your outlets | Check the power figures and included cable lengths |
| Mounting | Stands or truss decide where lights go | See what stands, clamps or brackets are supplied |
| Portability | Touring users carry the kit often | Compare weight and any carry case |
| Warranty | Shows how much the maker stands behind the kit | Read the warranty terms in the listing |
Setup and Care Tips
- Add up the total power draw before connecting everything to one circuit.
- Follow the maker’s guidance on stand load limits and clamps.
- Label DMX addresses so you can change them quickly.
- Keep vents clear and let fixtures cool before packing.
- Coil cables loosely and store them dry.
Mistakes to Avoid
- Buying more fixtures than your venue needs.
- Overlooking the controller type and cable lengths.
- Ignoring stand weight limits.
- Putting every light on a single circuit.
- Skipping the warranty details in the listing.
Fixture Types You Find in a Package
Stage lighting packages bundle several fixtures, and often a controller, cables and stands. Knowing what each fixture does helps you judge whether the mix suits your needs.
- Wash lights (par-style): Spread color across the stage or a wall. They are the workhorse of most packages and set the overall mood.
- Moving heads: Pan and tilt to throw beams or patterns around the room. They add movement but are more complex to control.
- Beam and spot effects: Produce focused beams or gobo patterns. Good for impact in a dark room.
- Strobes: Produce rapid flashes. Be mindful of audience comfort and venue rules, since flashing lights can affect some people.
- Derby and laser-style effects: Throw moving patterns into the room. Check any safety guidance and local rules that apply to laser products.
Look at the listing for the number of each type. A package with only effect lights can be lively but hard to use for general lighting, while one with only washes may feel plain. A balanced mix serves most small stages. Think about what you will use the lights for: a band, a mobile DJ, a church, a school play or a small venue each have different needs.
Control, DMX and Automation
How you control the lights shapes how much you will enjoy them. Many packages include a simple controller, while others rely on built-in modes or sound activation.
- DMX controller: Lets you control each fixture separately. This gives the most flexibility but needs setup, addressing and some learning time.
- Built-in programs: Fixtures run automatic shows, sometimes triggered by sound. These are easy to use but offer less control.
- Remote control: Some fixtures come with a remote for basic changes.
- App or wireless control: Some models offer wireless options. Check the listing for what is supported and what extra equipment is needed.
Check the number of channels each fixture uses, since a DMX universe has a limited total, and a larger count of fixtures with many channels each can use it up. Compare the controller’s channel count with your fixtures. Check the connectors too, as DMX cables come with different plug types and the fixtures and controller need to match or use adapters.
Think about who will run the lights. If the operator is a volunteer or a musician, simple control is usually better. Label each fixture’s DMX address so you can change them quickly.
Power, Rigging and Setup
Lights draw power, and a package can add up quickly. Check the wattage or current of each fixture in the listing, add them together and compare the total with the circuit you will use. Spread the load over more than one circuit if needed, and never overload an outlet or extension cord. If you are unsure, ask a qualified electrician.
Plan the mounting. Stands, trusses or clamps hold the lights, and each has a weight limit. Compare the combined weight of the fixtures with the stand’s stated limit. Use safety cables where the maker directs, and point lights where they cannot fall into the audience.
Plan the cabling:
- Power cables long enough to reach outlets without stretching.
- DMX cables of suitable length, kept away from power cables where possible.
- Cable covers or tape in walkways to reduce trip hazards.
- A way to keep cables tidy, such as ties or a case.
Test the package at home before an event. Run through every mode, check each fixture works and confirm cables reach. This saves stress on the day.
Portability, Venue Fit and Upkeep
Where the lights will be used changes what you should buy. For a touring act or mobile DJ, weight, case size and quick setup are important. For a fixed installation, mounting options and quiet operation may matter more. Check whether the package comes in a case or bag.
Think about the room. Ceiling height, the audience position and ambient light all affect how effective the lights are. In a small, low room, powerful effect lights can overwhelm, while a large hall needs enough output to be seen. Check the listing for beam angles and brightness descriptions, but treat them as a guide, since conditions vary.
Think about heat and noise. Fixtures with fans can be audible in a quiet room, and heat builds up if vents are blocked. Keep vents clear and allow fixtures to cool before packing.
Upkeep is simple. Dust lenses with a soft cloth, check clamps and cables for wear, and keep manuals handy. Replace parts that show damage or flicker. Signs the package no longer suits you include missing features you need, repeated failures and difficulty finding replacement parts.
Budget tiers are easy to describe: entry packages offer basic effects and simple control, mid-range ones add more fixture variety and better build, and higher tiers add finer control and sturdier fixtures. Check each listing for what is included and the warranty.
Stage Lighting Glossary for Package Shoppers
Lighting listings use shorthand that can be daunting if you are setting up your first show. These definitions will help.
- Wash light: a fixture that spreads color across a wide area.
- Spot: a fixture that produces a tighter, more defined beam.
- Beam angle: how wide or narrow the light spreads.
- DMX channels: the number of control slots a fixture uses on a lighting controller, which affects how many fixtures you can run from one line.
- Sound-active mode: a mode where lights respond to music without a controller.
- Truss or stand: structures that hold the lights in position.
- Clamp and safety cable: hardware that fixes a fixture to a bar and provides a backup if the clamp fails.
Terms differ a little between makers, so check what each fixture’s manual says about its modes and channel counts.
Which Package Fits Which Event
| Event type | What the package should include | Planning note |
|---|---|---|
| Small band or open mic | A few wash lights and simple control | Keep setup quick between acts |
| Mobile DJ work | Compact effects, stands and a controller | Think about load-in and storage |
| Church or school stage | Wash lights, spots and dimming control | Check ceiling or bar options |
| Dance floor or party room | Moving effects and sound-active mode | Count outlets and cable length |
| Permanent install | Fixtures with mounting hardware | Involve a professional for overhead work |
Begin with how the room will look from the audience’s seat, and then count what you need to make that happen. A few well placed fixtures can look better than a large number of random ones.
A Pre-Purchase Planning List
- Sketch the stage and mark where each fixture will go.
- Count outlets and note how much power each fixture draws according to the maker’s specifications.
- Decide how you will control the lights, whether by controller, app or built-in modes.
- Measure cable runs so you buy lengths that reach without strain.
- Plan how the lights will be mounted, and confirm that the stands or bars can support the weight listed by the maker.
- Think about transport. Cases or bags save fixtures from damage.
- Check that the package includes spare fuses, clamps or cables where possible.
A little planning here prevents the classic problem of arriving on show day with plenty of lights and nowhere to plug them in.
Electrical Work, Rigging and When to Hire Help
Lighting uses mains power, and hanging equipment overhead carries real risk. Follow the maker’s instructions for power loads, cable types and mounting. Never exceed the capacity of an outlet or extension cable, and use equipment designed for the job.
For overhead rigging, fixed installations or work that involves a building’s wiring, hire a qualified lighting technician or electrician and follow local regulations. Use safety cables on any fixture that hangs above people, and inspect clamps and brackets before every show.
If you operate in a rented venue, ask the venue about power availability, rigging points and any rules about haze, fog or effects that may affect smoke alarms.
Setting Up a Show Day Routine
A repeatable routine makes every event calmer. Arrive early, check the power supply and lay out cables before you raise any stands. Place heavier items low and keep cable runs tidy so no one trips on them. Tape down cables in walkways using the tape and methods the venue allows.
Power up the fixtures one at a time and check each one against your plan. Set the control mode, confirm the addresses if you use a controller, and run through the looks you intend to use. Fix any issues now, not after the doors open.
At the end of the night, let the fixtures cool before packing them. Coil cables gently, label them if you can, and store small hardware in a marked bag. Look over clamps, cables and housings for wear, and set aside anything that looks damaged until you have checked it against the maker’s guidance.
Finally, keep a short notes file with settings and what worked at each venue. It makes the next setup faster and helps you plan any additions to your package.
Going Deeper: The Decisions That Shape Living With a stage lighting package
The picks and guidance above cover what to buy. This section covers how to judge — the criteria experienced owners of a stage lighting package weigh most heavily once the first impressions fade, and the ones that decide whether a purchase still feels right a year from now.
Coverage for your actual stage size
Start with the width and depth of the spaces you really play — a coffeehouse corner, a school stage, and a wedding hall are three different lighting problems. A package that washes a small stage evenly may leave a wide stage with dark edges. Think in terms of throw distance and spread: how far the fixtures sit from performers and how wide each beam opens determines whether faces are lit or lost.
How the pieces work together
A good package is a system, not a pile of fixtures. Bars that combine effects, pars that wash, and any included stands or cases should share compatible control so one person can run the show. Mixed gear from different ecosystems means adapters, extra cables, and more failure points at setup time, so judge the package as a whole rather than by its flashiest single fixture.
Control options and learning curve
Decide who runs the lights. A solo performer needs footswitch or sound-active modes that work without attention; a DJ may want simple DMX scenes; a venue tech wants full channel control. The best package is the one whose control depth matches its operator — unused complexity is just weight, cost, and setup time you carry to every gig.
Setup and teardown time
Time yourself honestly: school and wedding work rewards packages that go up in minutes with few cables, while a fixed venue install can tolerate more rigging. Battery fixtures remove cable runs but add charging discipline. If you regularly set up alone, every extra stand, clamp, and cable run is multiplied by one pair of hands.
Transport and storage
Cases, bag quality, and total weight decide whether a package survives real gig life. Fixtures that travel loose in a car boot lose lenses, knobs, and calibration. Look at how the kit packs down, whether the included bags actually protect the units, and whether one person can carry it in two trips from the car.
Power draw and venue reality
Older halls, marquees, and school gyms may offer limited circuits. LED packages are forgiving, but a full rig plus sound on one circuit still trips breakers. Know roughly what your package draws, carry a plan for splitting loads across circuits, and prefer fixtures that behave well on dimmers or generators if your venues vary.
Stage lighting package in Real Life: Situations Worked Through
Specifications and feature lists become real only inside actual routines. Here is how the choice of a stage lighting package plays out in the situations buyers describe most often — and which priorities rise to the top in each.
A wedding and events DJ
For weddings, the package must look elegant in photos, set up fast between ceremony and reception, and run itself while you work the room. Uplighting and a compact effects bar cover most of the job, and battery fixtures help when the venue restricts cables across floors. Sound-active modes that stay tasteful — slow fades rather than frantic strobing — matter more than raw effect count.
A school or church stage
Fixed or semi-fixed installs value even wash, simple repeatable scenes, and controls a rotating cast of volunteers can learn. A package with clear DMX addressing and a small set of saved looks beats a clever rig nobody dares to touch. Durability and tidy cable runs also matter here, because the rig will be bumped by scenery, choirs, and cleaning crews.
A working band in pubs and clubs
Bands need punch in small spaces, fast changeovers, and gear that survives being loaded in the rain. A bar system plus a few pars for front wash covers most pub stages, and everything should tolerate being run from a single power drop. Prioritize rugged housings and quick clamps over delicate effects that only read well in a large room.
A mobile entertainer working alone
Solo operators should count every setup step. One bar on one stand, wireless or battery fixtures where cables are awkward, and a foot controller or remote you can trigger mid-performance will do more for the show than a bigger rig you dread deploying. If a package makes you consider leaving pieces at home, it is too much package for the job.
Step by Step: Getting the Most From Your Stage lighting package
Whether this is your first stage lighting package or a replacement for a worn-out favorite, the sequence below — setup, first use, and the habits that follow — is where good purchases become good ownership.
Plan the layout before the gig
Sketch where stands, bars, and pars will sit relative to performers and power. Decide your control method — sound active, footswitch, or DMX — and program or label scenes at home, not in a dark hall.
Position stands safely first
Set stands on flat ground, spread the legs fully, and keep them out of walkways and fire exits. Raise fixtures before final focusing, and tape or cover any cable that crosses a path.
Hang and secure every fixture
Use the clamps and safety cables as intended, and double-check each fixture’s tilt lock. A lighting bar that slips mid-show is both a show problem and a safety problem.
Run power and control cables logically
Work from the fixtures back to power, keeping signal and power runs tidy and separated where practical. Label both ends of DMX runs if your rig has more than a couple of fixtures.
Focus and set levels in order
Aim washes at faces and torsos, not foreheads and floors. Set your base wash first, then add effects and color at lower intensity than you think — you can always bring them up during the show.
Run a full check from the audience position
Stand where the audience stands and look for dark spots, glare into eyes, and fixtures pointing at cameras or mirrors. Save your settings, then photograph the rig so the next setup starts from a known good layout.
Care and Upkeep Over Time
Dust is the quiet enemy of stage lights: it dulls lenses, clogs fan intakes, and shortens the life of moving parts. Wipe lenses with a soft microfiber cloth after smoky or dusty gigs, and blow out vents with dry air rather than letting grime bake on. Inspect cables regularly for crushed sections and loose connectors, because most mid-show lighting failures are cable failures, not fixture failures.
Store fixtures in their cases with cables coiled loosely — tight coils stress conductors over time. Battery units should be charged on a routine rather than left flat for months, which ages the cells. Keep a small spares kit with clamps, safety cables, tape, and a spare data cable; the cheapest item in the bag is usually the one that saves the show.
Common Mistakes That Shorten the Honeymoon
Most disappointment with a stage lighting package is not caused by the product at all, but by a handful of repeatable mistakes new owners make. Here are the ones worth avoiding from day one.
Buying effects before wash
A rig of beams and effects with no even front wash looks exciting and lights nobody. Foundation first: faces visible, then decoration.
Running everything at full intensity
New owners blast every fixture at maximum and wonder why the room looks harsh. Layer intensities — wash moderate, effects lower — and the same rig looks twice as expensive.
Skipping the audience viewpoint
Focusing lights from behind the rig guarantees surprises. Always check from where the audience stands, including the glare check at eye level.
Treating setup as improvisation
Unlabeled cables, unplanned layouts, and scenes programmed in the dark cost the first hour of every gig. A photographed, known-good setup is a professional habit, not fussiness.
Ignoring power planning
Lights plus sound plus a fog machine on one tired circuit is a breaker trip scheduled for the first dance. Split loads deliberately, every time.
Troubleshooting: When Something Seems Off
Before assuming the worst — or booking help — work through the common problems below. Most stage lighting package issues have ordinary causes and unglamorous fixes.
Problem: one fixture will not respond
Swap the data cable first — cables fail more than fixtures — then check the fixture’s address and mode settings. Work from the simplest cause outward before suspecting the fixture itself.
Problem: lights look great in sound check, wrong in the show
Room conditions changed: house lights down, crowd absorbing light, haze or dust in the air. Re-check your base look from the audience position once the room is full and adjust levels, not programs.
Problem: flicker on video or photos
Some LED fixtures flicker at certain dimming levels on camera. Raise dimmer levels, change modes if the fixture offers a camera-friendly setting, and test with the photographer’s actual position before the key moments.
How the Options Compare — and How to Choose Between Them
Within the picks above, the all-in-one bar systems suit performers who want one stand, one power lead, and a complete look in minutes, while the par-light kits suit buyers building a wash or uplighting rig piece by piece. Battery sets trade charging discipline for cable-free placement, which is gold at weddings and a nuisance for forgetful owners. Decide first whether your bottleneck is setup time, coverage, or control depth — the right package is the one that removes your specific bottleneck, not the one with the longest feature list.
Ownership, Month One Versus Year One
The first month with a new stage lighting package teaches lessons no listing can: the feature you use daily is rarely the one that sold you, and the small friction you noticed on day two is the one that decides whether the product earns its place. This is why experienced buyers judge a stage lighting package twice — once against the checklist before purchase, and once against their actual routine a few weeks later. If the second judgment fails, return windows and resale options matter more than pride. If it passes, you have bought well in the only sense that counts: the product fits the life it was bought for, not the life in the advertisement. Keep notes during that first month — what delighted, what annoyed, what you would check first next time — because those notes are the most personalized buying guide you will ever own, and they make the next purchase in this category dramatically easier to get right.
The Total Cost Nobody Lists
The purchase price of a stage lighting package is only the entry fee. Ownership adds consumables, replacement wear parts, occasional professional help, storage, and the time cost of maintenance done properly — or the larger cost of maintenance skipped. None of this argues against buying; it argues for buying with open eyes. A slightly better-made stage lighting package whose parts are available and whose upkeep is simple often costs less across five years than a cheaper one that fights its owner monthly. When you compare options, mentally add a year of realistic running costs and care time to each, and notice how the ranking shifts. The cheapest stage lighting package is frequently the one you maintain without resentment, because maintained equipment lasts, and lasting equipment is where the savings actually live.
When Something Goes Wrong: A Calm Troubleshooting Order
Every stage lighting package eventually misbehaves, and the order in which you investigate decides whether the fix is free or expensive. Start with the obvious and the external: power, connections, settings, fit, cleanliness — the causes that require no parts and no tools beyond your hands. Then consult the manual’s troubleshooting section, which exists because your problem has happened to thousands of owners before you. Only after those steps should you suspect component failure and start pricing repairs or replacements. Keep a simple log of symptoms and what fixed them; patterns in that log predict future issues and make any conversation with support or a repairer ten minutes shorter. Most importantly, stop using a stage lighting package that behaves in a way that feels unsafe, however inconvenient the pause is — equipment can be replaced on a schedule that injuries cannot.
Buying for the Household, Not Just the Buyer
A stage lighting package rarely serves one person. Partners, children, grandparents, guests, and helpers all interact with it, and the best purchase is the one the least confident user can operate safely and happily. That means controls that explain themselves, routines that can be taught in minutes, and documentation kept where the household actually looks. Before buying, walk through the product’s daily routine as each likely user — including the one who will never read the manual — and let their experience veto options that only work for enthusiasts. This household test also reveals hidden requirements: storage another person can manage, cleaning another person will actually do, and safety steps that survive being performed by a tired human at the end of a long day. Products that pass it become shared tools; products that fail it become one person’s burden and everyone’s complaint.
Seasonal Rhythms and Storage
Most stage lighting packages have a season — of heavy use, of storage, or of weather that tests them — and planning for that rhythm prevents the classic failures that happen at transitions. Before a storage season, clean and inspect the stage lighting package, complete any pending maintenance, and store it in the conditions its materials prefer: dry, temperate, and protected from crushing, sunlight, or pests as appropriate. Before the busy season returns, reverse the ritual: retrieve it early, run a full function check, refresh consumables, and fix small issues while there is still time to order parts. Owners who keep this twice-a-year rhythm rarely face a dead product on the one day it is truly needed, and their equipment lasts noticeably longer than identical items owned by people who meet it again only in an emergency.
Passing It On: Resale, Hand-Me-Downs, and Honest Condition
A well-kept stage lighting package often has a second life — sold, gifted, or handed down — and its condition at that moment is the final grade on your ownership. Keeping manuals, receipts, and spare parts together, maintaining the product on schedule, and being honest about wear when passing it on all protect the next owner and your own reputation. If you are on the receiving end of a used stage lighting package, inspect it as this guide suggests: function first, wear points second, safety always, and price in the consumables and parts it will need immediately. Retire rather than pass on anything whose safety-critical parts are worn beyond honest repair. The secondhand market in stage lighting packages works beautifully when both sides treat condition as information rather than advertising.
The Upgrade Question: When Better Is Worth It
Sooner or later every owner of a stage lighting package wonders about upgrading, and the honest trigger is a specific, recurring limitation — not a launch event. Write down the exact moments your current one fails you: the job it cannot do, the friction it repeats, the user it excludes. If the list is empty, your stage lighting package is not outdated; it is sufficient, which is the best state equipment can be in. If the list is real, it becomes your shopping brief, and it will protect you from paying for improvements in areas you never struggled with while missing the one upgrade that matters. Sell or pass on the old one while it still serves someone well, and the upgrade costs less in every sense. Chasing novelty is expensive; answering a written list is shopping.
A Short Decision Worksheet Before You Buy
Reading guides is not the same as deciding. Work through the six prompts below — each distils one of the criteria above into a question about your own life with a stage lighting package. Ten honest minutes here prevents most returns, exchanges, and quiet disappointments.
Coverage for your actual stage size
Before you commit, turn this into a question about your own situation and answer it in writing. If your answer is vague, that vagueness is the finding: it marks the point where a little more measuring, testing, or honest thinking will do more for your satisfaction than any further comparison of listings.
How the pieces work together
Write your answer down rather than holding it in your head. Buyers consistently overestimate how well they remember their own requirements once the shopping begins, and a written answer from before the excitement started is the most trustworthy advice you will get during it.
Control options and learning curve
This is the criterion to test physically wherever you can — in a shop, with a tape measure, or by rehearsing the routine the product will join. Assumptions about it are cheap to make and expensive to live with, while a five-minute test now settles it permanently.
Setup and teardown time
Discuss this one with anyone else who will live with the purchase. Requirements that seem obvious to the buyer often look different to the person who will clean, store, share, or rely on the same product, and their answer belongs in the decision before money moves.
Transport and storage
Rank this against the other criteria rather than judging it alone. Almost no stage lighting package wins on everything; the right purchase is the one that wins on the criteria your life actually stresses, and accepts its compromises where your life is forgiving.
Power draw and venue reality
If you are torn between two options, let this criterion referee. Note how each candidate performs on it in your specific circumstances — not in the manufacturer’s scenario — and give the point to the one that serves your routine rather than your imagination.
FAQ
What is DMX?
DMX is a common control protocol that lets one controller send commands to many lights through linked cables.
How many lights do I need for a small stage?
It depends on the room and the effect you want. Many small stages use a few wash lights for color and one or two effects for movement.
Do I need a DMX controller?
Not always. Many fixtures run on built-in programs, but a DMX controller gives you precise control over each light. Choose based on how much control you want.
How do I set a DMX address?
Most fixtures have a display or switches for setting the starting address. Follow the manual, and label each fixture so you can change it quickly.
Can I run a whole lighting package from one outlet?
Probably not without checking. Add up the fixture power draw and compare it with the circuit rating. Spread the load or ask an electrician if you are unsure.
What kind of lights are best for a small band?
Many small acts use a few washes for color and one or two effects for movement. The right mix depends on the room and the style of the show.
Are strobe lights safe?
Flashing lights can affect some people, such as those with photosensitivity. Use strobes with care, give warnings where appropriate, and follow venue rules.
How do I transport lighting equipment safely?
Use cases or padded bags, coil cables loosely and let fixtures cool before packing. Check the manual for any transport notes.
How many fixtures do I actually need for a small stage?
For most small stages, an even front wash plus a touch of color or effect behind the performers reads as a complete rig. One bar system or a handful of pars can achieve that. Add fixtures when you see a specific gap — dark edges, no backlight, flat faces — rather than buying coverage you cannot set up in the time you have.
Is DMX control worth learning?
If you play varied venues or want scenes that change with songs, yes — even basic DMX gives you repeatable looks instead of whatever sound-active mode decides. If you are a solo act who needs lights that simply behave, sound-active and footswitch control may serve you better. Many packages let you start simple and add DMX later.
Can I run stage lights from one wall outlet?
Modern LED packages draw far less than older rigs, so one circuit often handles the lights alone. The risk comes from sharing that circuit with amplifiers, fog machines, or catering equipment. Split loads when you can, and never defeat a breaker that keeps tripping — it is reporting a real overload.
What is the difference between a wash light and an effect light?
Wash fixtures spread soft, even light over an area — they are how the audience sees faces. Effect fixtures create beams, patterns, and movement that the audience looks at directly. A balanced package uses wash as the foundation and effects as seasoning; a rig of only effects looks exciting for one song and tiring for a whole evening.
How do I stop lights from looking harsh in photos?
Aim washes slightly across faces rather than straight on, avoid pointing fixtures into the camera’s usual position, and keep a warm, steady base look for key moments like speeches and first dances. Ask the photographer where they will stand; thirty seconds of coordination beats hours of editing washed-out skin tones.
Do battery lights last a full event?
Runtime depends on brightness and how many colors run at once; full-white at maximum output drains cells far faster than a gentle color fade. Build headroom into your plan: dim to the level the room actually needs, and keep the chargers in the car for long events. Treat advertised runtimes as best-case numbers.
Should I buy one big package or build gradually?
A matched package wins when you need a working rig now, with compatible control and cases that fit. Building gradually wins when your needs are unusual or changing. Many buyers start with a package for the core wash and add specialty fixtures later — the package keeps its role, and the extras stay extras.
How high should I mount front lights?
High enough to clear heads and create natural downward modeling on faces, low enough that you are not lighting hats and foreheads while chins sit in shadow. Slightly above head height and angled down gently is the usual starting point. Always check from the audience side, because glare that performers never notice can blind the front rows.
The Short Version
The right package gives you balanced fixtures, simple control and sturdy mounting. Compare the mix, power needs and portability, read the warranty, and choose the kit that fits your venue.
Related Guides
- How to Choose the Best Stage Lighting Stands: A Buyer's Guide
- How to Choose the Best Stage Lighting: Buyer's Guide (2026)
- How to Choose the Best Two Stage Snow Blowers: A Buyer's Guide
- How to Choose the Best Deck Lighting: Buyer's Guide (2026)
- How to Choose the Best Landscape Lighting: Buyer's Guide (2026)